Embarcadero官方的文件 iOS Tutorials: Delphi iOS Application Development ,對於使用Delphi XE4開發iOS有興趣的朋友,一定得下載下來看看的好文件。
下載網址: http://docs.embarcadero.com/products/rad_studio/radstudioXE4/iOS%20Tutorial%20en.pdf
大型網站架構..net 架構師.rabbitMQ.redis.行動開發.APP開發教學.PHP Laravel開發..net core C# 開發.架構師之路.Delphi開發.資料庫程式.進銷存.餐飲POS系統
Embarcadero官方的文件 iOS Tutorials: Delphi iOS Application Development ,對於使用Delphi XE4開發iOS有興趣的朋友,一定得下載下來看看的好文件。
下載網址: http://docs.embarcadero.com/products/rad_studio/radstudioXE4/iOS%20Tutorial%20en.pdf
示範如果快速使用Delphi XE4開發iOS定位功能的程式
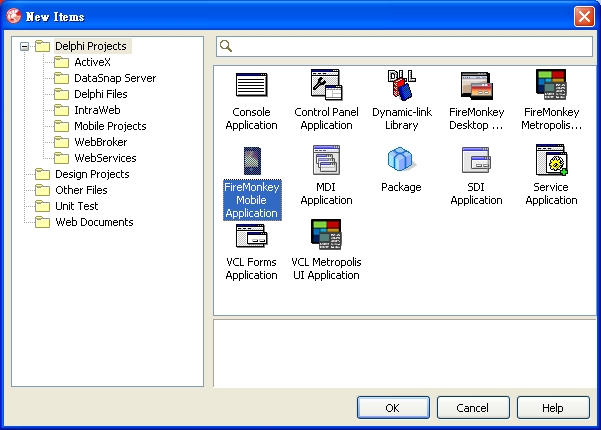
1.建立一個新的FireMonkey Mobile Application
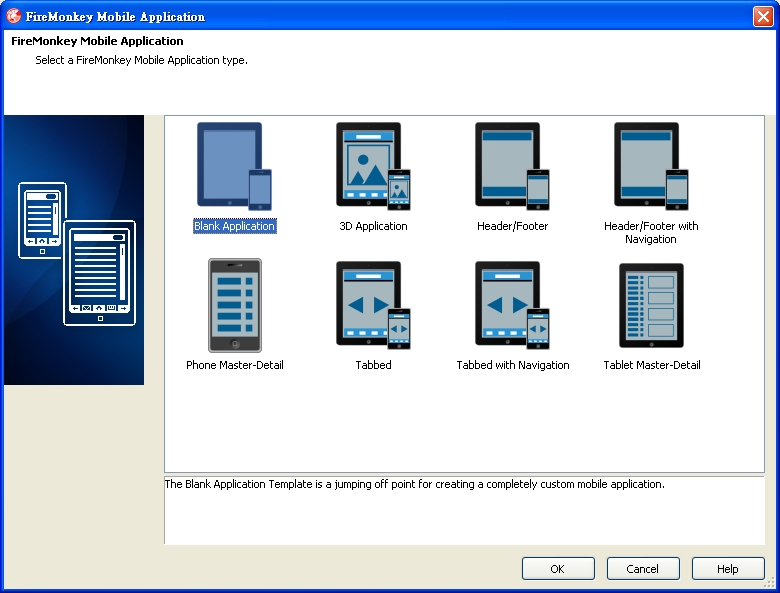
2.選擇 Blank Application 空白類型。
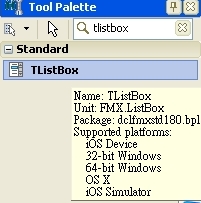
3.新增元件ListBox,將 Align 改為 alTop; GroupingKind 改為 GsGrouped;StyleLookup 改為 transparentlistboxstyle。
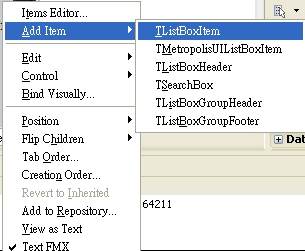
4. ListBox按右鍵,Add Item 新增 TListBoxHeader,在裡面新增Label ,屬性 Align 設為 alClient ; StyleLookup 設為 toollabel ; TextAlign 設為 taCenter。

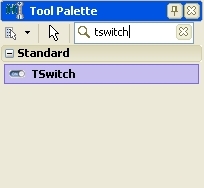
5. 接著新增三個 TListBoxItem,分別是開啟定位、經度、緯度。在開啟定位的右側新增TSwitch開關來開啟定位功能。經度、緯度使用TLabel。
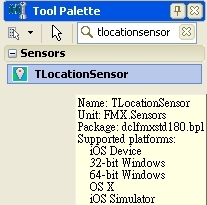
6.接著在畫面上佈置TWebBrowser跟TLocationSensor,TWebBrowser的 Align 設為 alClient。

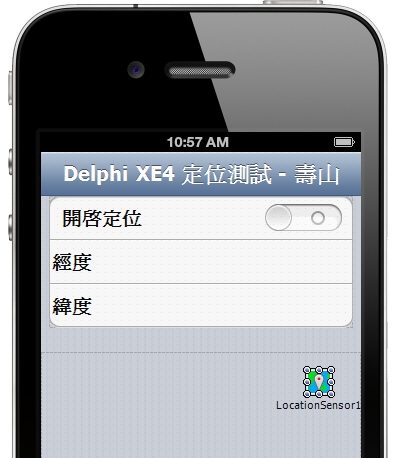
7.佈置好的畫面如下圖
8. 在Switch1 的 OnSwitch 事件中新增程式如下
[delphi]
procedure TForm1.Switch1Switch(Sender: TObject);
begin
LocationSensor1.Active := Switch1.IsChecked ;
end;
[/delphi]
9.接著在 LocationSensor1 的 OnLocationChange事件中新增程式如下
[delphi]
procedure TForm1.LocationSensor1LocationChanged(Sender: TObject;
const OldLocation, NewLocation: TLocationCoord2D);
const
sGoogleMapURL : String = ‘https://maps.google.com/maps?q=%s,%s&output=embed’;
begin
label3.Text := ‘經度: ‘ + NewLocation.Latitude.ToString;
label2.Text := ‘緯度: ‘ + NewLocation.Longitude.ToString;
WebBrowser1.Navigate(Format(sGoogleMapURL,
[NewLocation.Latitude.ToString,
NewLocation.Longitude.ToString]));
end;
[/delphi]
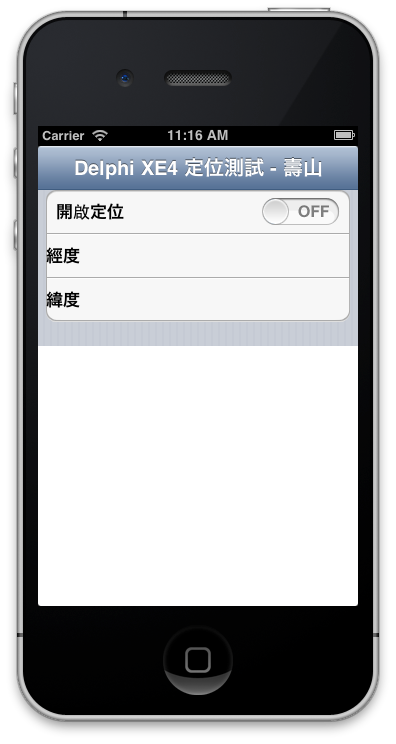
10.大功告成!我們來看執行結果

這是李維所教的小撇步,果然有些眉眉角角要注意!
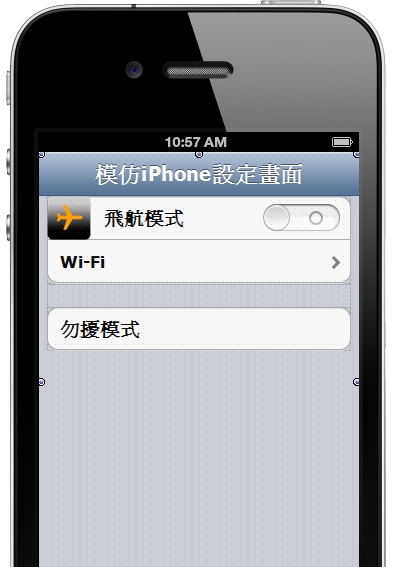
如果單純使用ListBox元件的話,畫面設定好像這樣。
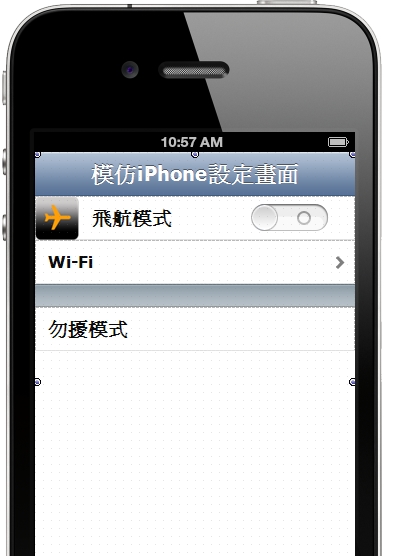
不過在調整ListBox二個屬性後,就山寨的更像了喔!
1. GroupingKind 改成 gsGrouped
2. Stylelookup 改成 transparentlistboxstyle
在上一篇文章中,筆者教大家如何在Mac系統中配置PAServer了,接下來要教大家如何設計可以同時執行在Windows及Mac OS的程式。
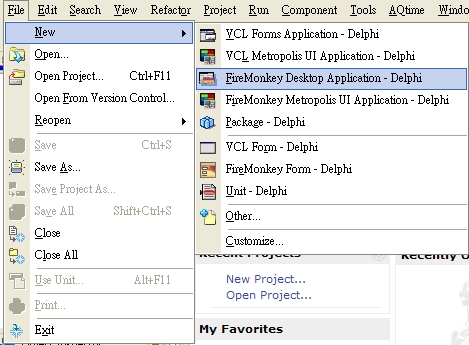
一、File→New選取FireMonkey Desktop Application
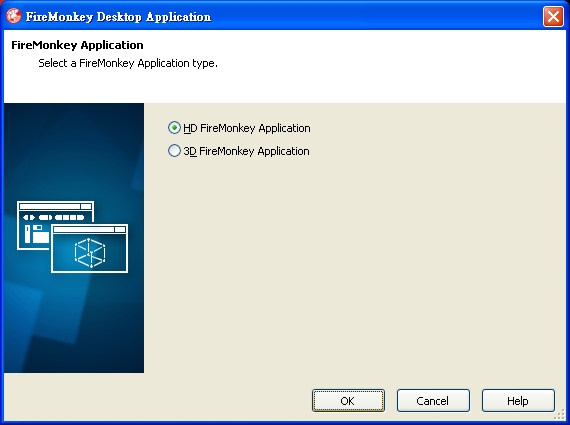
二、接下來選擇一般的HD FireMonkey Application
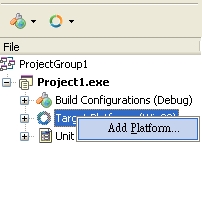
三、新增專案後,在專案的Target Platform按右鍵,選擇Add Platform
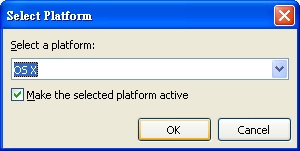
四、接著選擇OS X後按ok
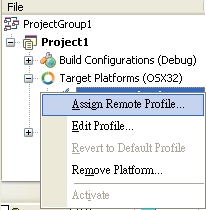
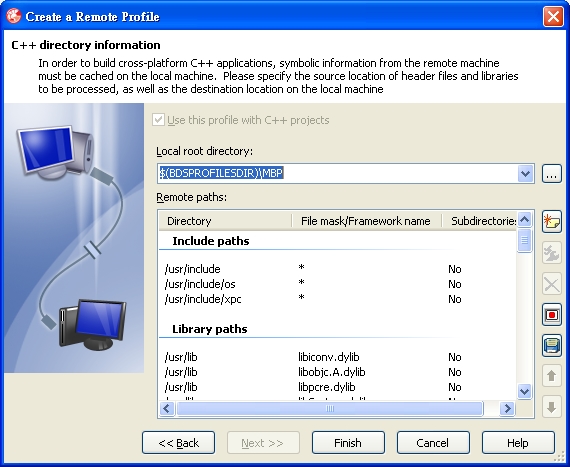
五、接著在OS X按右鍵 Assign Remote Profile 設置OS X的編譯環境
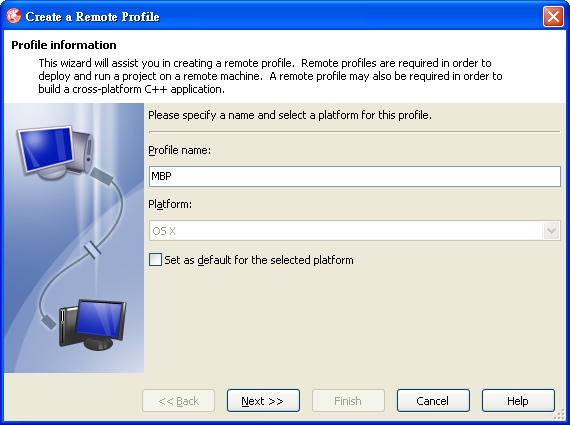
六、Profile name填上你要的名字
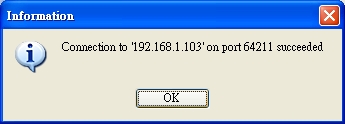
七、Host name填上你在上一篇文章設置的MAC OS主機位置,password則設置上篇文章所設定的密碼。

八、按 Test Connection測試是否可以連得上(記得要執行paserver)
九、如果順利的話,按下Finish就大功告成!
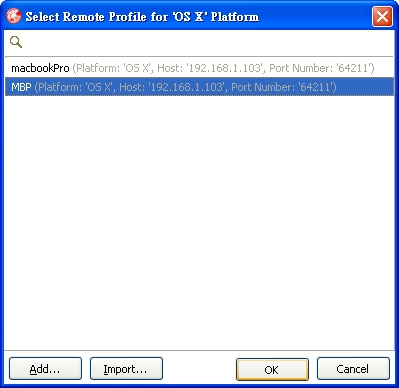
九、接著點選剛才建立的Platform名稱按OK!
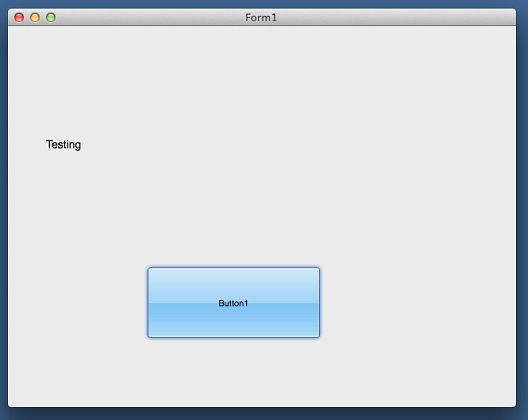
十一、如果設定沒錯的話,在XE3按下執行後,程式就會直接執行在Mac OS的畫面上囉!
1.安裝PAServer
將 \Program Files\Embarcadero\RAD Studio\10.0\PAServer中的setup_paserver.zip 複製到 Mac OSX系统
2.將setup_paserver.zip解壓縮進行安裝。
3.安裝完後,進行環境配置
\user\XXXX\Applications\Embarcadero\RADPAServer\10.0\,執行paserver
4.執行後,paserver會請您設定密碼,設定完後就配置ok!
5.利用文字編輯程式打開目錄下的 paserver.command,在第二行後面加上-password=xxxx,xxxx是你在上一步驟設定的密碼。儲存後關閉!
6.幫 paserver.command建立捷徑(替身),或是利用「系統偏好設定」→「帳號」→「登入項目」讓它隨系統啟動。
以前在撰寫程式時,最討厭的就是醜醜的外觀,如果不是自己畫,就是得找第三方元件(像BusinessSkinForm)來解決。
自從Delphi XE2就開始有的功能,跟大家分享一下如何讓程式看起來不再這麼醜。
1.靜態更改
.Project→Options開啟Project Options選項,在Application→Appearance的Custom Styles就是可以更改介面的選項
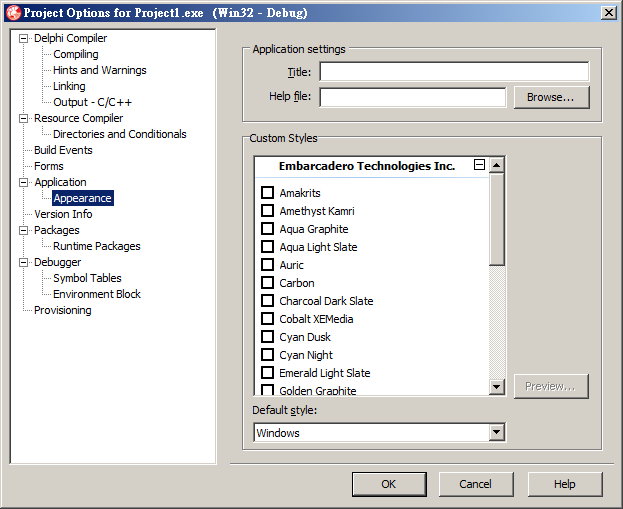
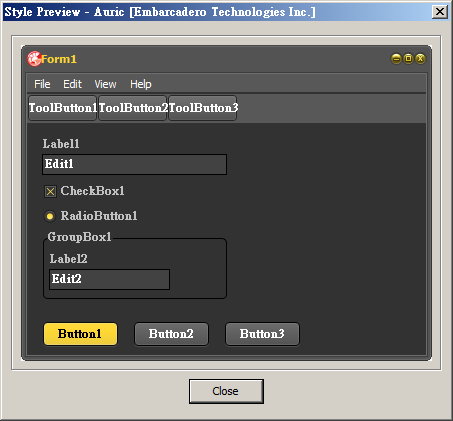
.如果不清楚長什麼樣子時,可以點選任一名稱反白後,再點旁邊的Preview就可以預覽
.勾選要變成的Style後,再到Default Style下拉你要的Style按OK即可。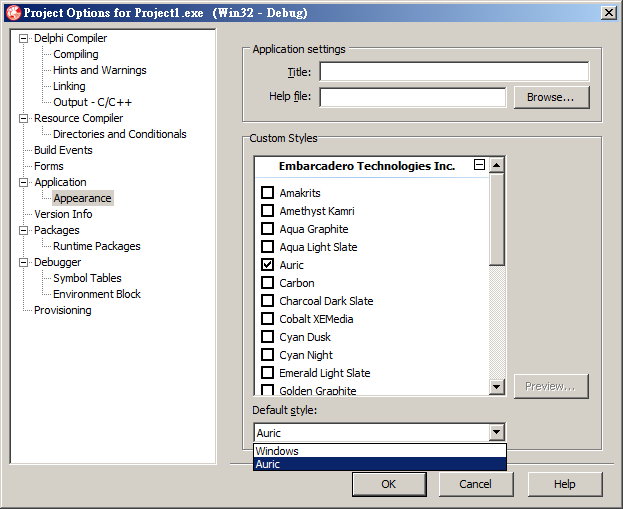
2.動態程式更改
.依照靜態更改方式,勾選你想要呈現的STYLE。
.增加 uses Vcl.Themes
[delphi]
uses Vcl.Themes;
[/delphi]
.讀入風格檔
[delphi]
procedure TForm1.Button1Click(Sender: TObject);
Var
StyleName : string;
begin
ListBox1.Items.Clear;
for StyleName in TStyleManager.StyleNames do
if ListBox1.Items.IndexOf(Name)=-1 then
ListBox1.Items.Add(StyleName);
end;
[/delphi]
.設定風格檔
[delphi]
procedure TForm1.Button2Click(Sender: TObject);
begin
if ListBox1.ItemIndex>=0 then
TStyleManager.SetStyle(ListBox1.Items[ListBox1.ItemIndex]);;
end;
[/delphi]
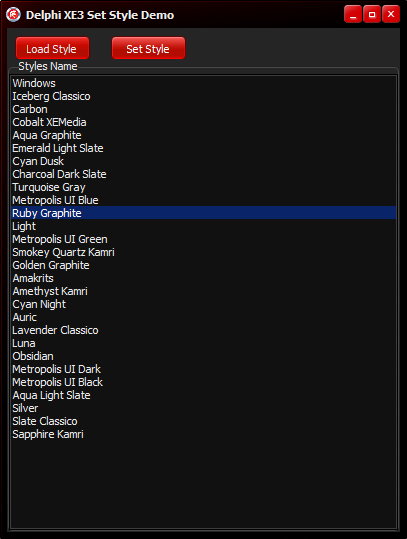
範例程式下載 GitHub https://github.com/superlevin/DelphiXE3_SetStyle
3.自製風格.Tools→Bitmap Style Designer
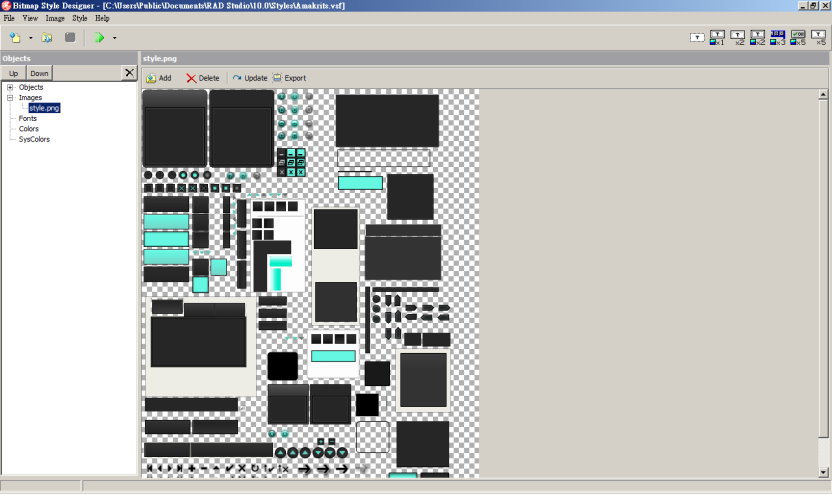
預設的Style檔案位置在:C:\Users\Public\Documents\RAD Studio\10.0\Styles
[delphi]
uses Winapi.Windows;
procedure TMainForm.Button1Click(Sender: TObject);
var
ScreenHorizontal :integer;
ScreenVertical:integer;
begin
ScreenPixelX:= GetDeviceCaps(GetDC(Application.Handle),HORZRES); // Horizontal width in pixels
ScreenPixelY:= GetDeviceCaps(GetDC(Application.Handle),VERTRES); // Vertical height in pixels
// 取得螢幕解析度
ShowMessage(IntToStr(ScreenHorizontal)+’ X ‘+ IntToStr(ScreenVertical));
end;
[/delphi]
找遍了台灣的資料,對於POS收銀系統硬體相關的程式非常的少。
只好自己Try & Error一番,順便也將結果告訴一下大家囉~希望大家不要再為了它而浪費了不少時間。
很簡單的示範如何利用Delphi XE3及SPComm 元件來印出收據、切紙並打開錢櫃。
[sourcecode language=”delphi”]
procedure TForm2.Button1Click(Sender: TObject);
var
s:Ansistring;
begin
Comm1.CommName := ComboBox1.Text;
Try
Comm1.StartComm;
//初始化
s:= chr(27) + chr(64);
Comm1.WriteCommData(PAnsiChar(s),Length(s));
// 印出目前日期、時間並換行
s:= DateToStr(now)+’ ‘+TimeToStr(now)+ chr(10)+ chr(13) ;
Comm1.WriteCommData(PAnsiChar(s),Length(s));
s:= chr(27) + chr(100) + chr(2);
Comm1.WriteCommData(PAnsiChar(s),Length(s));
s:= chr(29) + chr(33) + chr(17) ;
Comm1.WriteCommData(PAnsiChar(s),Length(s));
s:= ‘Printer – Testing Success’+ chr(10);
Comm1.WriteCommData(PAnsiChar(s),Length(s));
s:= chr(29) + chr(33) + chr(0) ;
Comm1.WriteCommData(PAnsiChar(s),Length(s));
s:= chr(27) + chr(100) + chr(5);
Comm1.WriteCommData(PAnsiChar(s),Length(s));
// 切紙
s := Chr(29) + Chr(86) + Chr(0) ;
Comm1.WriteCommData(PAnsiChar(s),Length(s));
//打開錢櫃
s := chr(27) + chr(112) + chr(0) + chr(50) + chr(200) ;
Comm1.WriteCommData(PAnsiChar(s),Length(s));
Except
on E: Exception do Begin
ShowMessage(‘Open ComPort Error!’+#10#13+’Error MSG:’+E.Message);
End;
End;
end;
[/sourcecode]
Delphi 有記住打開過的專案的功能,在下一次開啟IDE時會顯示在Welcome Page中,那要如何清除呢?
可以設定~
.Number of Projects →記住幾個開過的專案(預設10個)
.Number of files→記住幾個開過的檔案(預設15個)
.Reopen Items就是顯示在Welcome Page的內容,可以點選後用Delete或直接Clear
HKEY_CURRENT_USER\Software\Embarcadero\BDS\10.0\Closed Projects
uses 加入 System.Win.Registry;
[delphi]
procedure TForm1.Button1Click(Sender: TObject);
var
iCount : Integer;
Reg : TRegistry;
sList : TStrings;
begin
sList := TStringList.Create;
Reg := TRegistry.Create;
try
Reg.RootKey := HKEY_CURRENT_USER;
if Reg.OpenKey(‘\Software\Embarcadero\BDS\10.0\Closed Projects’, True) then
Reg.GetValueNames(sList);
if sList.Count > 0 then begin
for iCount := 0 to Pred(sList.Count) do
Reg.DeleteValue(sList[icount]);
end else
MessageDlg(‘No registry items to be cleaned at this time.’,
mtInformation, [mbOk], 0);
finally
sList.Free;
Reg.Free;
end;
end;
[/delphi]
Delphi的資源似乎變得很少了!不過自從看到XE3似乎有些長進後,或許大家可以嘗試回鍋來做開發也不錯,畢竟Delphi在開發商用軟體的速度真的蠻快速的 :)。後續除了一些行動裝置開發、網頁開發的分享,也來做一下Delphi開發的分享好了!
Splash Screen是什麼?就是打開程式時,會先顯示個幾秒的圖片,大多是產品名稱、公司Logo這類的東西。在Delphi做法也很簡單:
1. File → New → VCL Form – Delphi 新增一個 Form
2. 開啟 Project → View Source 就可以看到 Project Source。
[delphi]
program Project1;
uses
Vcl.Forms,
Unit1 in ‘Unit1.pas’ {Form1},
Unit2 in ‘Unit2.pas’ {Form2};
{$R *.res}
begin
Application.Initialize;
Application.MainFormOnTaskbar := True;
Application.CreateForm(TForm1, Form1);
Application.CreateForm(TForm2, Form2);
Application.Run;
end.
[/delphi]
3. 改成如下就可以!
[delphi]
program Project1;
uses
Vcl.Forms,
Unit1 in ‘Unit1.pas’ {Form1},
Unit2 in ‘Unit2.pas’ {Form2};
{$R *.res}
begin
Application.Initialize;
Application.MainFormOnTaskbar := True;
try
Form2:=TForm2.create(application);
Form2.show;
Form2.Update;
Application.CreateForm(TForm1, Form1);
finally
Form2.Free;
end;
Application.Run;
end.
[/delphi]
4. 如此一來,如果專案變大後,一方面在程式初始化時,可以Show出產品畫面外,避免看起來好像是程式當掉的冏境。也可以讓程式看起來更專業些XD