Delphi 11 安裝後出現Socket Error 10038的解決

最近安裝完Delphi 11後,一開啟IDE就跳出一個 Socket Error #10038. Socket operation on non-socket的錯誤,接著就無法開啟IDE惹。

感謝捷康的eddie幫忙,處理掉問題,處理的方式是到 regedit 登錄檔編輯器中。依序進入 HKEY_CURRENT_USER \ SOFTWARE \ Embarcadero \ BDS \ 22.0 \ Known IDE Packages ,然後在列表裡找到一個 $ (BDS) \ Bin \ LivePreview280.bpl 接著點二下進入編輯,在名字前面加上二個底線”__” 變成 “__Embarcadero FireUI Live Preview Package”就可以了!終於可以順利操作Delphi 11了 🙂

相關連結:

Delphi 10.4.1 Socket Error on IDE Start

https://en.delphipraxis.net/topic/4535-delphi-1041-socket-error-on-ide-start/

Delphi 10.3 RIO 使用 Google Firebase(FCM)推播

一、Firebase新增專案(網址: https://console.firebase.google.com )

二、專案名稱可自訂,訂定後按建立專案

三、建立完專案後,點選中間android的連結

四、這邊很重要! Android的套件名稱要跟你要開發的名稱一致,這邊我輸入 com.linshoushan.FirebaseCloudMessaging,按註冊應用程式

五、設定完後,進入Cloud Messagin頁面中,把寄件者ID記下來。就完成了Firebase基本的設定了

六、開啟Delphi 10.3 RIO,建立一個新的Multi-Device Application

七、在畫面上拖拉出Layout、Button、Memo

八、將Target Platforms切換成Android

九、專案的Options中,在 Entitlement List中,把Receive push notifications 設為true

十、Version Info中,package的名稱記得改成在firebase中的設定

十一、修改AndroidManifest.template.xml,最後一行加上

(一開始會找不到這個檔案,壽山是先把專案存檔後,先做一次的build,然後檔案就出現了)

十二、加上相關程式碼

unit Unit1;

interface

// 1 新增use
// System.Notification, System.PushNotification, FMX.PushNotification.Android
uses
  System.SysUtils, System.Types, System.UITypes, System.Classes, System.Variants,
  FMX.Types, FMX.Controls, FMX.Forms, FMX.Graphics, FMX.Dialogs, FMX.StdCtrls,
  FMX.Controls.Presentation, FMX.ScrollBox, FMX.Memo, FMX.Layouts,
  System.Notification, System.PushNotification, FMX.PushNotification.Android;

type
  TForm1 = class(TForm)
    Layout1: TLayout;
    Memo1: TMemo;
    Button1: TButton;
    procedure FormCreate(Sender: TObject);
    procedure Button1Click(Sender: TObject);
  private
    { Private declarations }
  public
    { Public declarations }
    // 2 宣告相關的變數以及事件
    PushService: TPushService;
    ServiceConnection: TPushServiceConnection;
    DeviceId: string;
    DeviceToken: string;
    procedure DoServiceConnectionChange(Sender: TObject; PushChanges: TPushService.TChanges);
    procedure DoReceiveNotificationEvent(Sender: TObject; const ServiceNotification: TPushServiceNotification);
  end;

var
  Form1: TForm1;

implementation

{$R *.fmx}

procedure TForm1.Button1Click(Sender: TObject);
begin
  // 按下按鈕時打開 ServiceConnection
  ServiceConnection.Active := True;
end;

procedure TForm1.DoReceiveNotificationEvent(Sender: TObject;
  const ServiceNotification: TPushServiceNotification);
var
  MessageText: string;
  NotificationCenter: TNotificationCenter;
  Notification: TNotification;
begin
  // 取得通知的內容
  // 全部內容可以透過  ServiceNotification.DataObject.ToString看到
  MessageText := ServiceNotification.DataObject.GetValue('gcm.notification.body').Value;
  NotificationCenter := TNotificationCenter.Create(nil);
  try
    Notification := NotificationCenter.CreateNotification;
    try
      Notification.Name := MessageText;
      Notification.AlertBody := MessageText;
      Notification.Title := MessageText;
      Notification.EnableSound := False;
      NotificationCenter.PresentNotification(Notification);
    finally
      Notification.DisposeOf;
    end;
  finally
    NotificationCenter.DisposeOf;
  end;
end;

procedure TForm1.DoServiceConnectionChange(Sender: TObject;
  PushChanges: TPushService.TChanges);
begin
  // 取得裝置的ID跟TOKEN
  if TPushService.TChange.DeviceToken in PushChanges then
  begin
    DeviceId := PushService.DeviceIDValue[TPushService.TDeviceIDNames.DeviceId];
    DeviceToken := PushService.DeviceTokenValue[TPushService.TDeviceTokenNames.DeviceToken];
    Memo1.Lines.Add('設備ID = ' + DeviceId);
    Memo1.Lines.Add('設備TOKEN = ' + DeviceToken);
  end;
end;

procedure TForm1.FormCreate(Sender: TObject);
begin
  // 注意要把GCMAppID改成自己的
  PushService := TPushServiceManager.Instance.GetServiceByName(TPushService.TServiceNames.GCM);
  PushService.AppProps[TPushService.TAppPropNames.GCMAppID] := '220657168616';
  ServiceConnection := TPushServiceConnection.Create(PushService);
  ServiceConnection.OnChange := DoServiceConnectionChange;
  ServiceConnection.OnReceiveNotification := DoReceiveNotificationEvent;
end;

end.

十三、執行

十四、記下TOKEN,回到Firebase中,選擇左邊功能列的Cloud Messageing,然後新增一筆測試訊息,將TOKEN值加入後按測試,就會收到推播訊息了。


Delphi 推出社群版本(Community Edition)


Delphi推出了全新的社群版本(Community Edition),不像先前的starter版本。而是專業版加上iOS/Android功能。如果寫開放源始碼/免費軟體都可以,商業版的話限制為
1年收入不超過5000美金(約15萬台幣)
2成員不超過5人


延伸閱讀:

Learn to Program with Community Edition

Introducing Delphi and C++Builder Community Edition

Delphi 10 Berlin 在tabitem加上數字

tabbarcustom
[pascal]
interface

uses
System.SysUtils, System.Types, System.UITypes, System.Classes, System.Variants,
FMX.Types, FMX.Controls, FMX.Forms, FMX.Graphics, FMX.Dialogs, FMX.TabControl, FMX.Controls.Presentation, FMX.Edit,
FMX.EditBox, FMX.SpinBox, FMX.StdCtrls, FMX.Layouts, FMX.ListBox,
FMX.NumberBox;

type
TForm16 = class(TForm)
TabItem1: TTabItem;
TabItem2: TTabItem;
BadgeItem: TTabItem;
SpinBox1: TSpinBox;
ToolBar1: TToolBar;
Switch1: TSwitch;
ListBox1: TListBox;
ListBoxItem1: TListBoxItem;
ToolLabel: TLabel;
TabControl1: TTabControl;
procedure BadgeItemPaint(Sender: TObject; Canvas: TCanvas; const ARect: TRectF);
procedure SpinBox1Change(Sender: TObject);
procedure FormCreate(Sender: TObject);
procedure Switch1Switch(Sender: TObject);
procedure StepperUpClick(Sender: TObject);
private
FBadge: Integer;
FShowBadge: Boolean;
procedure SetBadge(const Value: Integer);
procedure SetShowBadge(const Value: Boolean);
{ Private declarations }
public
{ Public declarations }
property Badge: Integer read FBadge write SetBadge;
property ShowBadge: Boolean read FShowBadge write SetShowBadge;
end;

var
Form16: TForm16;

implementation

{$R *.fmx}
{$R *.iPhone55in.fmx IOS}

procedure DrawBadge(Canvas: TCanvas; const ARect: TRectF; const Text: string;
const Color: TAlphaColor = TAlphaColorRec.Red);
const
Padding = 2;
HorzTextMargin = 6;
VertTextMargin = 4;
var
R: TRectF;
TextSize: TSizeF;
Brush: TBrush;
BadgeRadius: Single;
begin
Canvas.Font.Size := 12;
// Measure text width
TextSize := TSizeF.Create(Canvas.TextWidth(Text), Canvas.TextHeight(Text));
// Calculate badge rect
R := TRectF.Create(0, 0, HorzTextMargin * 2 + TextSize.Width, VertTextMargin * 2 + TextSize.Height);
if R.Width < R.Height then
R.Width := R.Height;
// Position rect
R := TRectF.Create(ARect.Right – R.Width, ARect.Top, ARect.Right, ARect.Top + R.Height);
R.Offset(-Padding, Padding);
// Draw badge
BadgeRadius := R.Height / 2;
Brush := TBrush.Create(TBrushKind.Solid, Color);
try
Canvas.FillRect(R, BadgeRadius, BadgeRadius, AllCorners, 1, Brush);
finally
Brush.Free;
end;
// Draw text
Canvas.Fill.Color := TAlphaColorRec.White;
Canvas.FillText(R, Text, False, 1, [], TTextAlign.Center, TTextAlign.Center);
end;

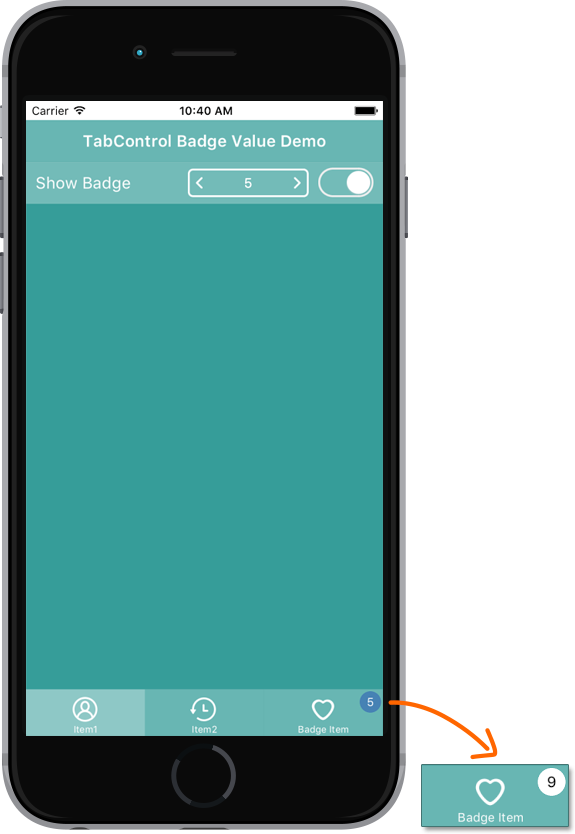
procedure TForm16.BadgeItemPaint(Sender: TObject; Canvas: TCanvas; const ARect: TRectF);
begin
if ShowBadge then
DrawBadge(Canvas, ARect, FBadge.ToString);
end;

procedure TForm16.FormCreate(Sender: TObject);
begin
FBadge := 1;
end;

procedure TForm16.SetBadge(const Value: Integer);
begin
if FBadge Value then
begin
FBadge := Value;
BadgeItem.Repaint;
end;
end;

procedure TForm16.SetShowBadge(const Value: Boolean);
begin
if FShowBadge Value then
begin
FShowBadge := Value;
BadgeItem.Repaint;
end;
end;

procedure TForm16.SpinBox1Change(Sender: TObject);
begin
Badge := Trunc(SpinBox1.Value);
end;

procedure TForm16.StepperUpClick(Sender: TObject);
begin
Badge := Trunc(SpinBox1.Value);
end;

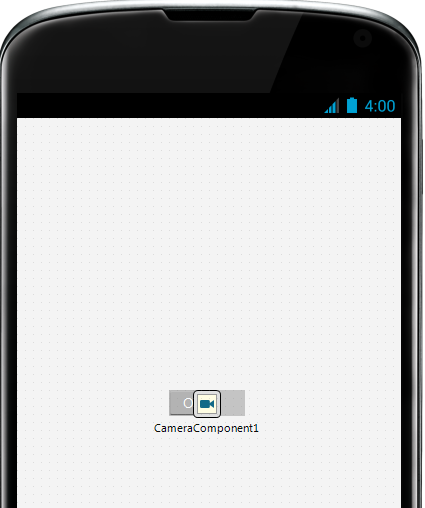
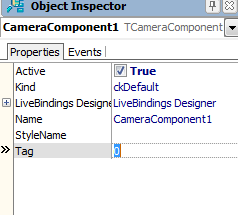
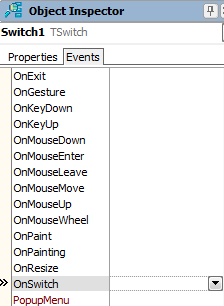
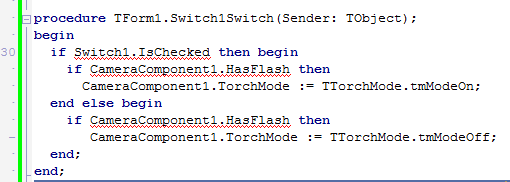
procedure TForm16.Switch1Switch(Sender: TObject);
begin
ShowBadge := Switch1.IsChecked;
end;

end.
[/pascal]
原始資料:https://community.embarcadero.com/blogs?view=entry&id=9074

能取代parse服務的台灣MBaas平台-Lightspeed

Facebook收購國外著名的MBaaS(行動雲端平台)服務 Parse後,前幾天無預警的宣布一年後將關閉服務。也讓大家開始尋找新的MBaaS(行動雲端平台)服務,希望能為企業App加入推播、即時通訊、社交功能,來加速開發流程。
尋找解決方案中,看到台灣在2014年就有赫迅這家公司,提供了Lightspeed這個服務。包辦複雜的後端架構,而且提供推播、即時通訊以及社群互動功能加入app。
lightspeed01
目前該服務已經服務的客戶有許多知名的公司及媒體如Sony、遠傳電信、蘋果日報、蘋果動新聞、壹週刊網、窮游、海底撈火鍋、ump聯動優勢、csdn、中國銀聯。
lightspeed02
目前的申請方式需先至服務的申請頁面,然後填寫表單後核准。
lightspeed03
核准後會收到一封裡面有beta code的邀請函,然後註冊後就可以試用。
lightspeed04

lightspeed05

lightspeed06

相關聯結:
Lightspeed官方網站
sdk說明文件
試用申請
Lightspeed Admin Console
主控台

Delphi 10 Seattle隆重登場

很久沒更新近況了!最近Embarcadero出了Delphi 10 Seattle,主要是針對行動裝置/PC以及IOT物聯網。

到時候再來分享一下

1442335478407

另一件事在設計電子發票,當然圖片中少了CODE39的條碼啦XDD

11205488_10152975552941541_8585917734032493888_n

JAVA2OP更新

主要是修補缺少的二個檔案
bin\converters\java2op\bootclasses.jar
bin\converters\java2op\bootclasses.xml

下載之後將檔案copy到以下的路徑即可

bin\converters\java2op\bootclasses.jar
bin\converters\java2op\bootclasses.xml

下載路徑:
http://cc.embarcadero.com/Item/30326

Day4 – Delphi XE5 簡易BMI計算器

今天教大家設計BMI計算機,螢幕快照 2013-10-12 下午12.30.53

1首先開啟一個空白專案

螢幕快照 2013-10-12 下午12.31.17

2新增一個ListBox

螢幕快照 2013-10-12 下午12.31.31

3將aligh 設為 alClient(填滿)

螢幕快照 2013-10-12 下午12.31.53

4將GroupingKind 設成 gsGrouped

螢幕快照 2013-10-12 下午12.32.17

5將StyleLookup 設定 transparentlistboxstyle

itemeditor

6在畫面上按右鍵開啟 Items Editor

itemsdesigner1

7下拉TListBoxGroupHeader後按Add Item

itemsdesigner2

8接著下拉 TListBoxItem 後按 Add Item

螢幕快照 2013-10-12 下午12.33.24

9新增如上圖

螢幕快照 2013-10-12 下午12.34.04

10點上面的LiboxGroupHeader1修改Text 為 BMI計算機,TextAligh設為 taCenter(置中)螢幕快照 2013-10-12 下午12.34.48

11陸續修改其他如上圖

螢幕快照 2013-10-12 下午12.35.16

12新增TEdit元件

螢幕快照 2013-10-12 下午12.35.34

13修改屬性Aligh 為 alRight

螢幕快照 2013-10-12 下午12.36.23

14將KeyboardType改成 vktNumberPad (預設開啟數字鍵盤)

螢幕快照 2013-10-12 下午12.36.50

15新增一個Button

螢幕快照 2013-10-12 下午12.37.06

16將Aligh 設為 alClient

螢幕快照 2013-10-12 下午12.37.24

17 Text設為計算

螢幕快照 2013-10-12 下午12.37.44

18新增Label

螢幕快照 2013-10-12 下午12.38.17

19設定完畫面如圖

螢幕快照 2013-10-12 下午12.38.35

20將edit1.text,edit2.text的TextAligh屬性設為 taTrailing (置右)

螢幕快照 2013-10-12 下午12.39.34

21都設定完之後,可以下拉成不同機器

螢幕快照 2013-10-12 下午12.39.03 螢幕快照 2013-10-12 下午12.39.16

22可以看得到在ios、android會自動轉換成各自的風格

sourcecode

23接著在畫面的計算按鈕點二下,輸入上圖的程式

[pascal]
procedure TForm1.Button1Click(Sender: TObject);
var
BMI:double;
begin
BMI := StrToFloat(FormatFloat(‘#.##’,(StrToFloat(Edit2.text) /
( (StrToFloat(Edit1.Text)/ 100) * (StrToFloat(Edit1.Text)/100 )))));
Label1.Text := FloatToStr(BMI);
end;
[/pascal]

螢幕快照 2013-10-12 下午12.41.36

24 可以雙點不同的平台,看看跑出來的效果

螢幕快照 2013-10-12 下午12.42.16

25 Windows

螢幕快照 2013-10-12 下午12.47.44

螢幕快照 2013-10-12 下午12.48.00

26 iPhone

1386014_10151624432496541_1740355845_n 1382787_10151624432376541_1638450671_n

27  Android

Github 程式下載 https://github.com/superlevin/delphixe5bmicalc


Day3 – Delphi XE5簡易手電筒

在經過前二天的安裝以及設定之後,今天來教大家寫一個最簡單的app-手電筒。十分鐘就可以完成了唷 🙂

螢幕快照 2013-10-10 下午8.43.051新增空白專案

螢幕快照 2013-10-10 下午8.56.04

2接著我們要在畫面上放上二個元件,在右下角的元件盤中搜尋打上tswitch,這是一個開關的元件。直接在TSwitch快點二下

螢幕快照 2013-10-10 下午8.56.28

3第二個元件是TCameraComponent,從名稱就知道跟相機有關的,沒錯,因為手電筒就是打開相機的閃光燈。一樣也是搜尋到之後快點二下即可。

螢幕快照 2013-10-10 下午9.16.09

4二個元件放上去的畫面

螢幕快照 2013-10-10 下午8.56.45

5接下來點選畫面上的CameraComponent1元件,然後左下角的Active打勾成為 True

螢幕快照 2013-10-10 下午8.57.05

6接下來點選畫面上的Switch元件,然後將左下角的屬性視窗點Events頁籤,往下找到OnSwitch快點右邊空白處二下

螢幕快照 2013-10-10 下午8.59.57

7在裡面輸入以下的程式

[pascal]
if Switch1.IsChecked then begin
if CameraComponent1.HasFlash then
CameraComponent1.TorchMode := TTorchMode.tmModeOn;
end else begin
if CameraComponent1.HasFlash then
CameraComponent1.TorchMode := TTorchMode.tmModeOff;
end;
[/pascal]

稍微講解一下,如果Switch是打開的(Switch1.IsChecked),檢查相機是不是有閃光燈(CameraComponent1.HasFlash),確定有的話,就將相機的TorchMode(燈光)打開(tmModeOn),相反的就是關掉(tmModeOff)。

打完收功!按下F9之後,就是您的第一個APP程式叫「手電筒」XD

範例程式碼下載: https://github.com/superlevin/delphixe5flashlight

實機操作畫面: