一、安裝Git
二、安裝 T
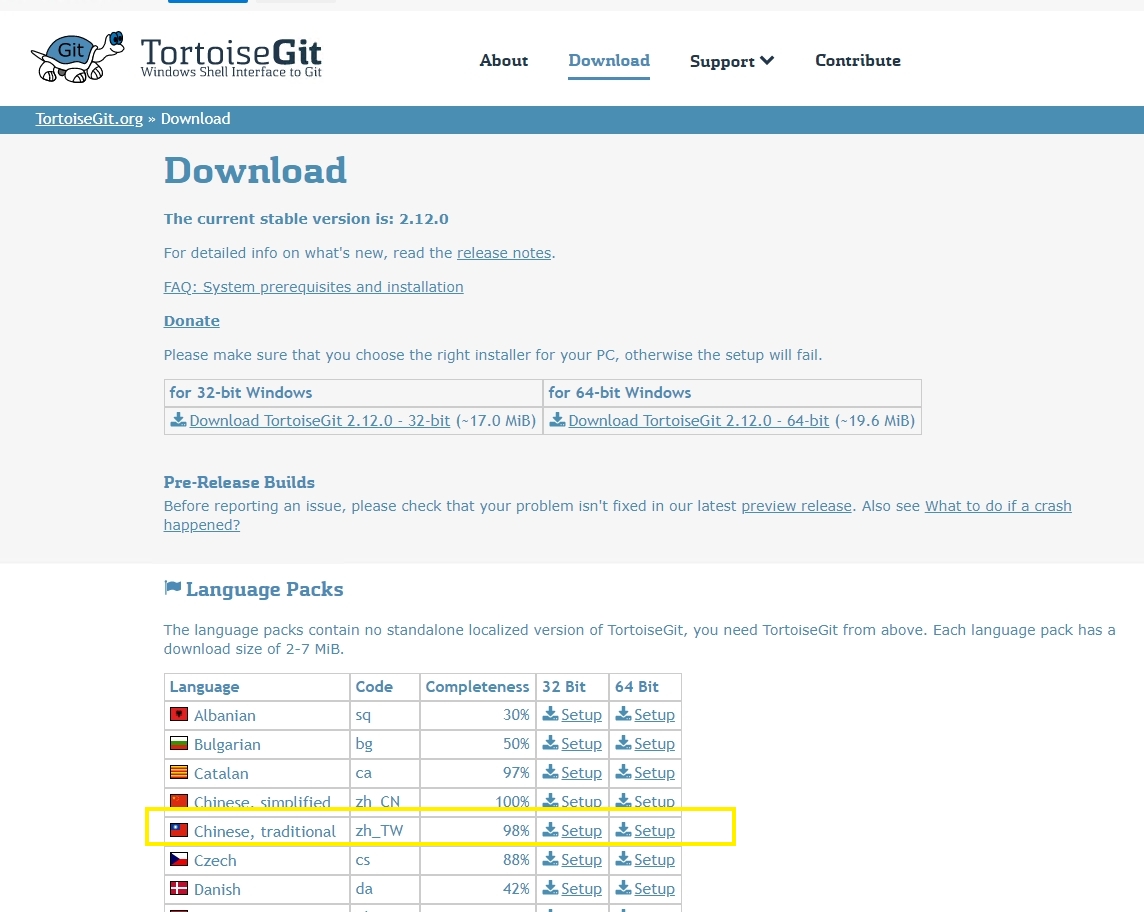
三、記得有繁體中文的語系包,可以一起安裝上
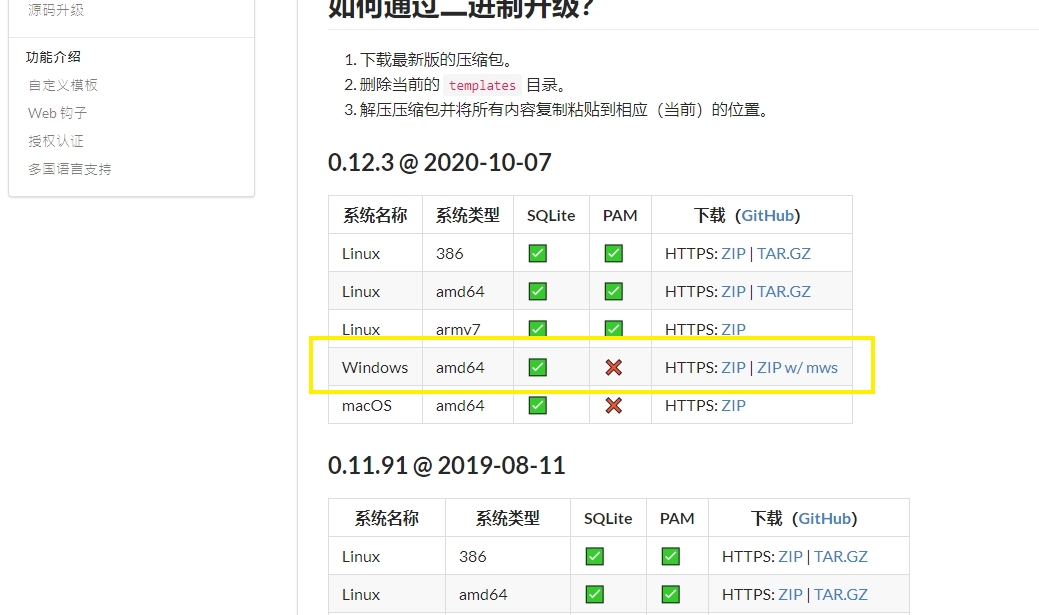
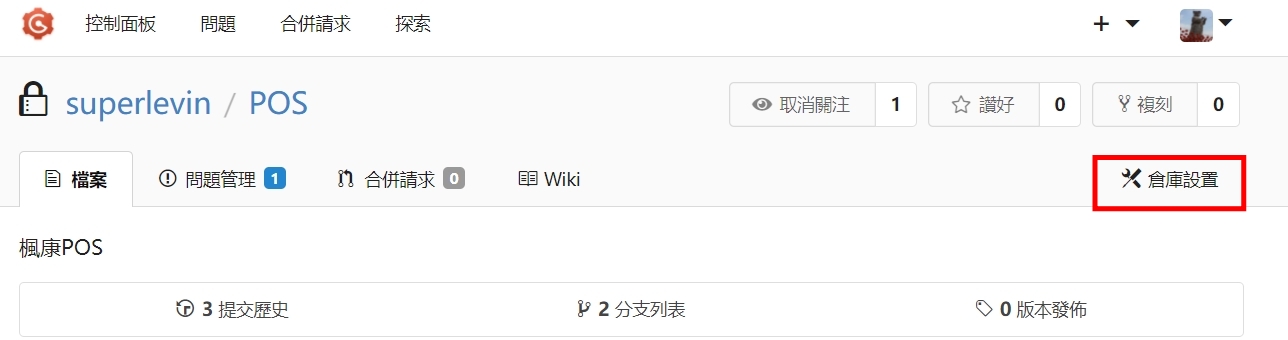
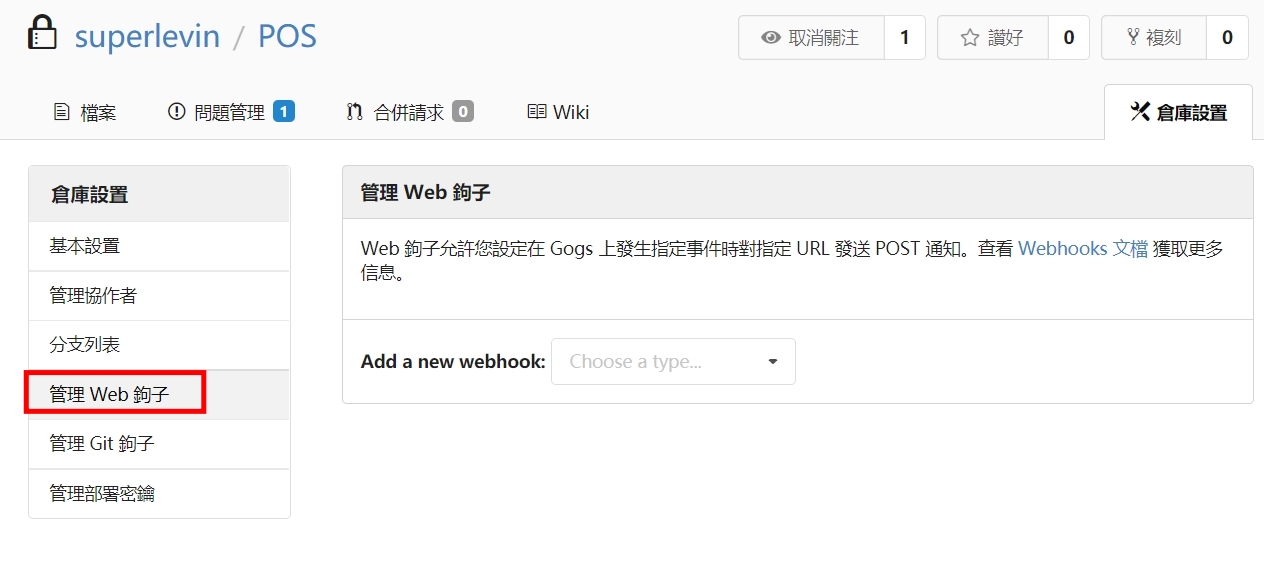
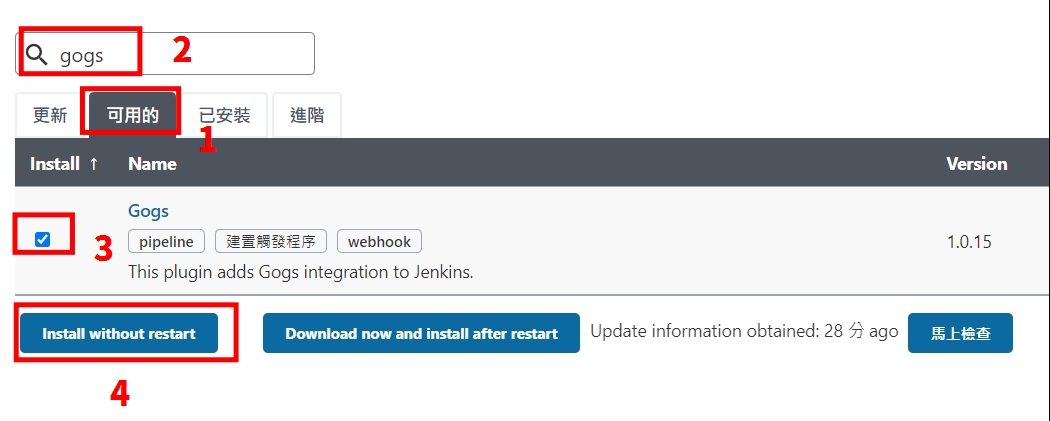
四、安裝Gogs
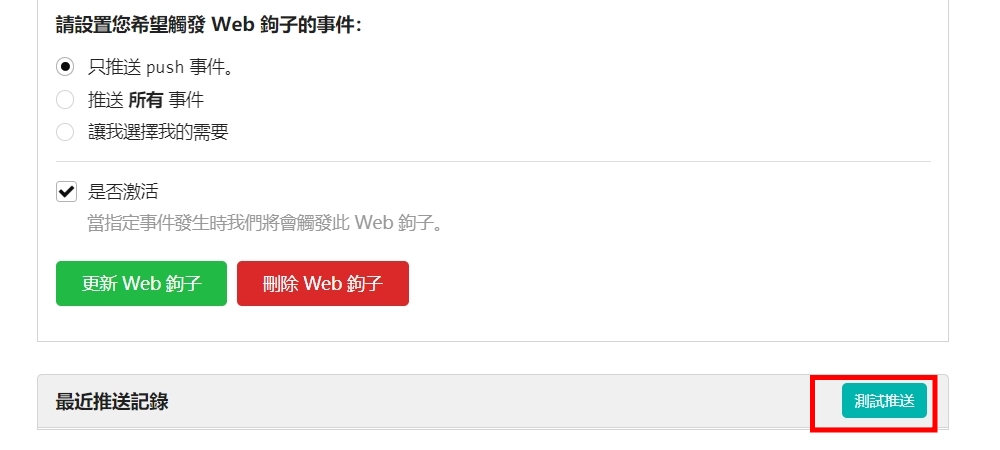
五、下載透過二進制即可,切到目錄 gogs web
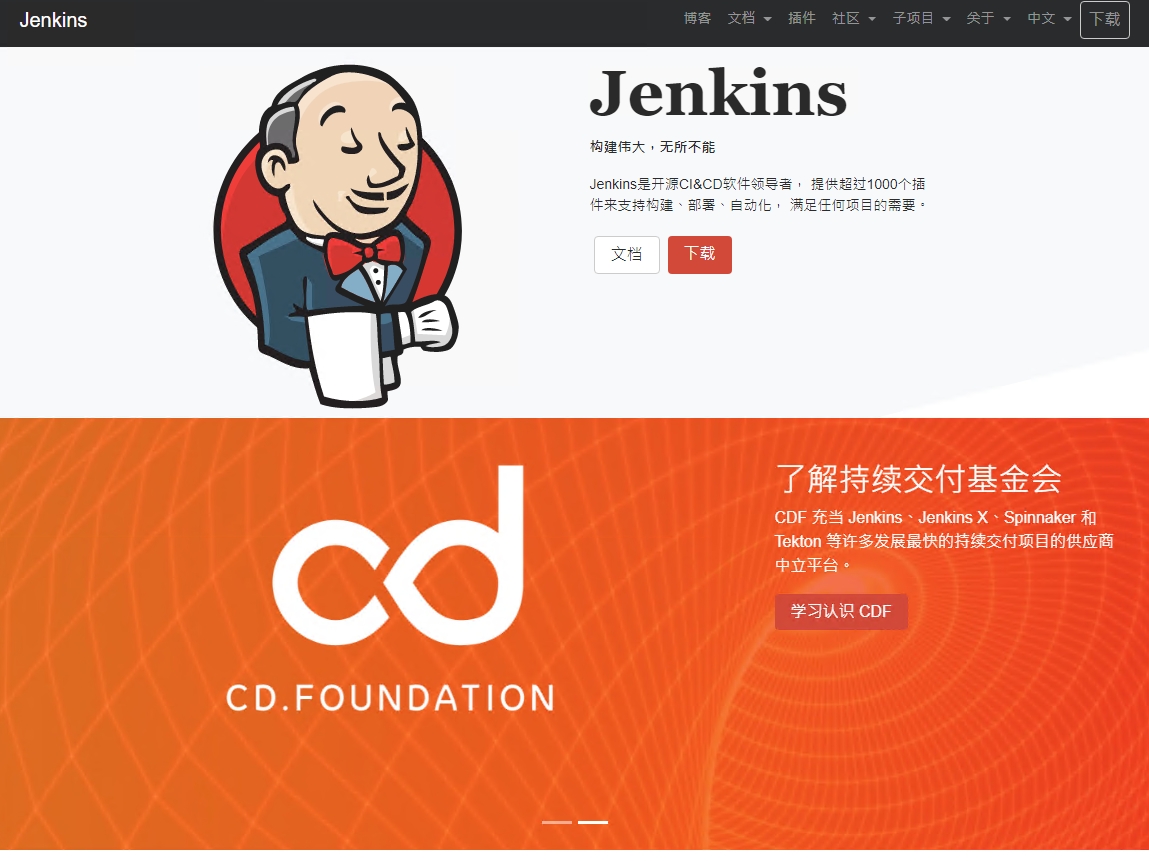
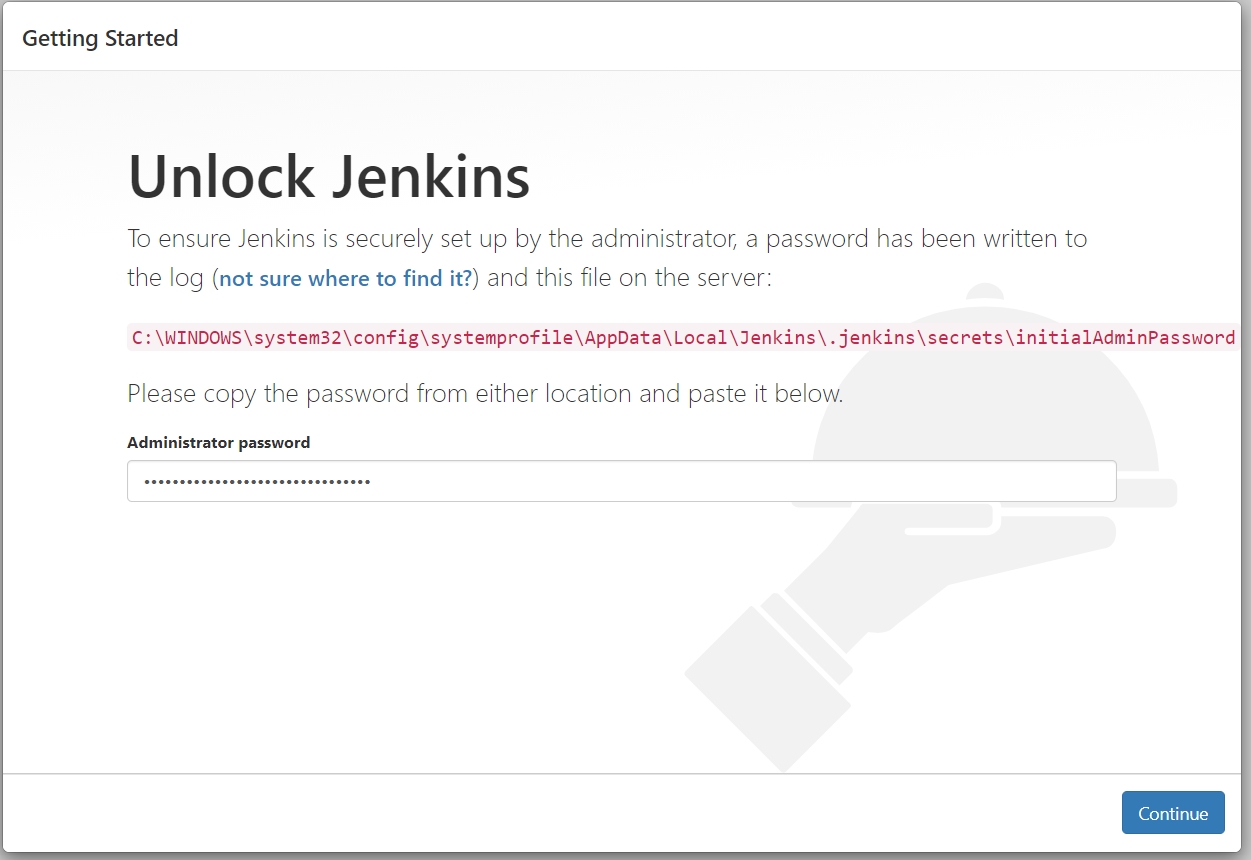
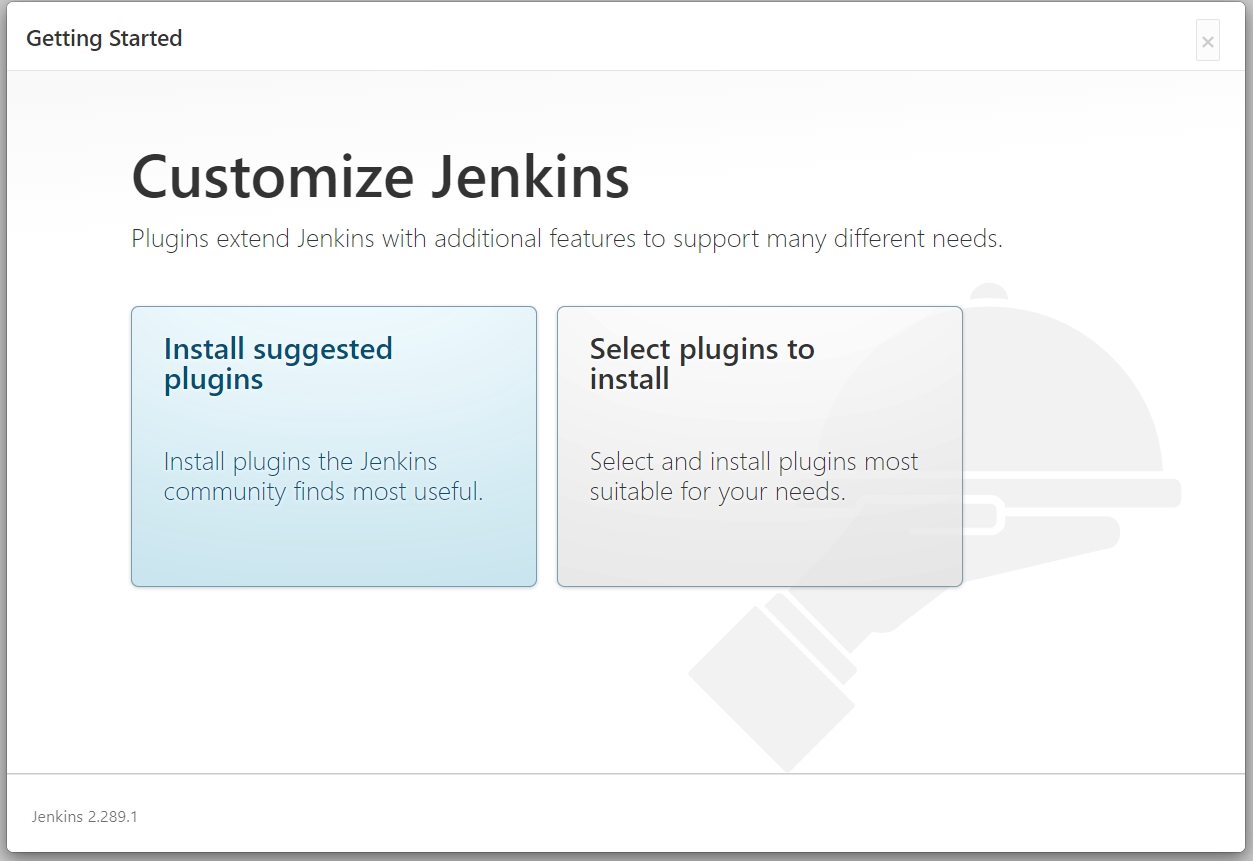
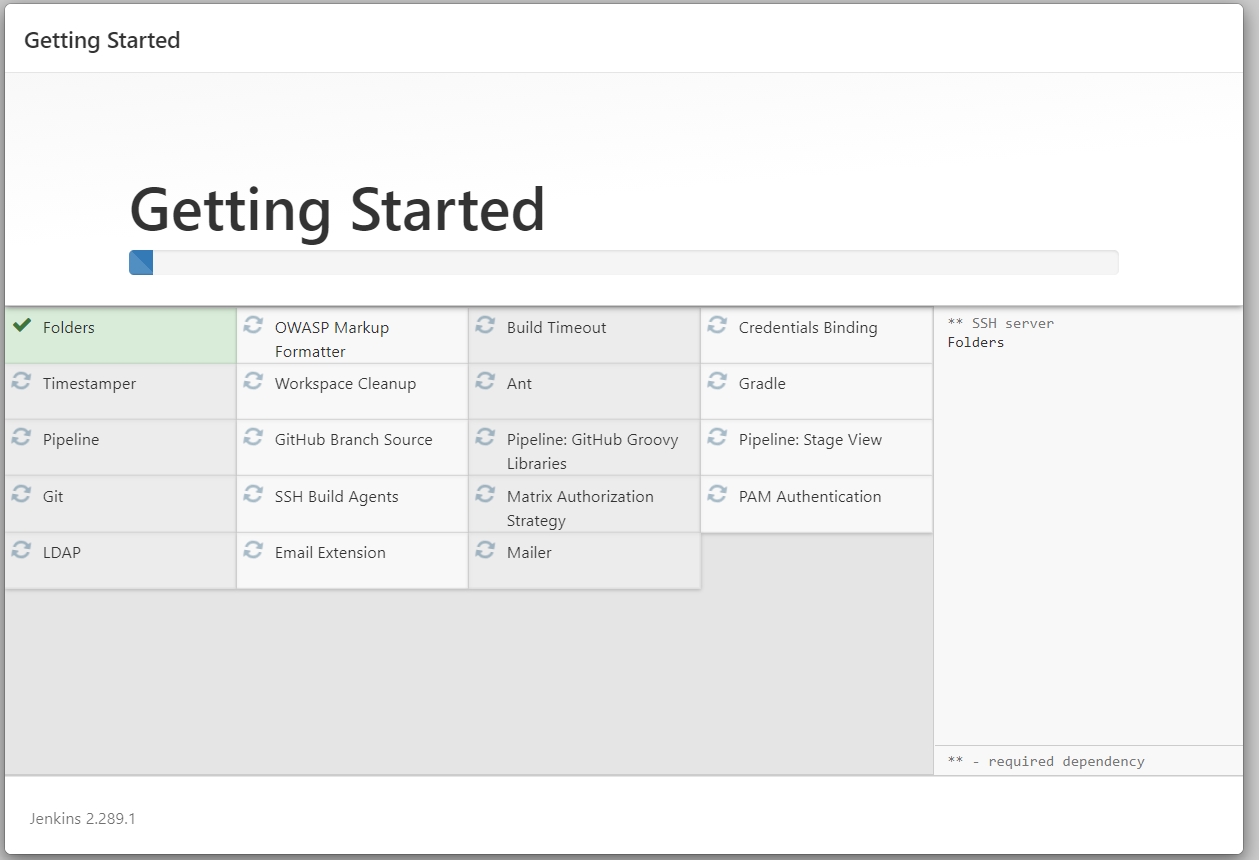
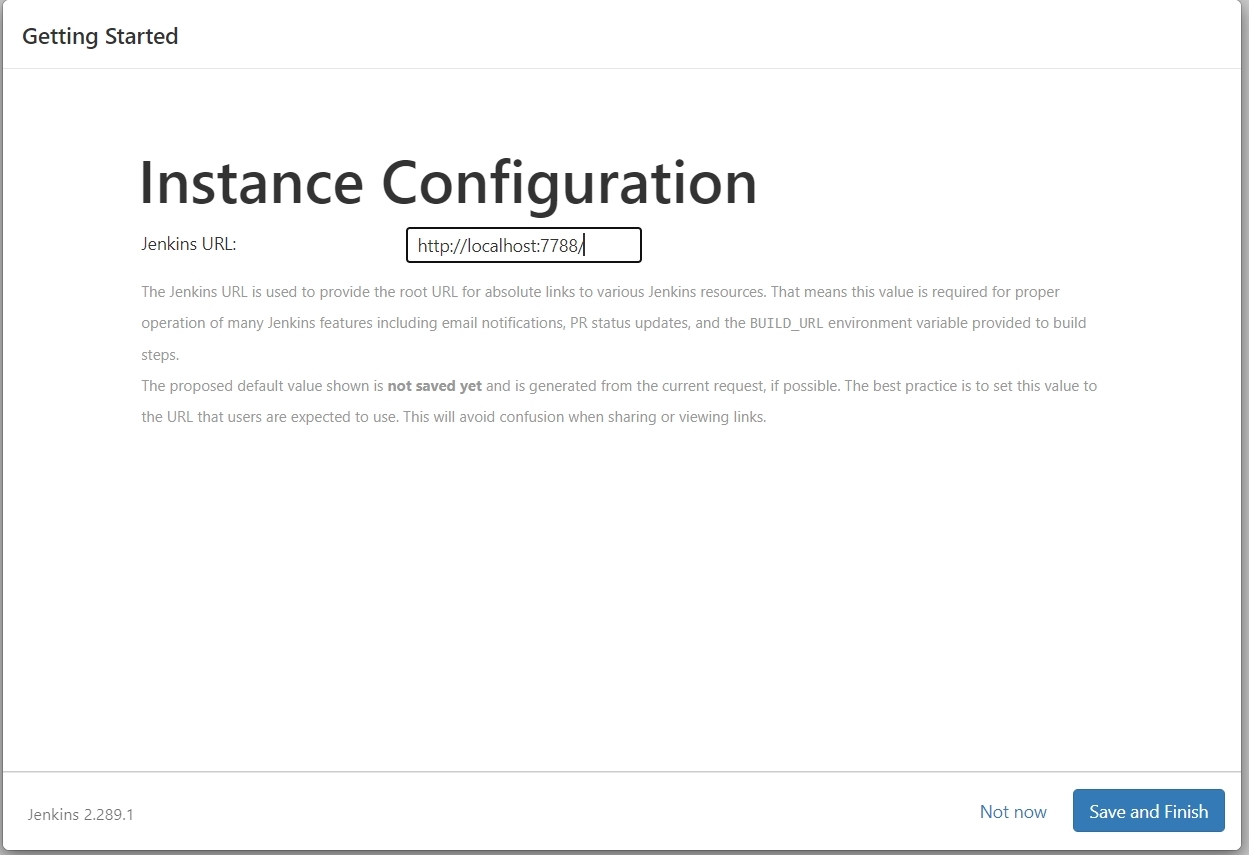
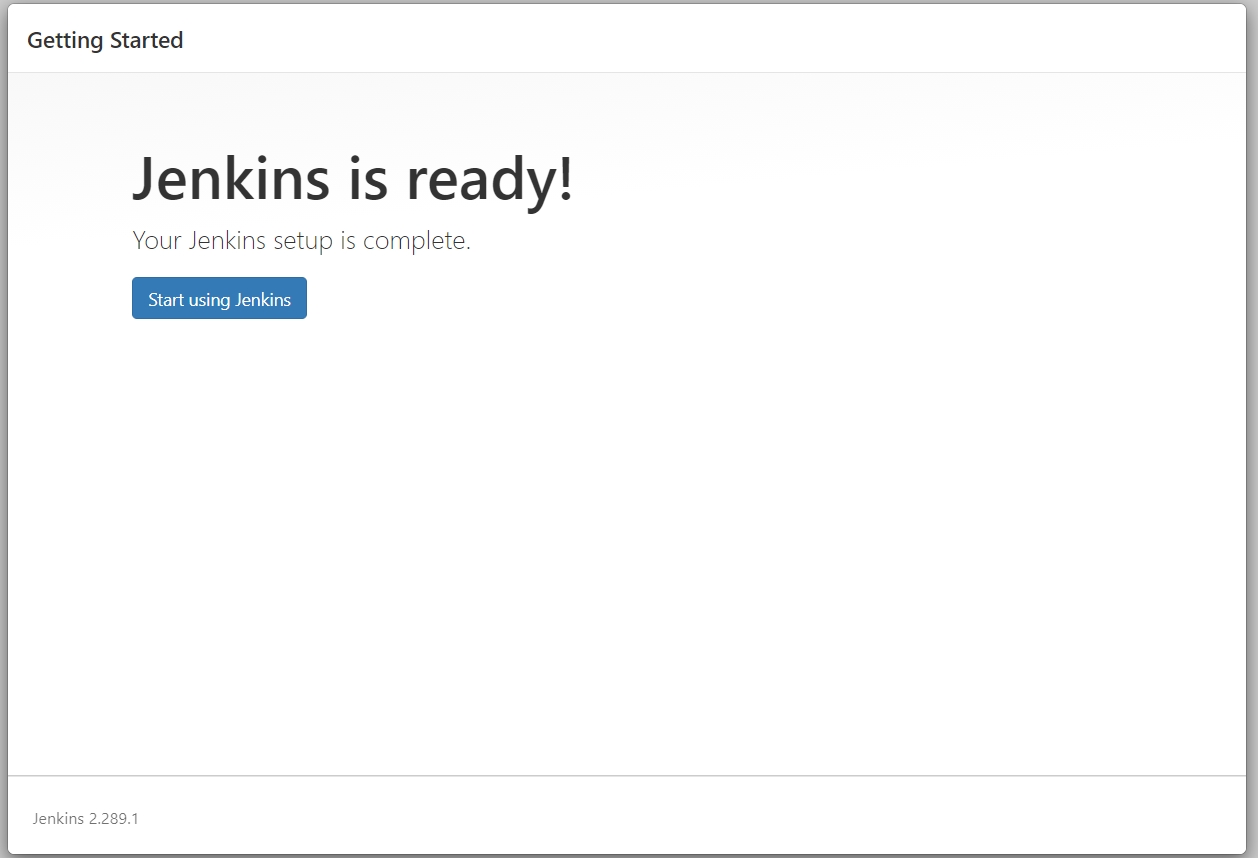
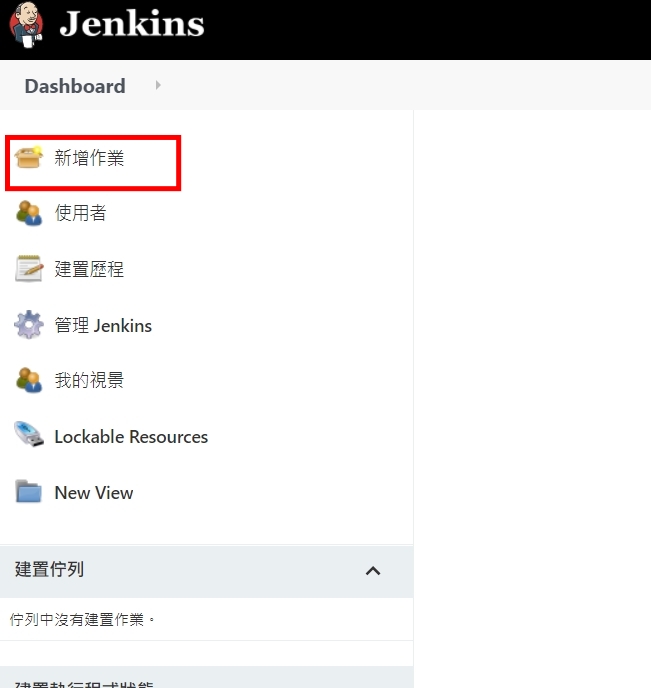
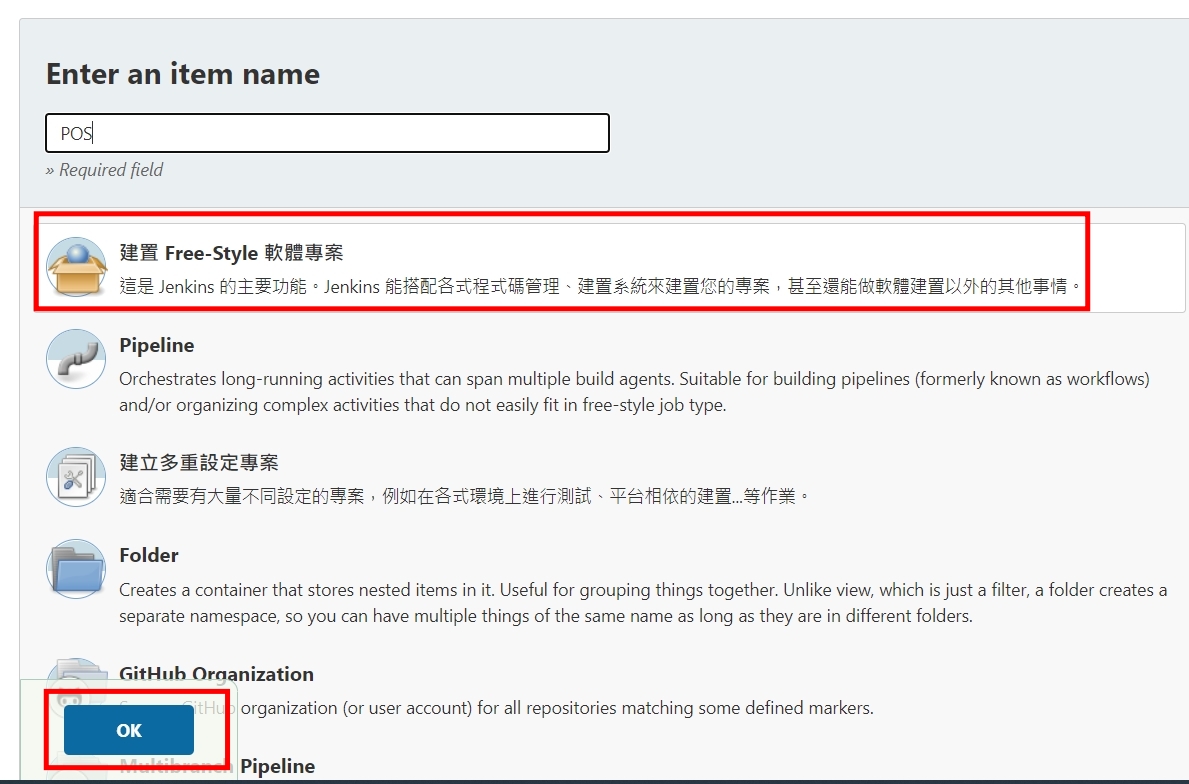
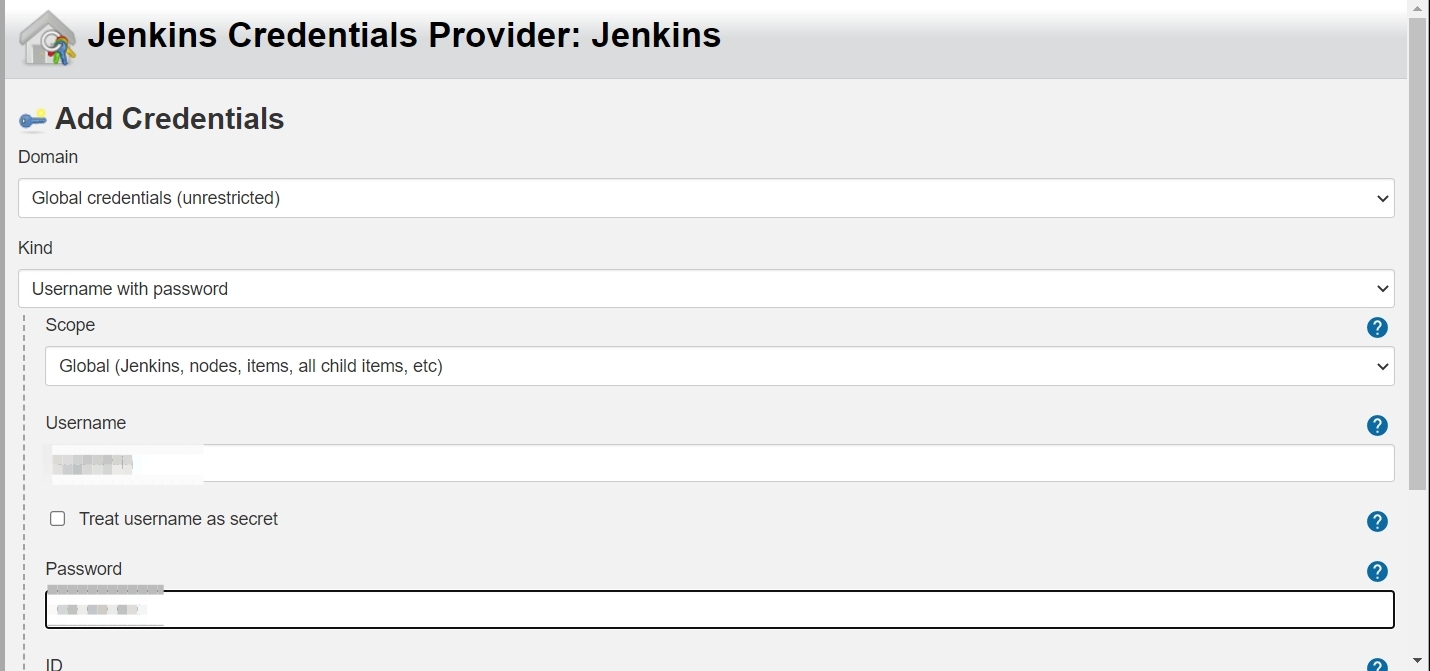
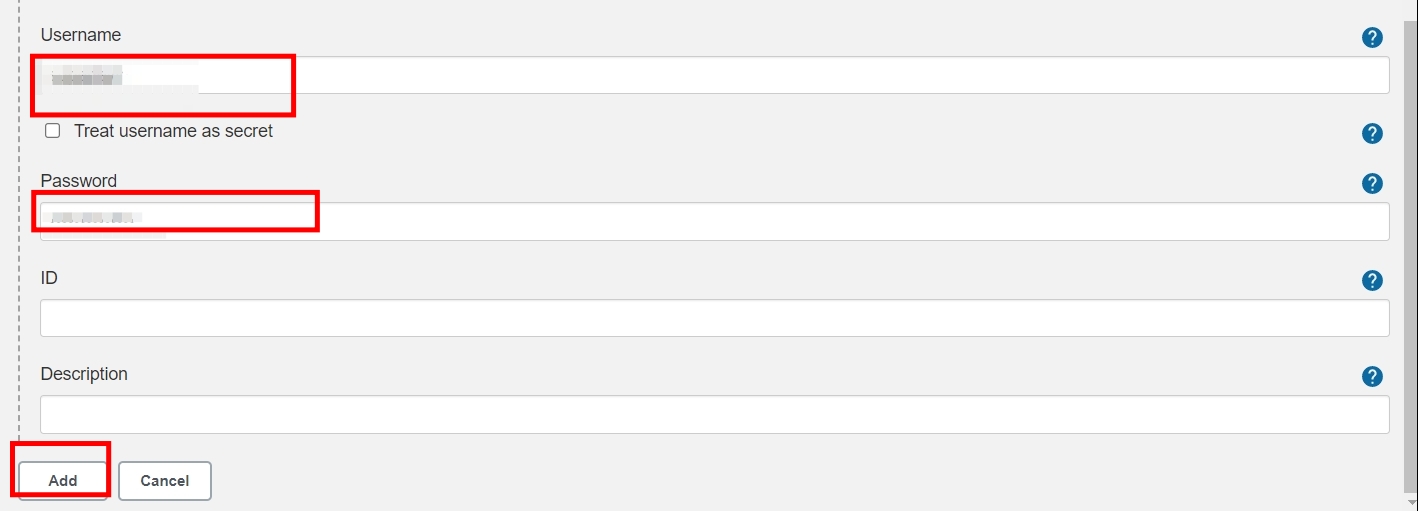
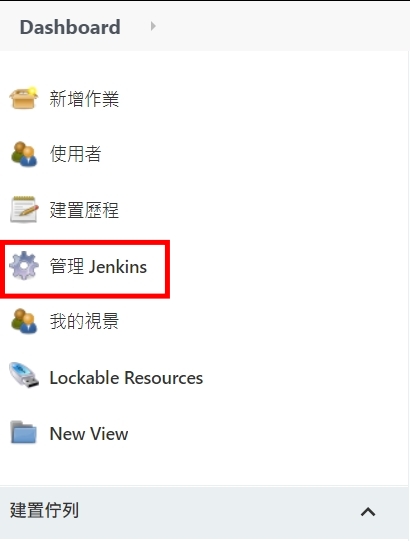
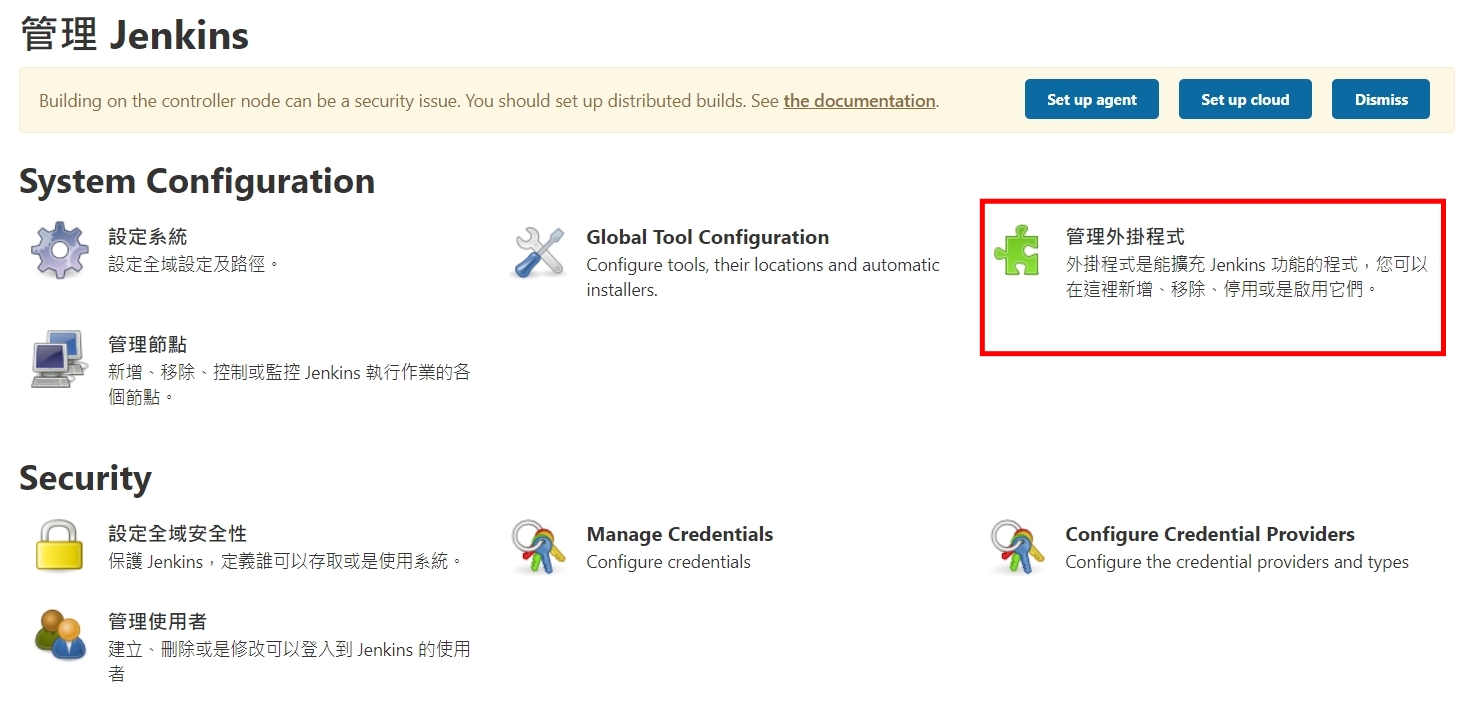
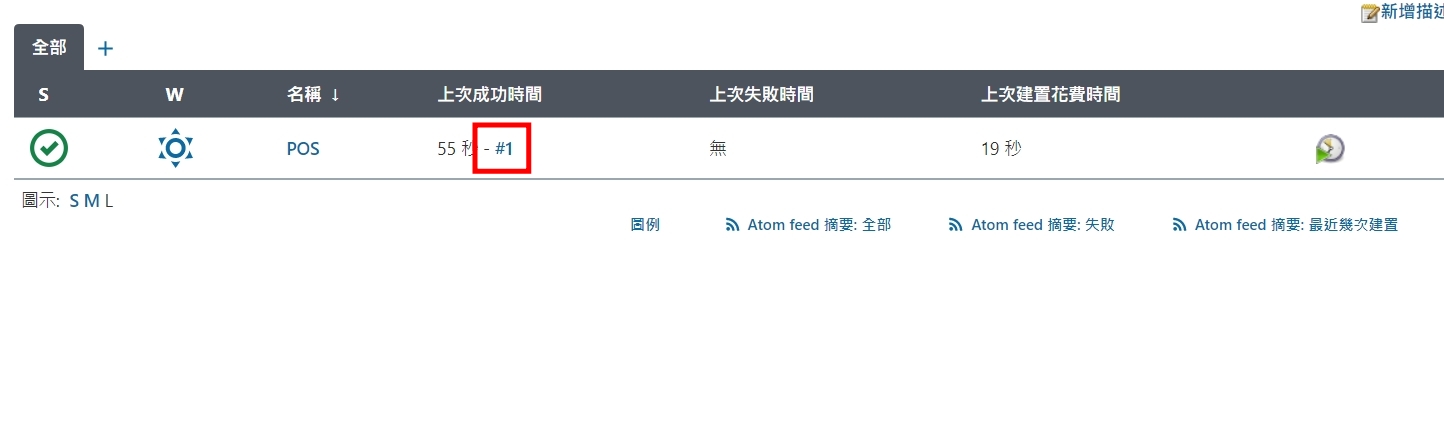
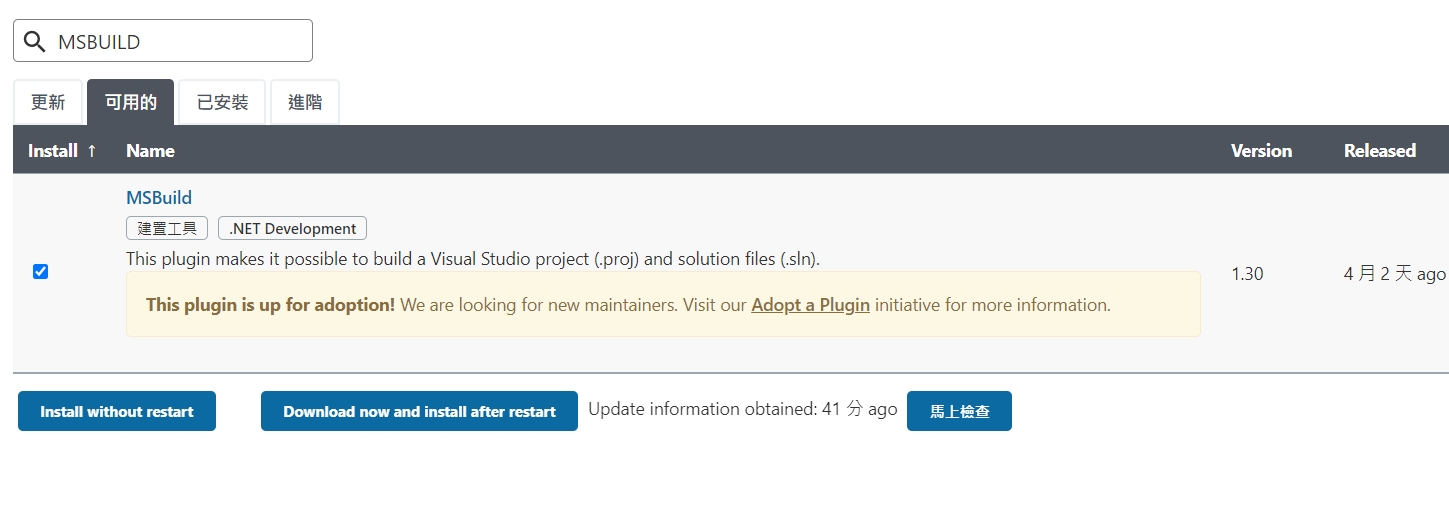
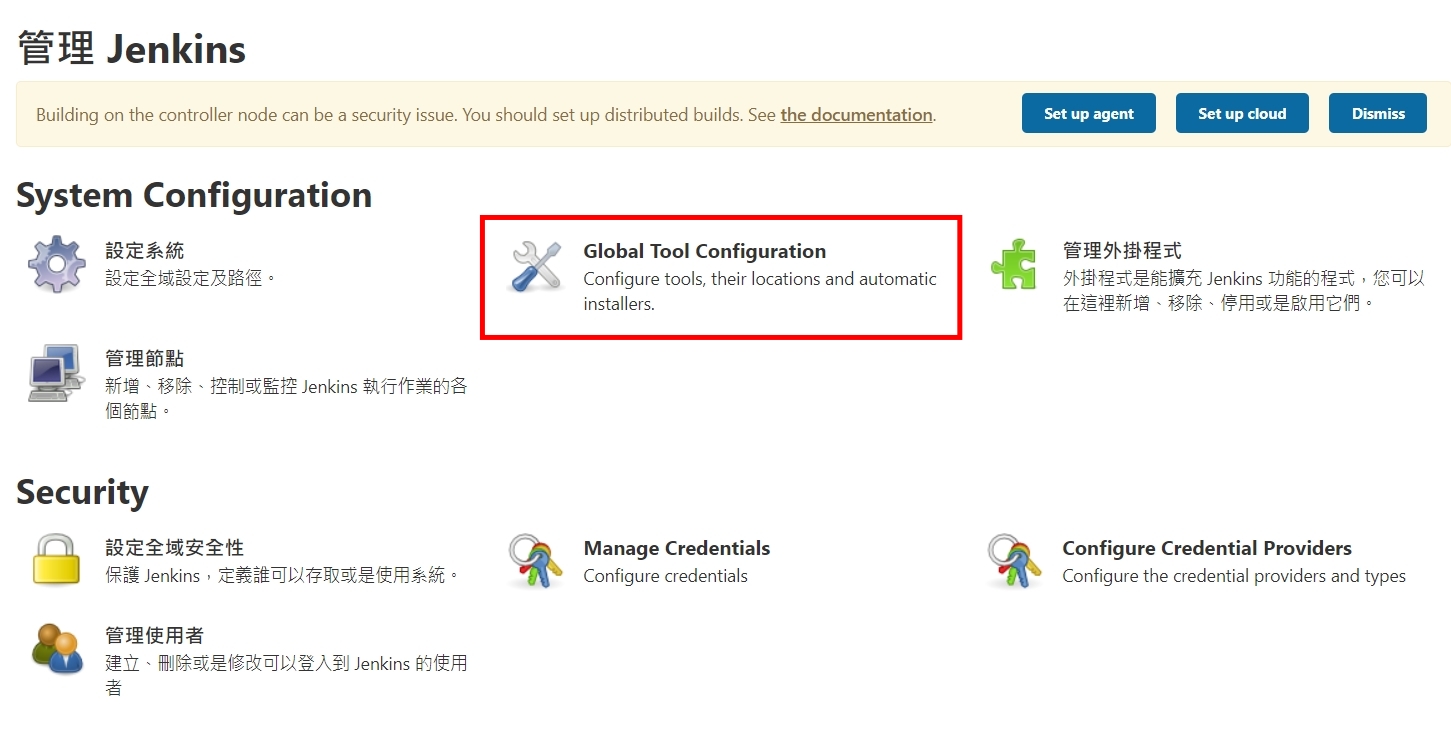
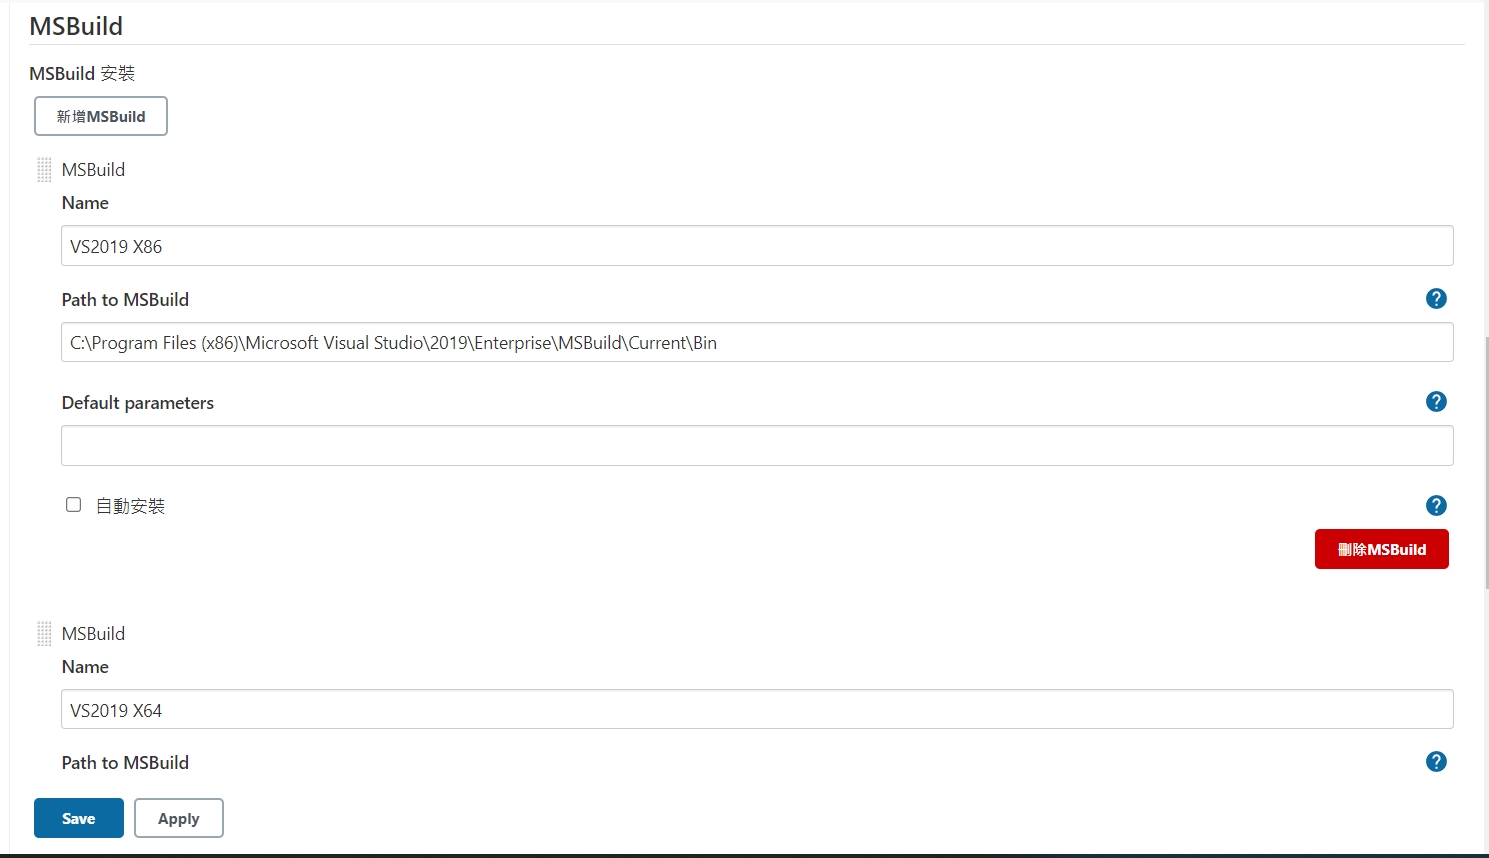
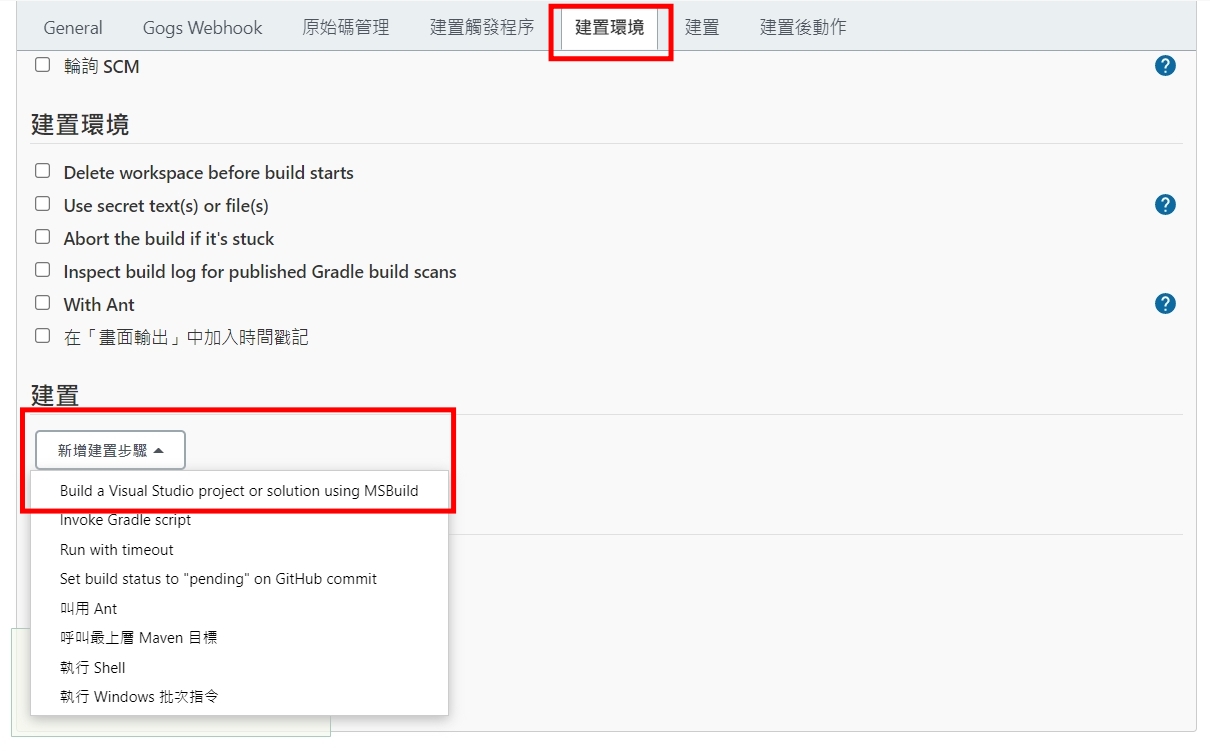
六、下載Jenkins安裝


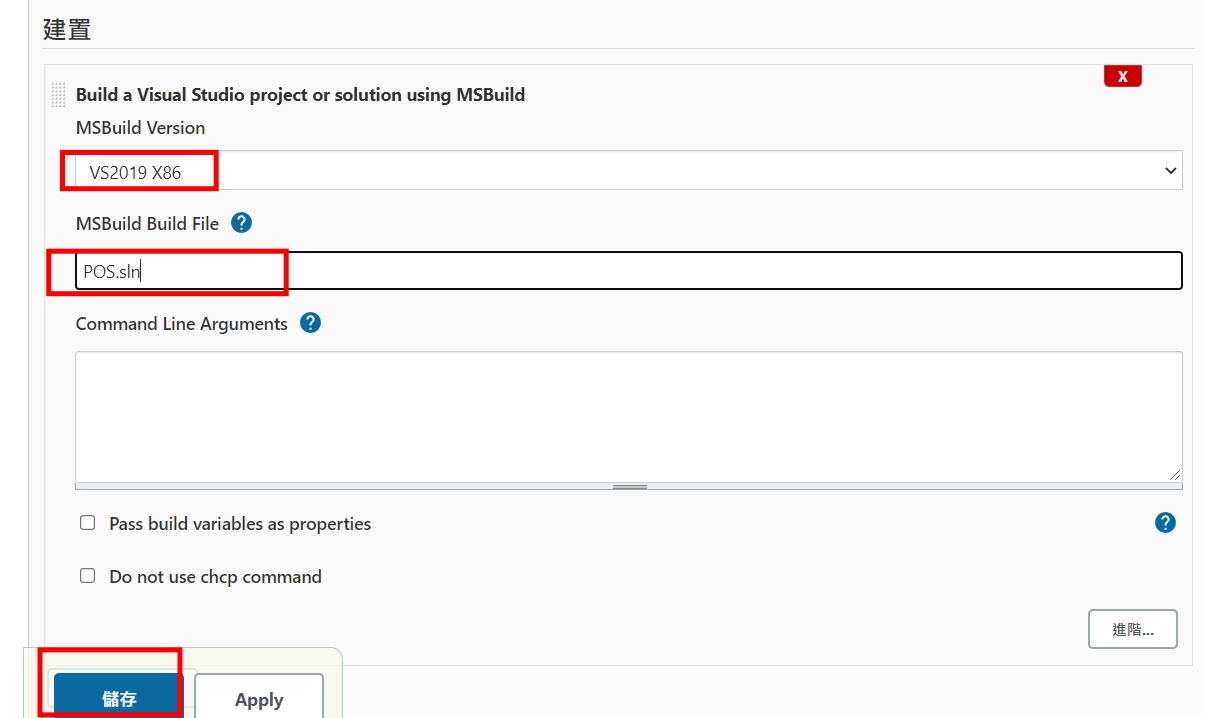
大型網站架構..net 架構師.rabbitMQ.redis.行動開發.APP開發教學.PHP Laravel開發..net core C# 開發.架構師之路.Delphi開發.資料庫程式.進銷存.餐飲POS系統
一、安裝Git
二、安裝 T
三、記得有繁體中文的語系包,可以一起安裝上
四、安裝Gogs
五、下載透過二進制即可,切到目錄 gogs web
六、下載Jenkins安裝
一、install Hyper-V.bat
pushd "%~dp0"
dir /b %SystemRoot%\servicing\Packages*Hyper-V*.mum >hyper-v.txt
for /f %%i in ('findstr /i . hyper-v.txt 2^>nul') do dism /online /norestart /add-package:"%SystemRoot%\servicing\Packages\%%i"
del hyper-v.txt
Dism /online /enable-feature /featurename:Microsoft-Hyper-V -All /LimitAccess /ALL
pause
二、安裝containers
pushd "%~dp0"
dir /b %SystemRoot%\servicing\Packages*containers*.mum >containers.txt
for /f %%i in ('findstr /i . containers.txt 2^>nul') do dism /online /norestart /add-package:"%SystemRoot%\servicing\Packages\%%i"
del containers.txt
dism /online /enable-feature /featurename:Containers -All /LimitAccess /ALL
pause
三、註冊為非HOME版(專業版)REG ADD "HKEY_LOCAL_MACHINE\software\Microsoft\Windows NT\CurrentVersion" /v EditionId /T REG_EXPAND_SZ /d Professional /F
四、安裝Docker執行DESKTOP後出現錯誤訊息,下載更新就好
來源文章 https://docs.microsoft.com/en-us/windows/wsl/install-win10#step-4—download-the-linux-kernel-update-package
https://wslstorestorage.blob.core.windows.net/wslblob/wsl_update_x64.msi
在疾管家的簡訊實聯制中,主要看到是透過LIFF功能,去掃QR CODE後,然後發送簡訊。所以技術有
1 LINE LIFF 功能
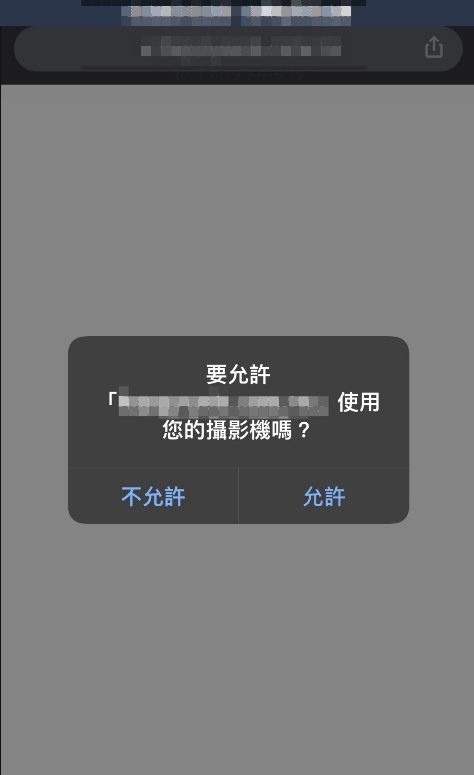
2 掃條碼功能(透過HTML5-QRCODE) 注意:網站要https才能有權限開啟鏡頭
3 SMS
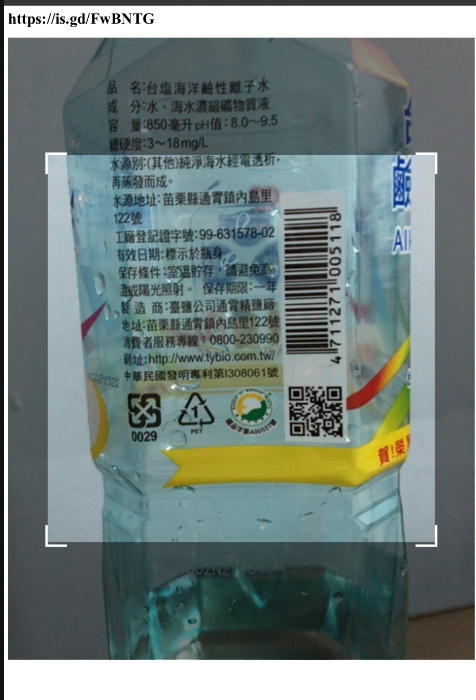
以下稍微實作一下,如何像疾管家一樣自動直接開啟後鏡頭
然後在掃描確認到開頭是SMSTO:1922後,透過SMS協定自動調到簡訊畫面
不過android/ios的簡訊中串body不同(ios是& android是 ? )
這樣就可以實現出像唐鳳政委與幕後功臣們所做出的功能了!
<html>
<head>
    <meta charset="utf-8">
    <title>壽山掃條碼測試</title>
</head>
<body>
    <!-- 條碼顯示的內容顯示在 qr-reader-results -->
    <div id="qr-reader-results"><h1 id="qrtext"></h1></div>
	<!-- 掃描用 -->
    <div id="qr-reader" style="width:100%"></div>
</body>
<script src="https://cdnjs.cloudflare.com/ajax/libs/html5-qrcode/2.0.3/html5-qrcode.min.js"></script>
<script>
    <!-- 呼叫 html5qrcode 代入qr-reader -->
	const html5QrCode = new Html5Qrcode("qr-reader");
	const qrCodeSuccessCallback = (decodedText, decodedResult) => {
          /* 處理成功掃描 */
		  document.getElementById("qrtext").innerHTML = decodedText;
	      if (decodedText.toUpperCase().startsWith("SMSTO:1922:")) {
              var t = decodedText.split(":", 3),
              r= t[1],
              a= t[2],
		      o = "sms:" + r + "&body=" + a; // to-do 如果是android 要將&改為?
			  window.location.href = o;
		  }
          html5QrCode.clear();
     };
     const config = { fps: 10, qrbox: 800 };
	// 直接開啟後面鏡頭
	<!-- 開啟前置鏡頭 -->
	<!-- html5QrCode.start({ facingMode: "user" }, config, qrCodeSuccessCallback); -->
	html5QrCode.start({
	  facingMode: "environment" },
	  config, qrCodeSuccessCallback);
</script>
</head>
</html>
進到網站 https://notify-bot.line.me/zh_TW/ ,右上角有一個登入,登入後選個人頁面
往下拉可以看到一個發行存取權杖(TOKEN),按發行權杖功能。按照步驟就可以取得權杖
複製權杖下來備用。
接下來在安裝ipwork的Delphi上,加入ipwhhtp的元件後,呼叫LINE NOTIFY的程式如下:
2021.06.12 更新 Delphi 版本 ipwork試用連結(官網)
https://www.nsoftware.com/download/download.aspx?sku=IPDF-A&type=demo
七行程式就可以了!
ipwhttp1.Config(‘CodePage=65001’);
ipwhttp1.Timeout := 10;
ipwhttp1.ResetHeaders;
ipwhttp1.OtherHeaders := ‘Authorization: Bearer +’這裡改成剛才的權杖';
ipwhttp1.ContentType := ‘application/x-www-form-urlencoded;’;
ipwhttp1.PostData:= ‘message=’+’這裡改成你要通知的內容';
ipwhttp1.Post(‘https://notify-api.line.me/api/notify’);
最近在測試,如果透過web申請帳號後,可不可以直接在DNS上一增子網域以及在IIS上增加站台的方式,直接申請後就有站台,在Windows 的網站主機上,似乎要透過appcmd與dnscmd達到。後來弄出了一個可以執行的方式,主要重點在於要有較高權限的帳密透過process執行cmd模式再去下指令。分享一下
/// <summary>
/// 新增IIS站台
/// </summary>
/// <param name=”subdomain”>網站名稱</param>
/// <param name=”domain”>網域</param>
/// <param name=”webpath”>網頁位置</param>
/// <returns></returns>
public bool AddSite(string subdomain, string domain, string webpath)
{
using (Process p = new Process())
{
p.StartInfo.FileName = @”cmd.exe”;
p.StartInfo.UseShellExecute = false;
p.StartInfo.CreateNoWindow = true;
p.StartInfo.RedirectStandardError = true;
p.StartInfo.RedirectStandardInput = true;
p.StartInfo.RedirectStandardOutput = true;
p.StartInfo.WindowStyle = ProcessWindowStyle.Hidden;
p.StartInfo.UserName = “高權限帳號”;
string pw = “高權限密碼”;
SecureString ss = new SecureString();
foreach (char c in pw)
{
ss.AppendChar(c);
}
p.StartInfo.Password = ss;
//
p.StartInfo.Arguments = “/c appcmd add site /name:”+subdomain+” /bindings:\”http/*:80:”+subdomain+”.”+domain+”,https/*:443:”+subdomain+”.”+domain+”\” /physicalPath:\””+webpath+”\””;
p.Start();
p.WaitForExit();
StreamReader sr = p.StandardOutput;
p.Close();
string message = sr.ReadToEnd().Replace(“\n”, “<br />”);
if (message.Contains(“ERROR”))
{
return false;
}
else
{
return true;
}
}
}
/// <summary>
/// 透過指令新增子網域(如: levin.ksi.com.tw)
/// </summary>
/// <param name=”subdomain”>子網域名稱</param>
/// <param name=”domain”>主網域</param>
/// <param name=”ip”>主機IP</param>
/// <returns></returns>
public bool AddDNS(string subdomain,string domain,string ip)
{
using (Process p = new Process())
{
p.StartInfo.FileName = @”cmd.exe”;
p.StartInfo.UseShellExecute = false;
p.StartInfo.CreateNoWindow = true;
p.StartInfo.RedirectStandardError = true;
p.StartInfo.RedirectStandardInput = true;
p.StartInfo.RedirectStandardOutput = true;
p.StartInfo.WindowStyle = ProcessWindowStyle.Hidden;
p.StartInfo.UserName = “高權限帳號”;
string pw = “高權限密碼”;
SecureString ss = new SecureString();
foreach (char c in pw)
{
ss.AppendChar(c);
}
p.StartInfo.Password = ss;
p.StartInfo.Arguments = @”/c dnscmd /recordadd ” + domain + ” ” + subdomain + ” A ” + ip;
p.Start();
p.WaitForExit();
StreamReader sr = p.StandardOutput;
p.Close();
string message = sr.ReadToEnd().Replace(“\n”, “<br />”);
if (message.Contains(“成功”)){
return true;
}
else
{
return false;
}
}
}
程式下載: https://drive.google.com/file/d/1rmz910QWqQxLa8XOMWrFG1fjSTPoTLFd/view?usp=sharing
本篇學會
– LOG的撰寫以及追蹤
– ngrok 讓本機可以debug webhook
– JSON 的基本運用
– LINE BOT初步瞭解(回應訊息)
準備篇
– Visual Studio
– ngrok(localhost 對應到https public domain的服務)
下載連結:
https://ngrok.com/download
– LINE Developers 帳號(免費)
https://developers.line.biz/en/ “https://developers.line.biz/en/
開發步驟
– 新增asp.net Core web應用程式後按下一步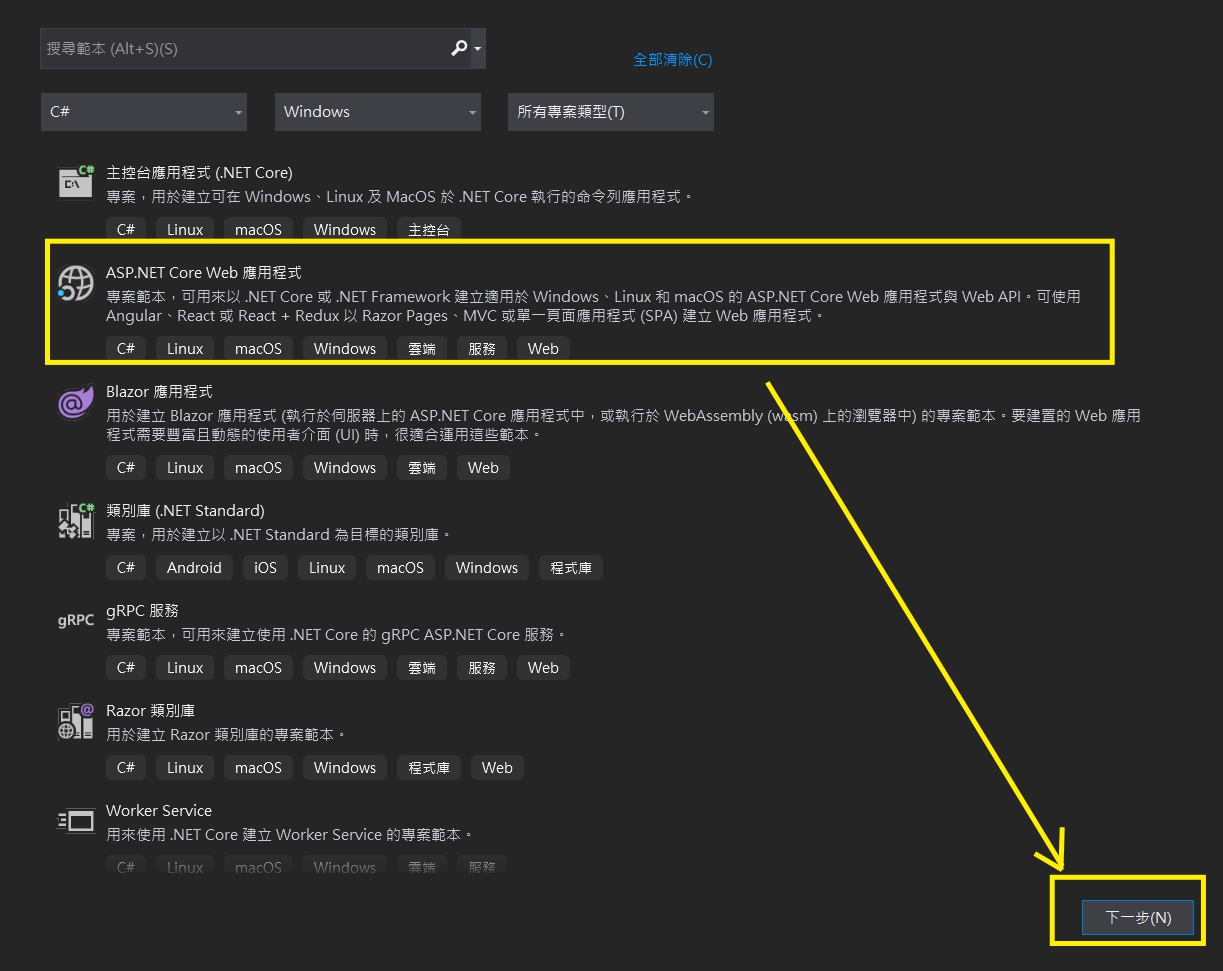
– 設定專案名稱LINEBOT,建立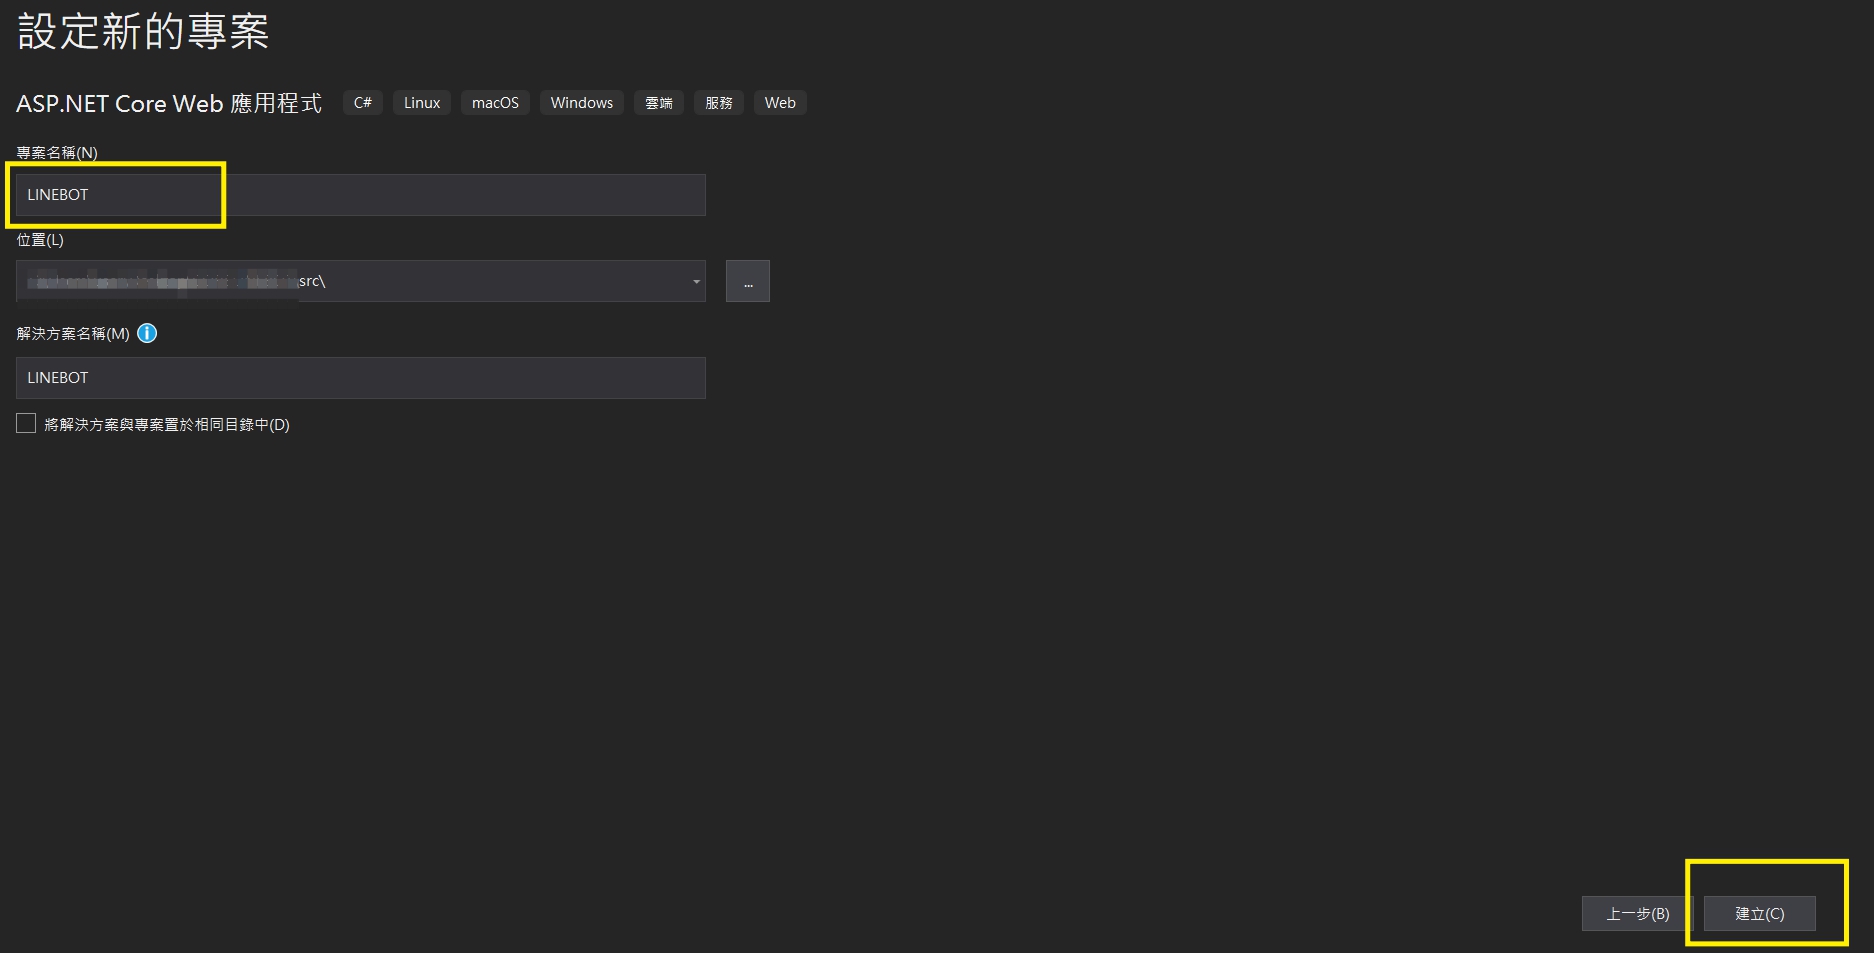
– 選擇.NET Core → ASP.NET Core 3.1 →API→建立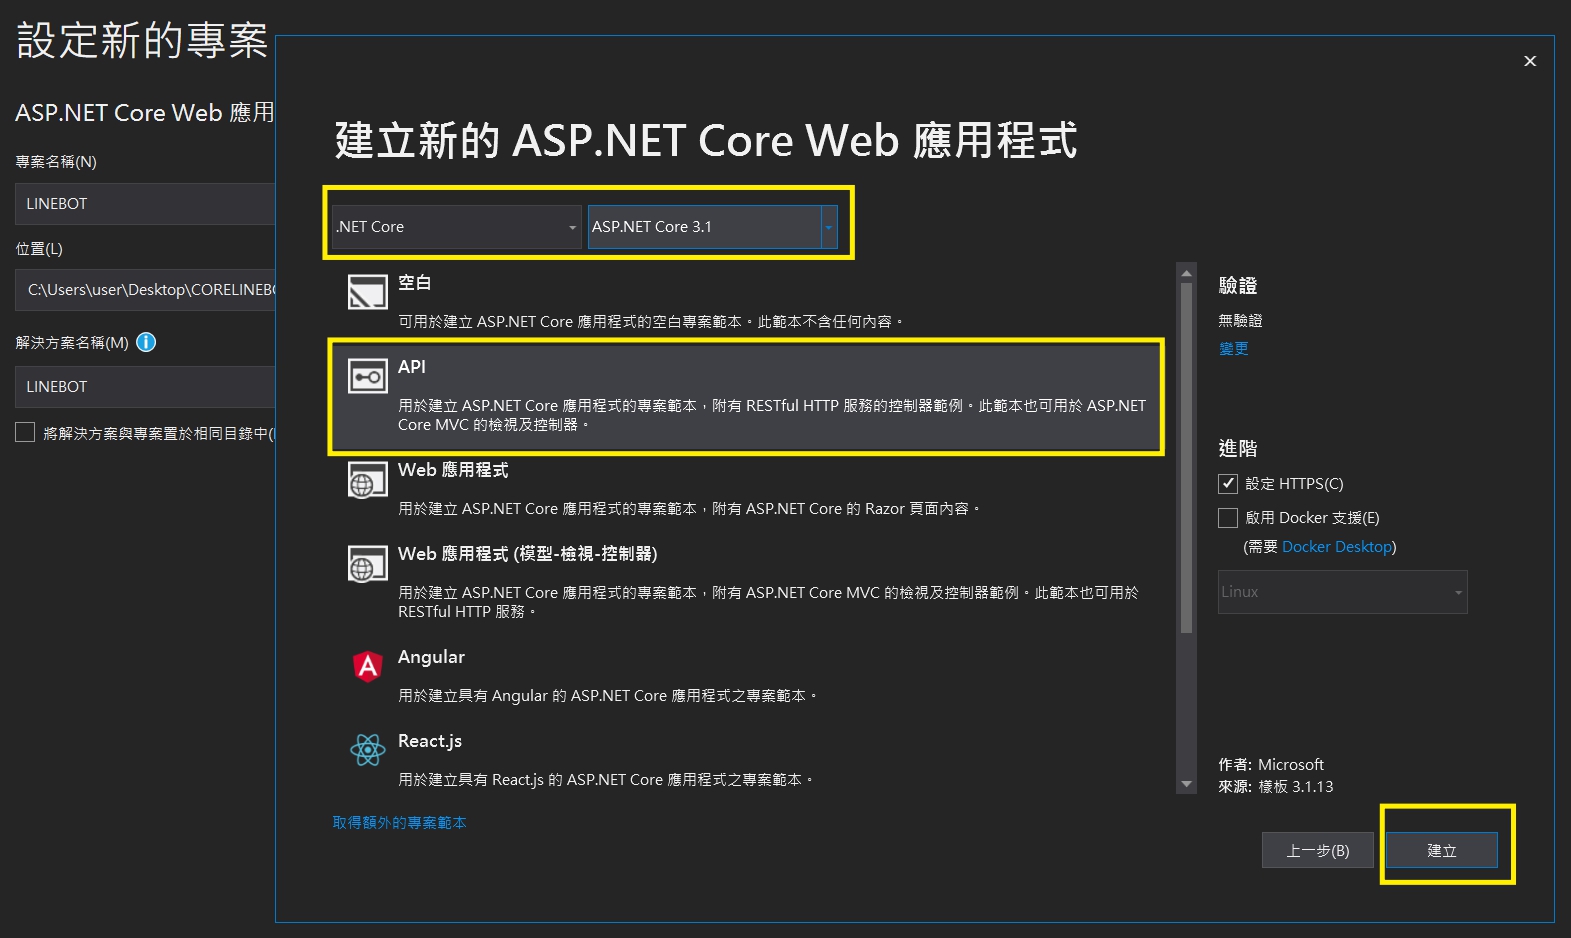
– 首先安裝 *serilog.extensions.logging*
– 在Startup.cs加上 ILoggerFactory ,並設定檔名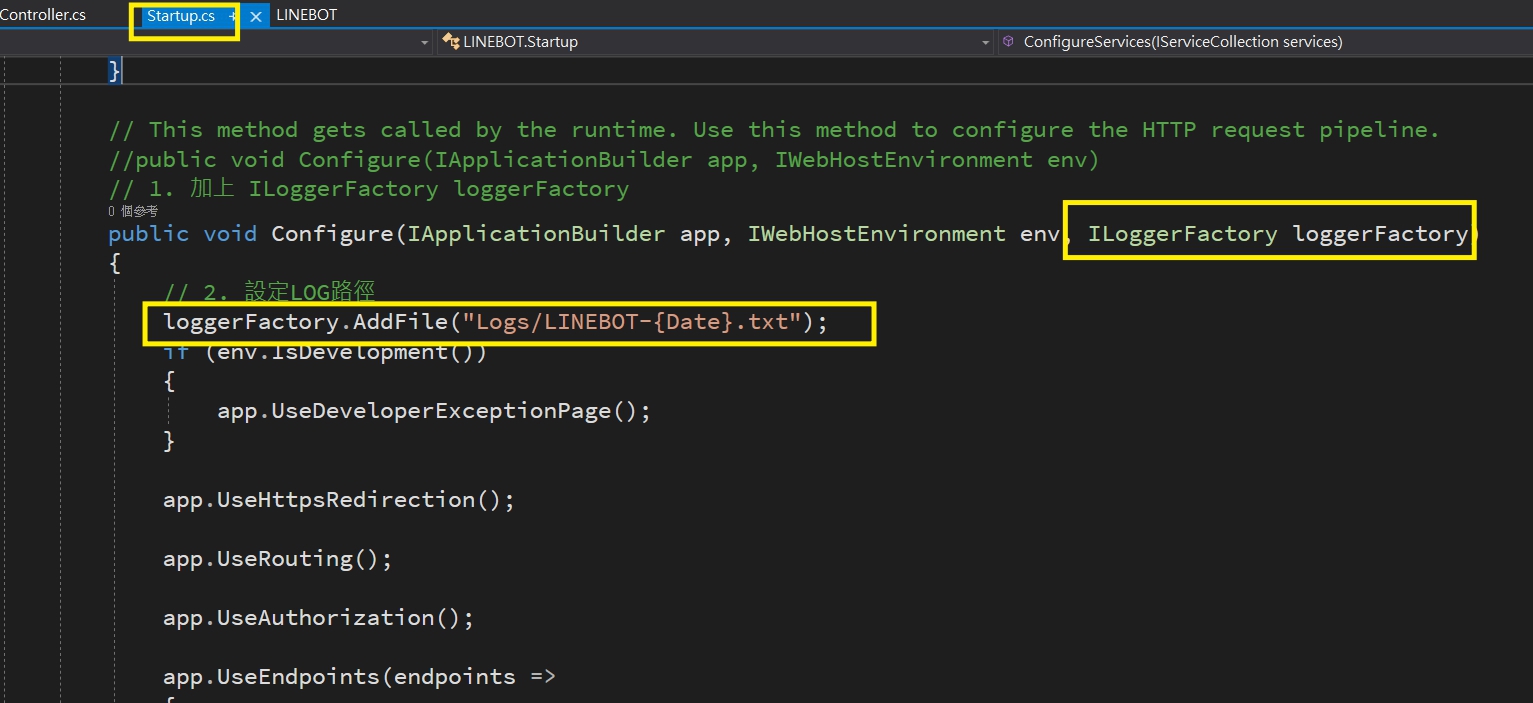
– 在預設的WeatherForecastController.cs試著加上LOG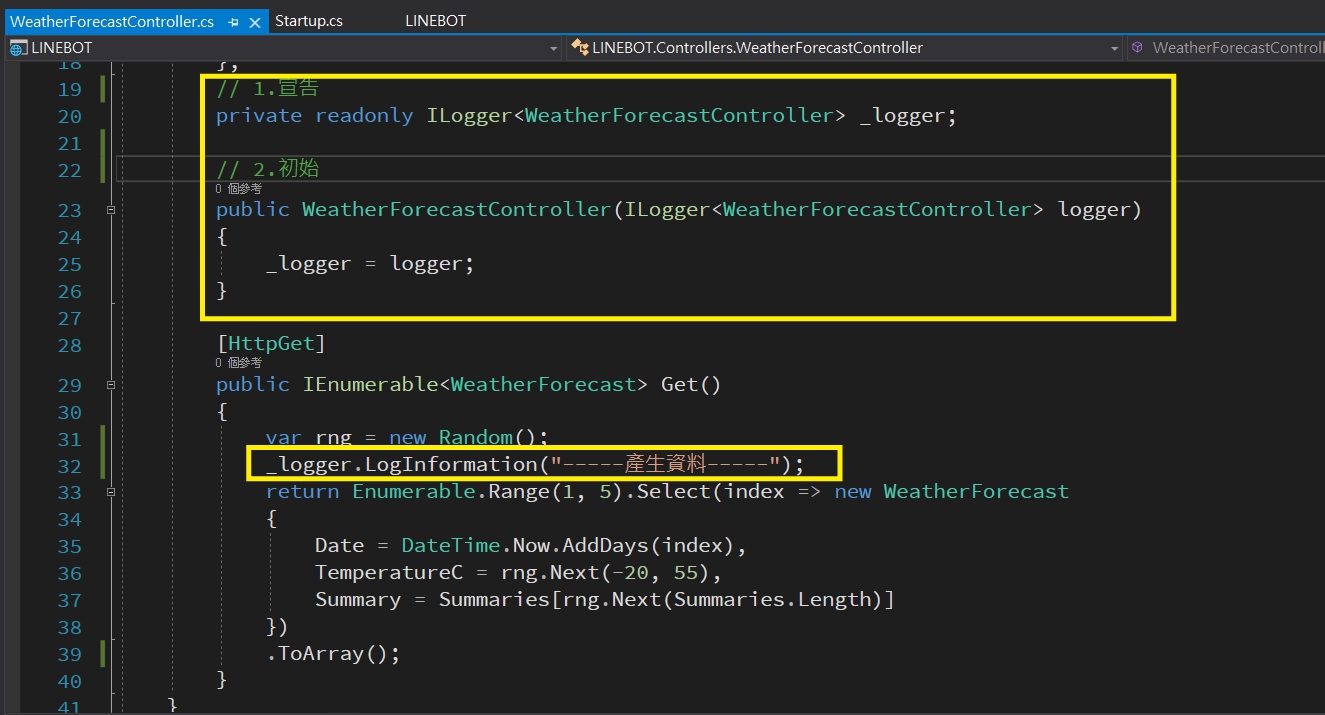
– 開啟程式後,到logs目錄下確定LOG正常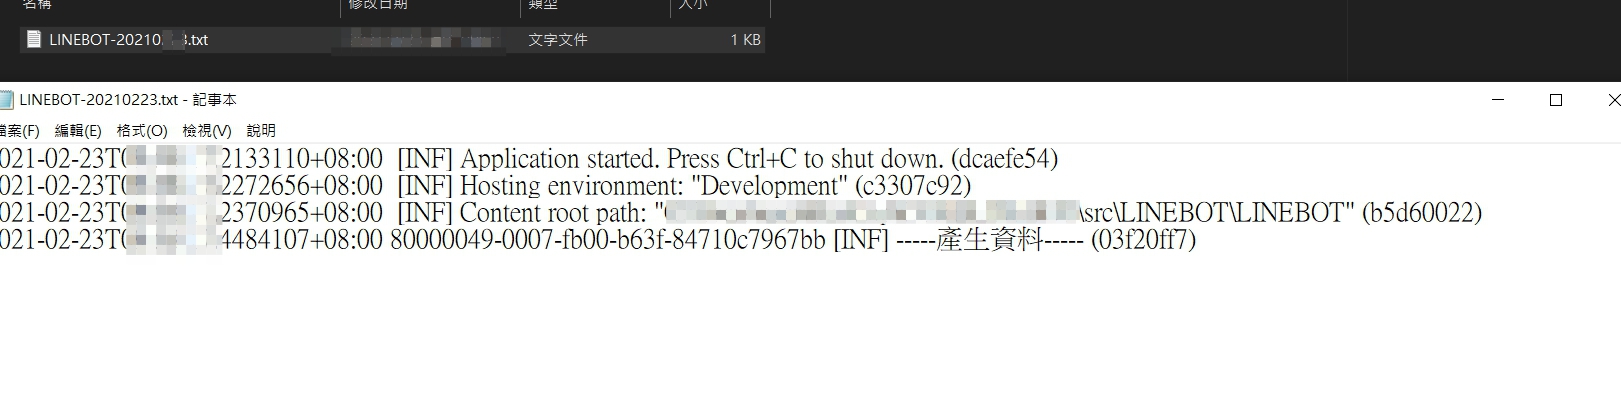
– 新增API控制器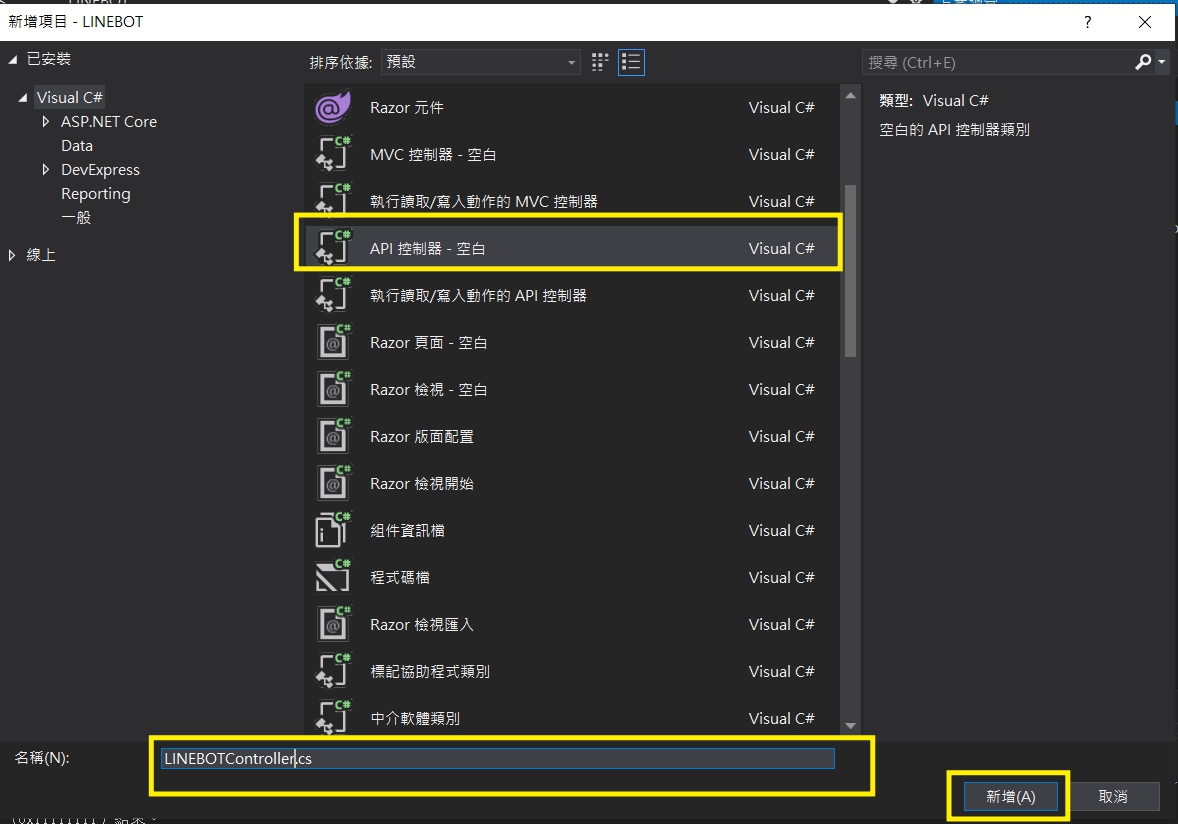
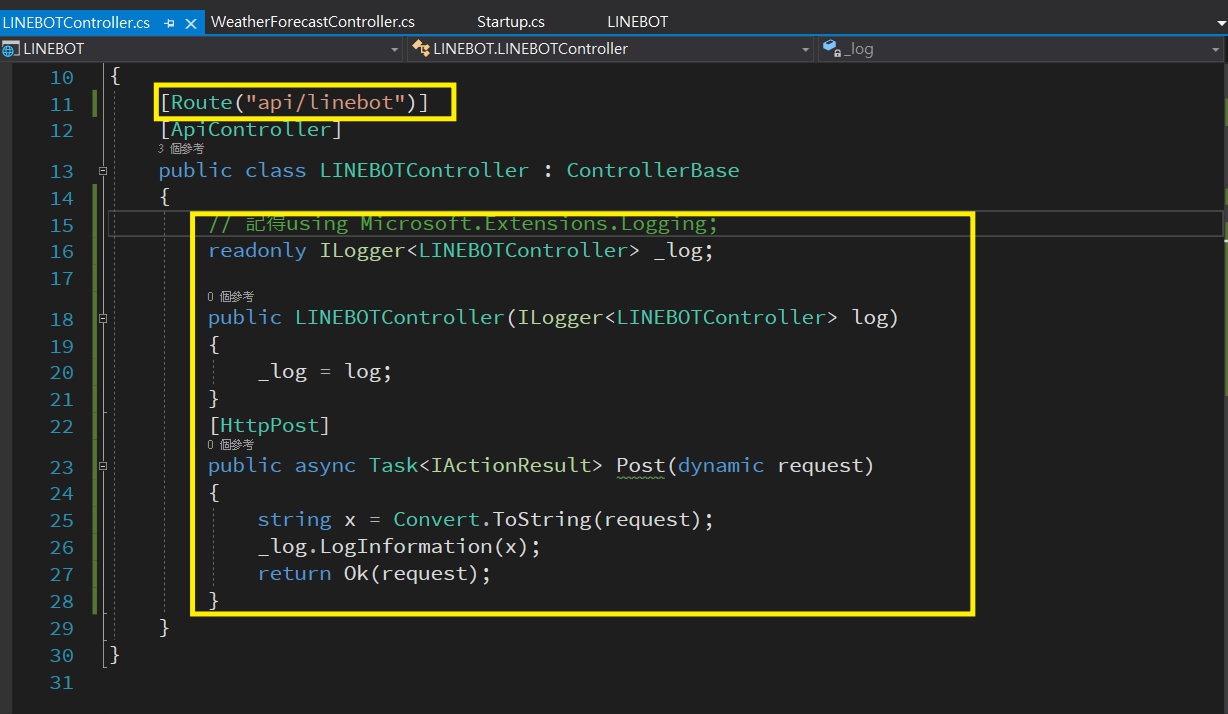
– 修改route為 api/linebot ,程式如下
// 記得using Microsoft.Extensions.Logging;
readonly ILogger<LINEBOTController> _log;
public LINEBOTController(ILogger<LINEBOTController> log)
{
_log = log;
}
[HttpPost]
public async Task<IActionResult> Post(dynamic request
{
string x = Convert.ToString(request);
_log.LogInformation(x);
return Ok(request);
}
– 執行程式後,打開IIS Express,確認PORT號
– 打開命令提示字元,切換到ngrok目錄下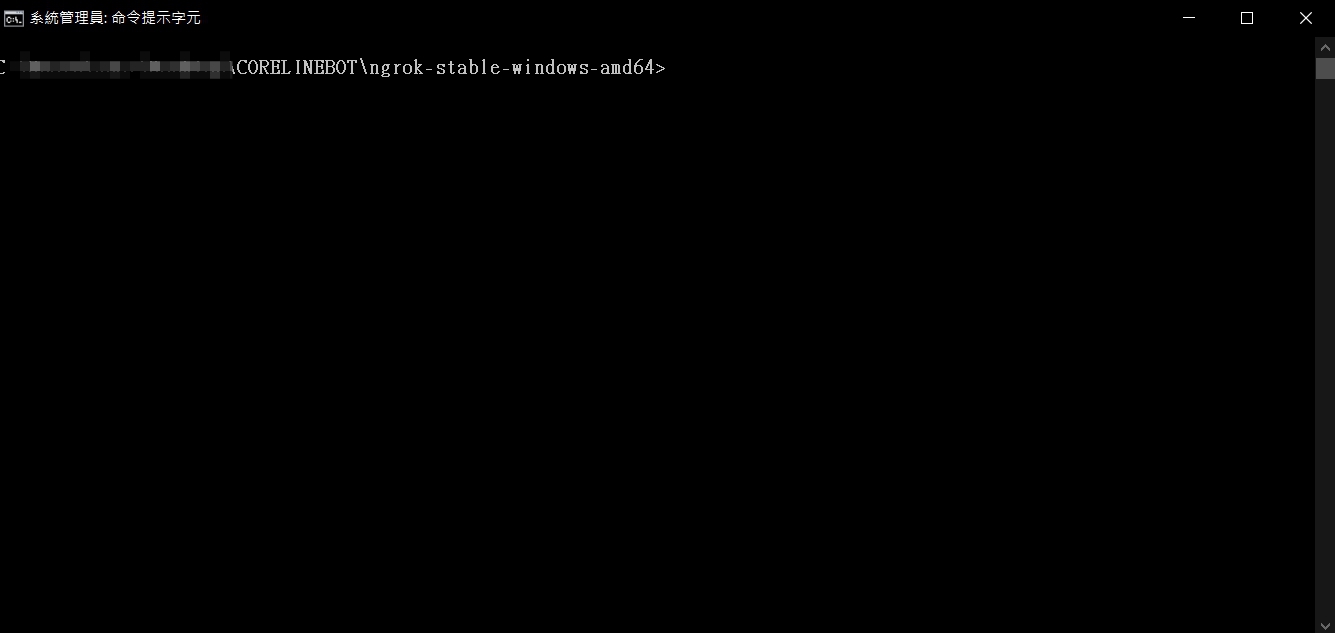
– 執行命令(記得Port號改成自己對應)
`!ngrok http 33766 -host-header=”localhost:33766″`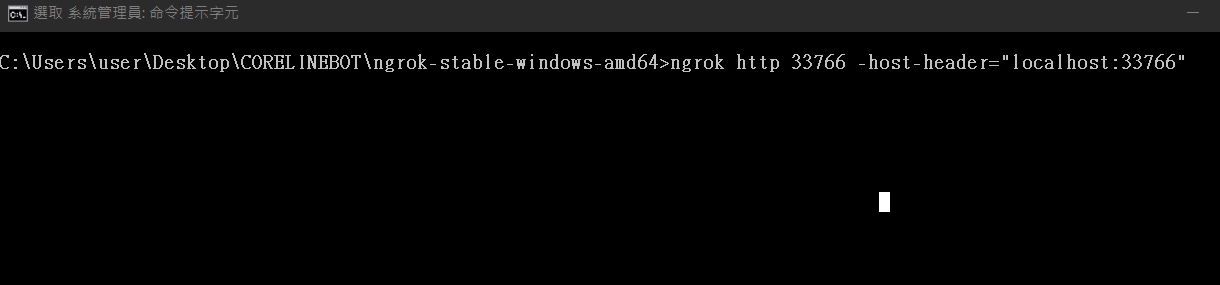
– 執行後,會取到一個https開頭網址,記下來後(不要關閉視窗)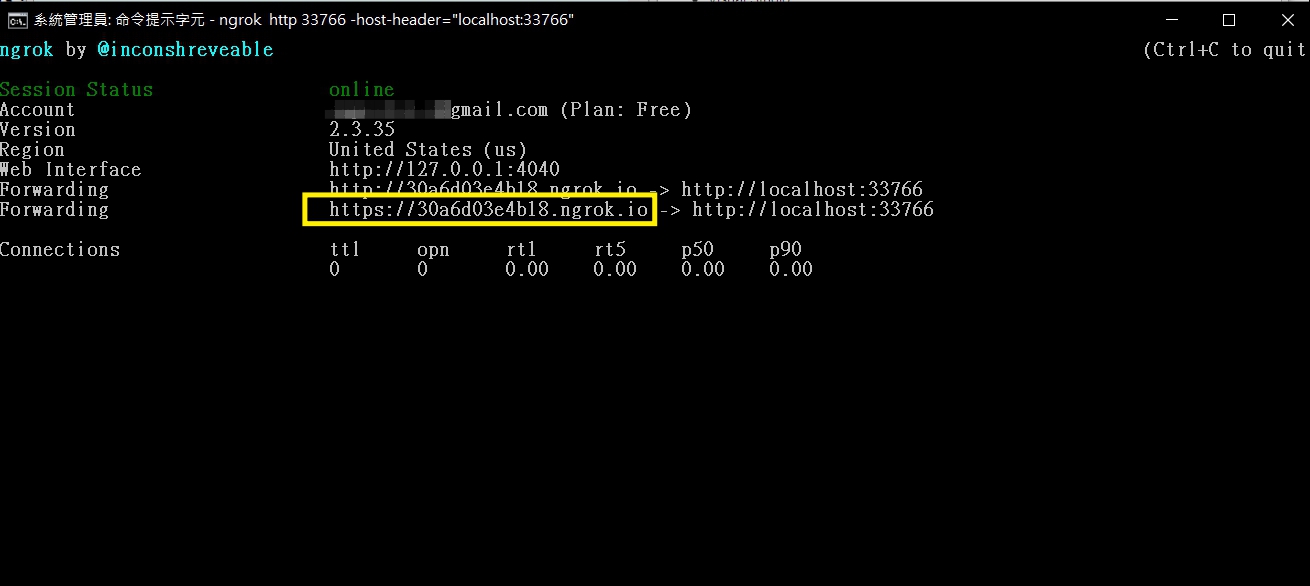
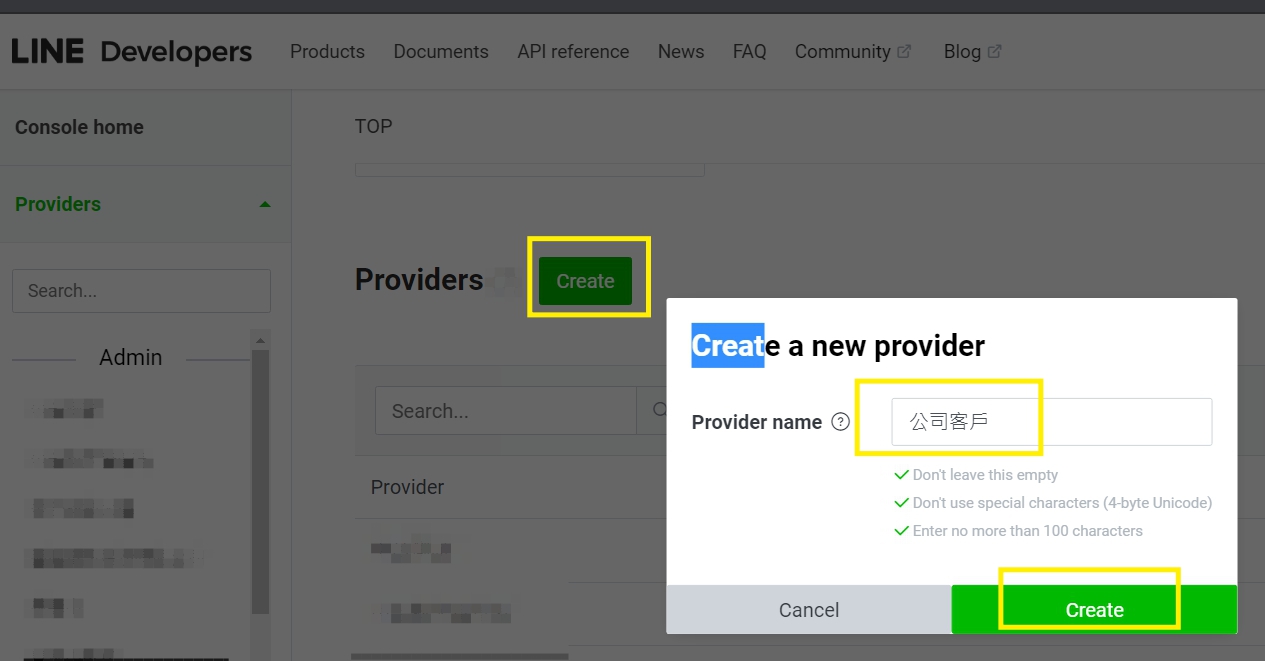
– 進到LINE Developer網址,新增Provi![]
– 新增一個 Messaging API的Channel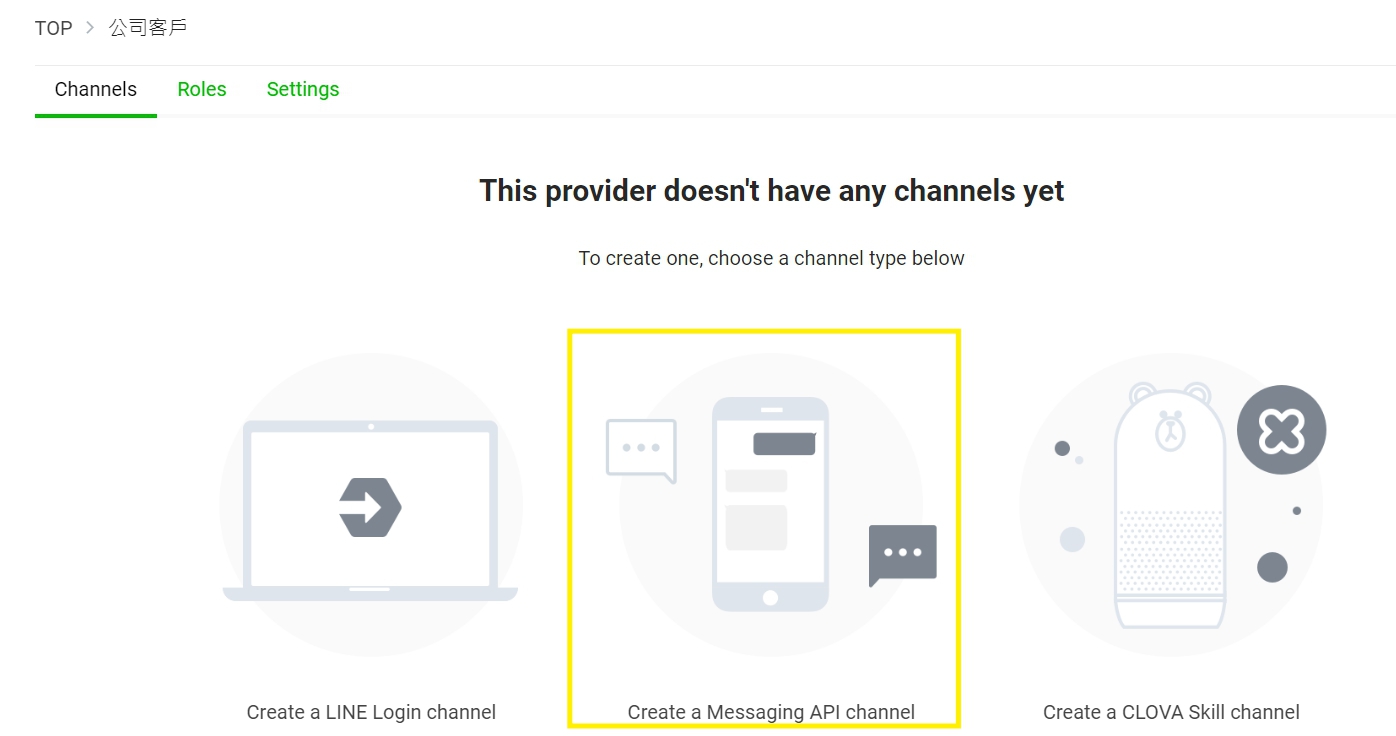
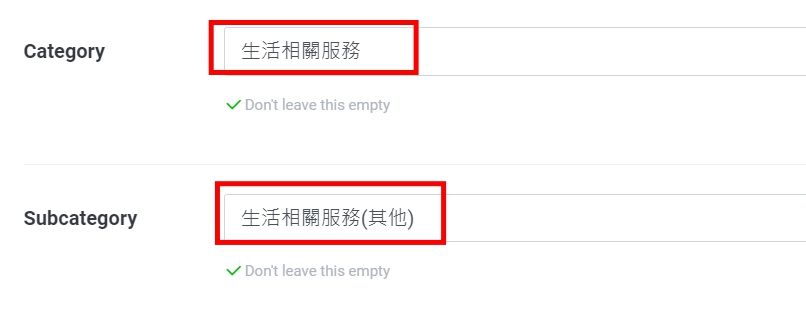
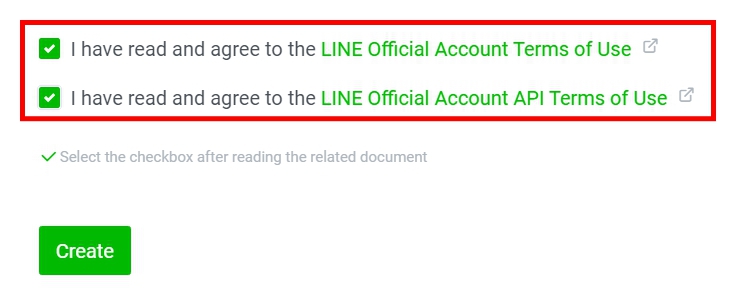
– 設定名稱與描述、目錄、子目錄後勾選允許相關條款後按Create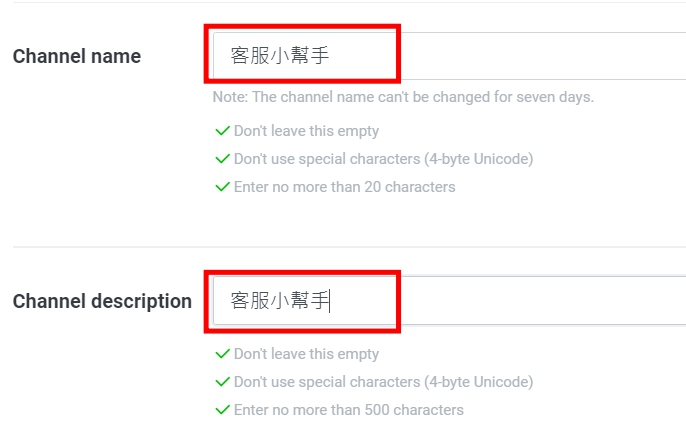
– 最後同意使用資訊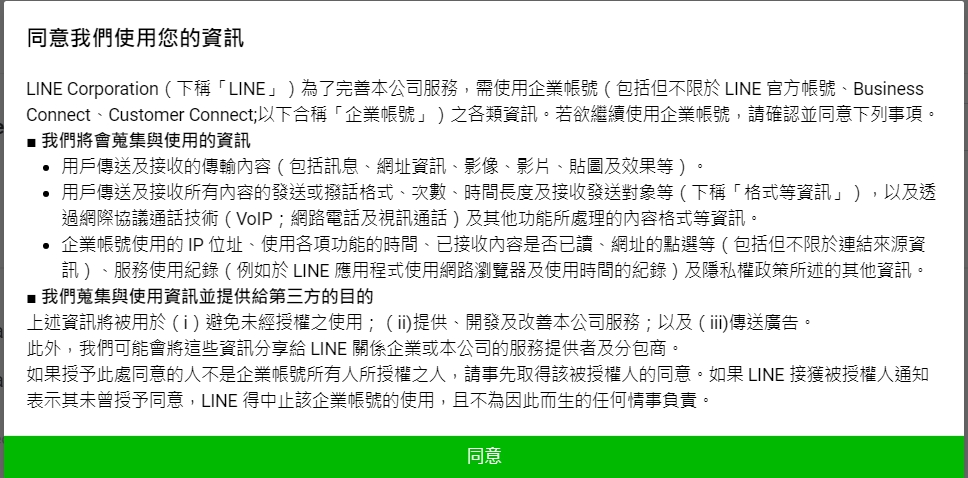
– 建立完成後進到MessagingAPI頁籤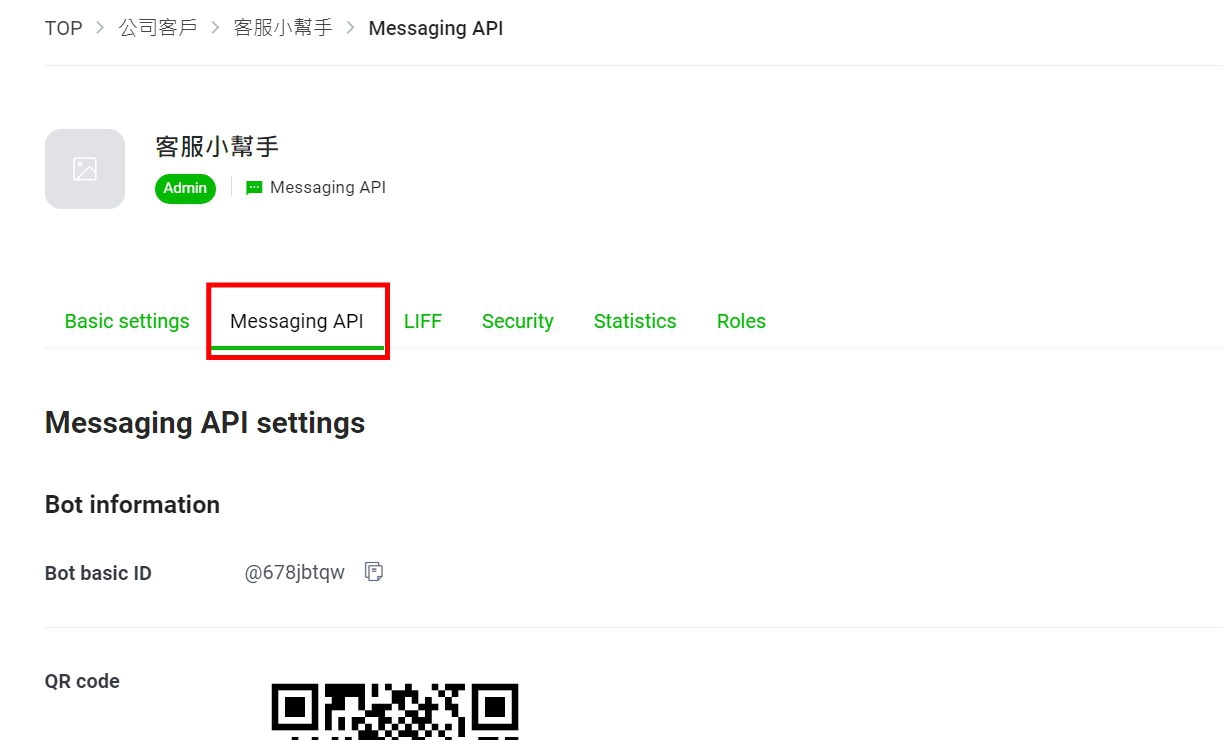
– 修改以下內容
– 允許加入群組或多人聊天室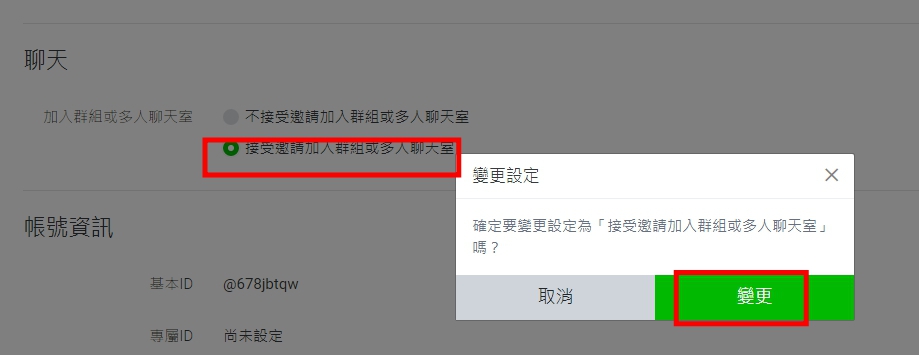
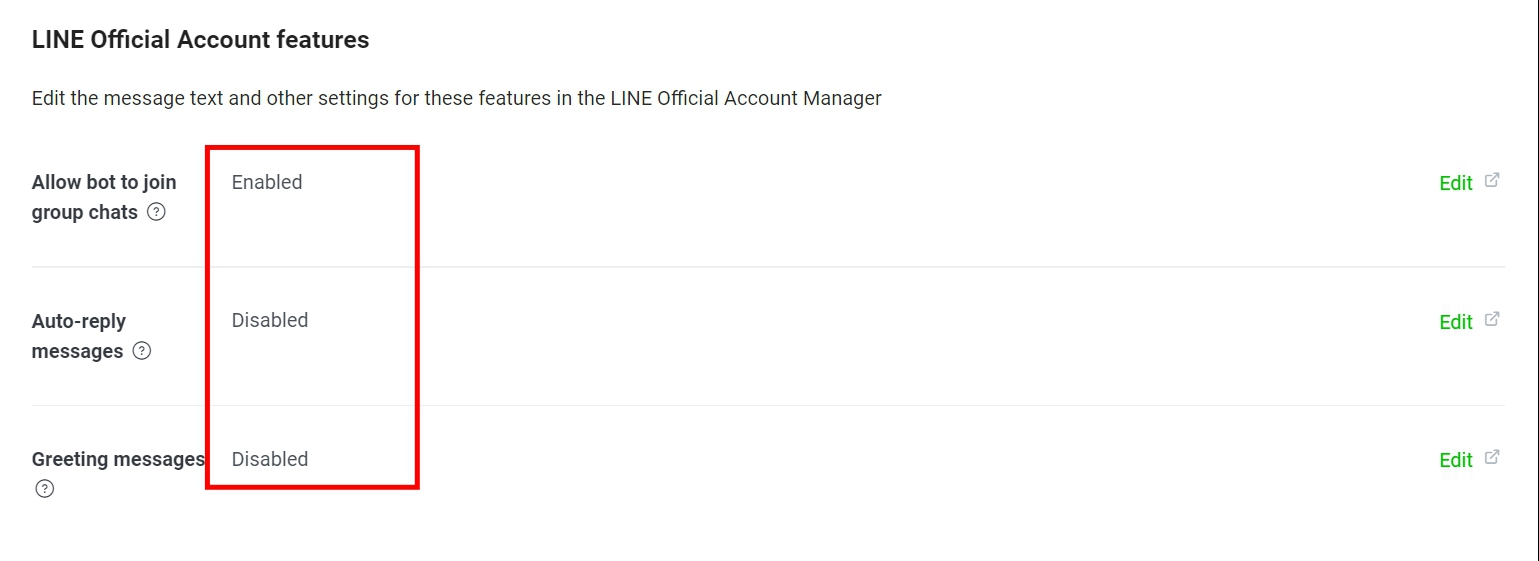
– 停用加入好友訊息以及自動回應訊息,啟用webhook功能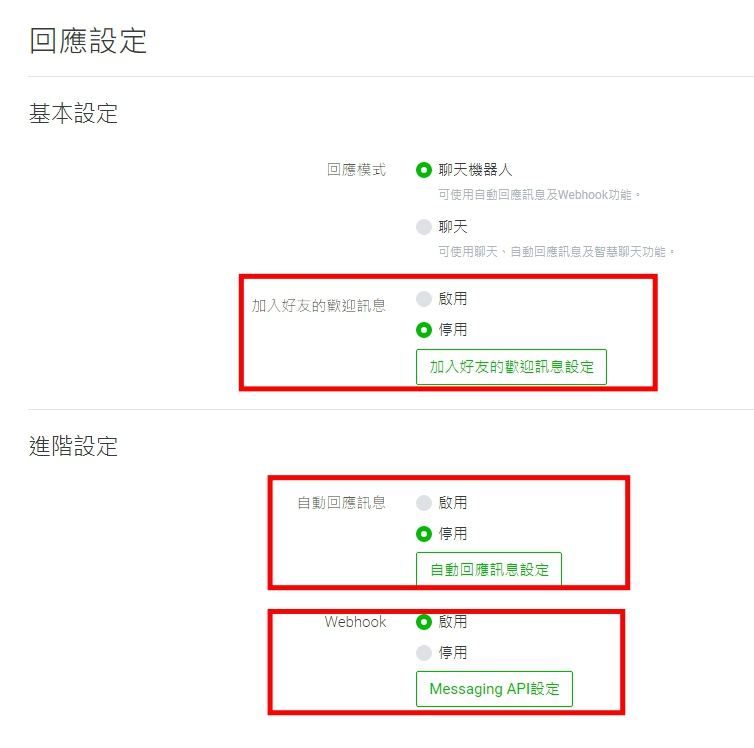
– 加webhook URL輸入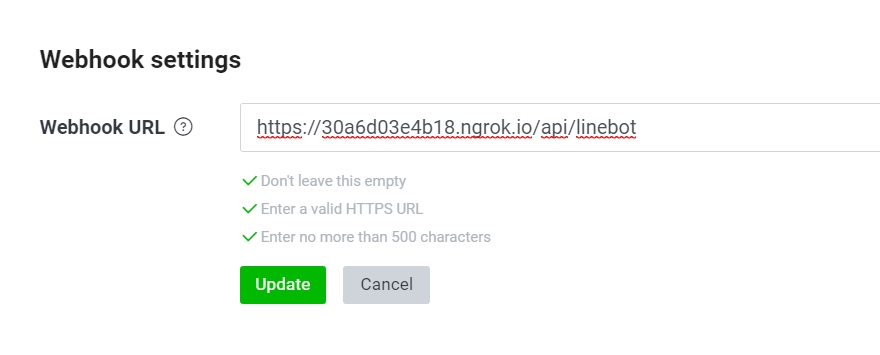
– 輸入確定後按Verify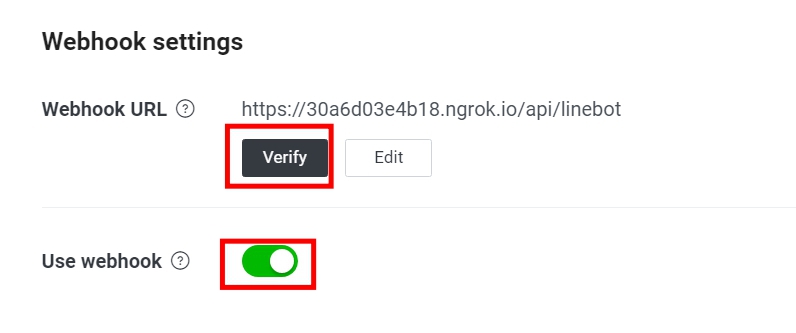
– 出現 307 Temporary Redirect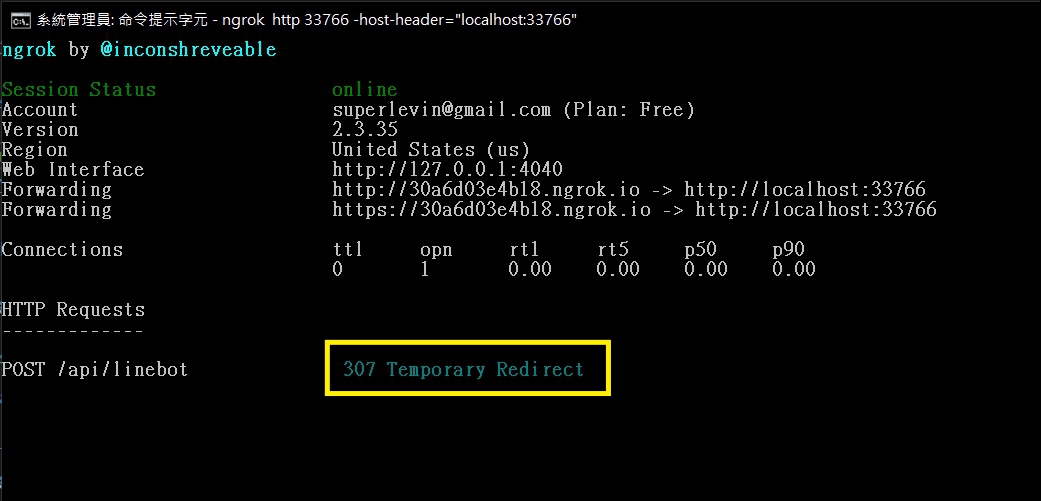
– Startup.cs中的 app.UseHttpsRedirection() 註解,重新開啟程式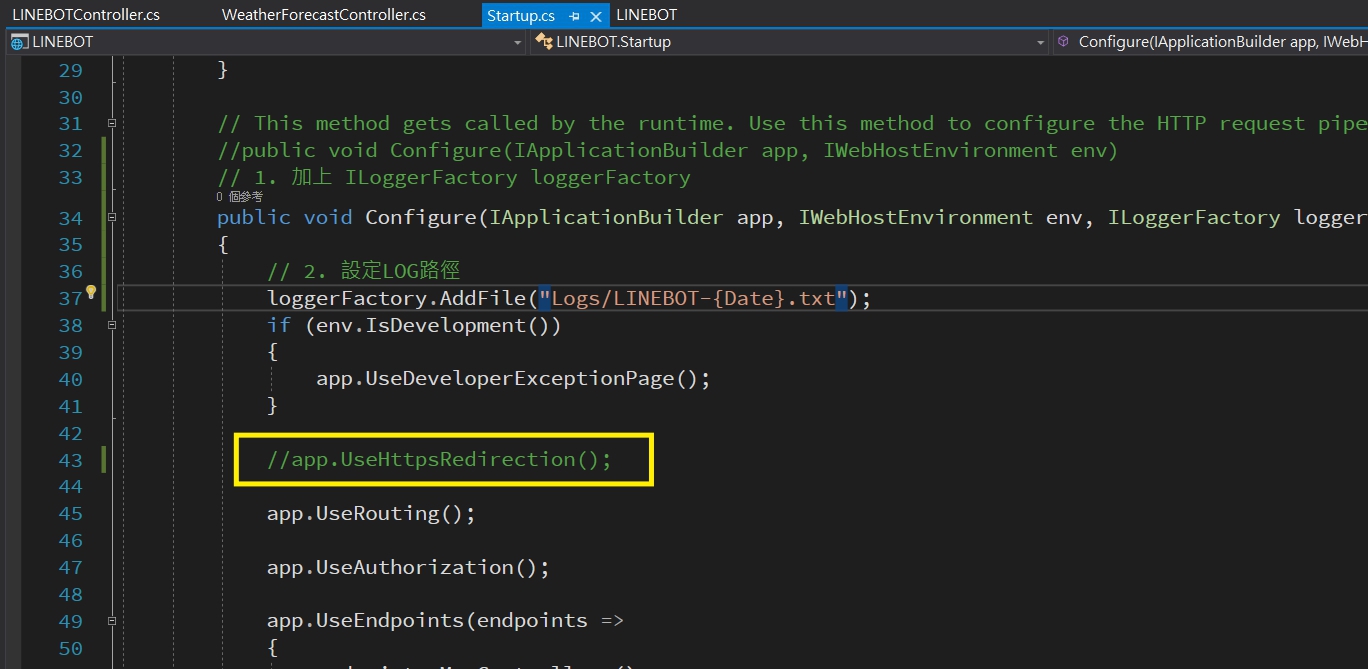
– 重新驗證後成功!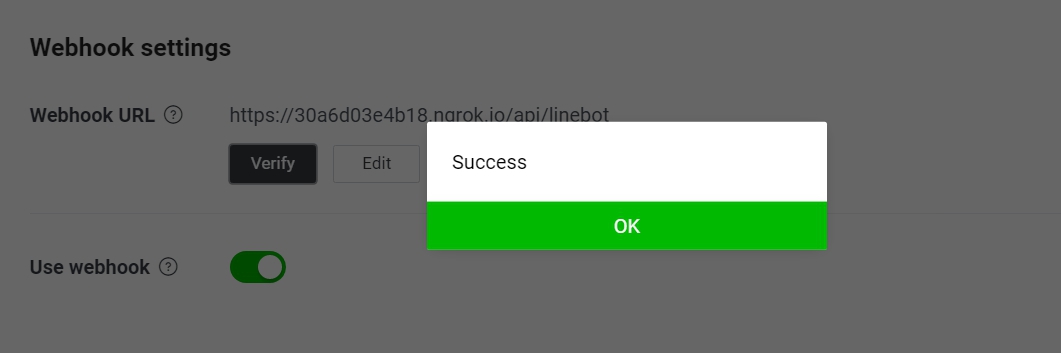
– 從LOG看到LINE傳來的驗證訊息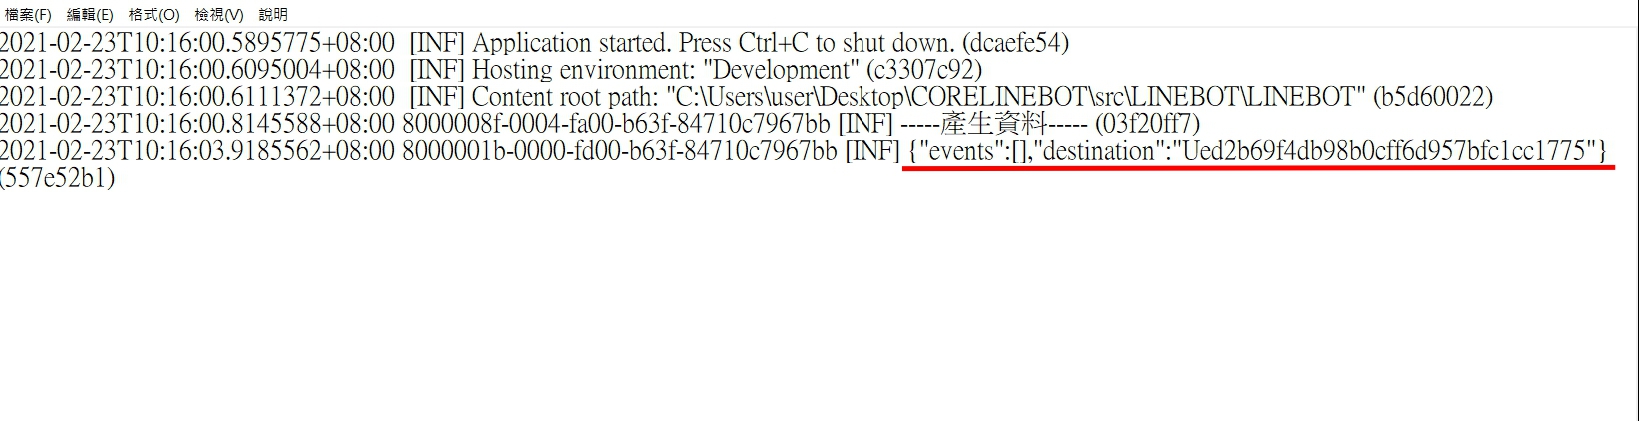
## 回聲蟲
– 從開發者網站中的Messaging API得知如何做[回應reply](https://developers.line.biz/en/docs/messaging-api/sending-messages/#reply-messages)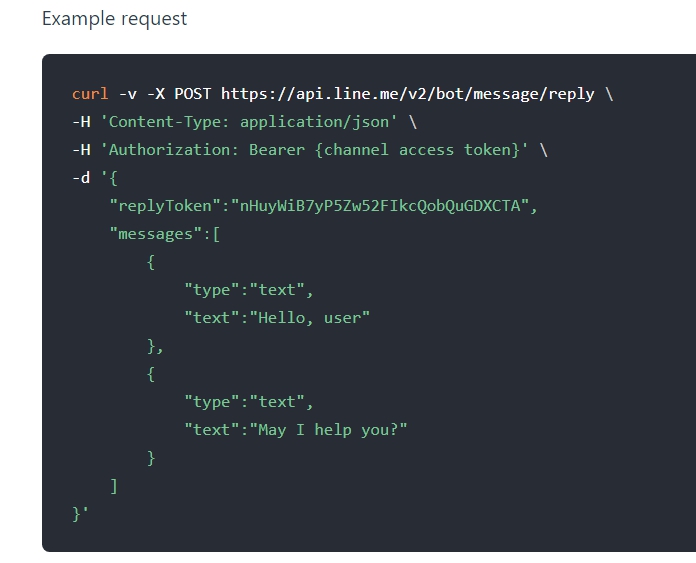
– 安裝 NewtonSoft.Json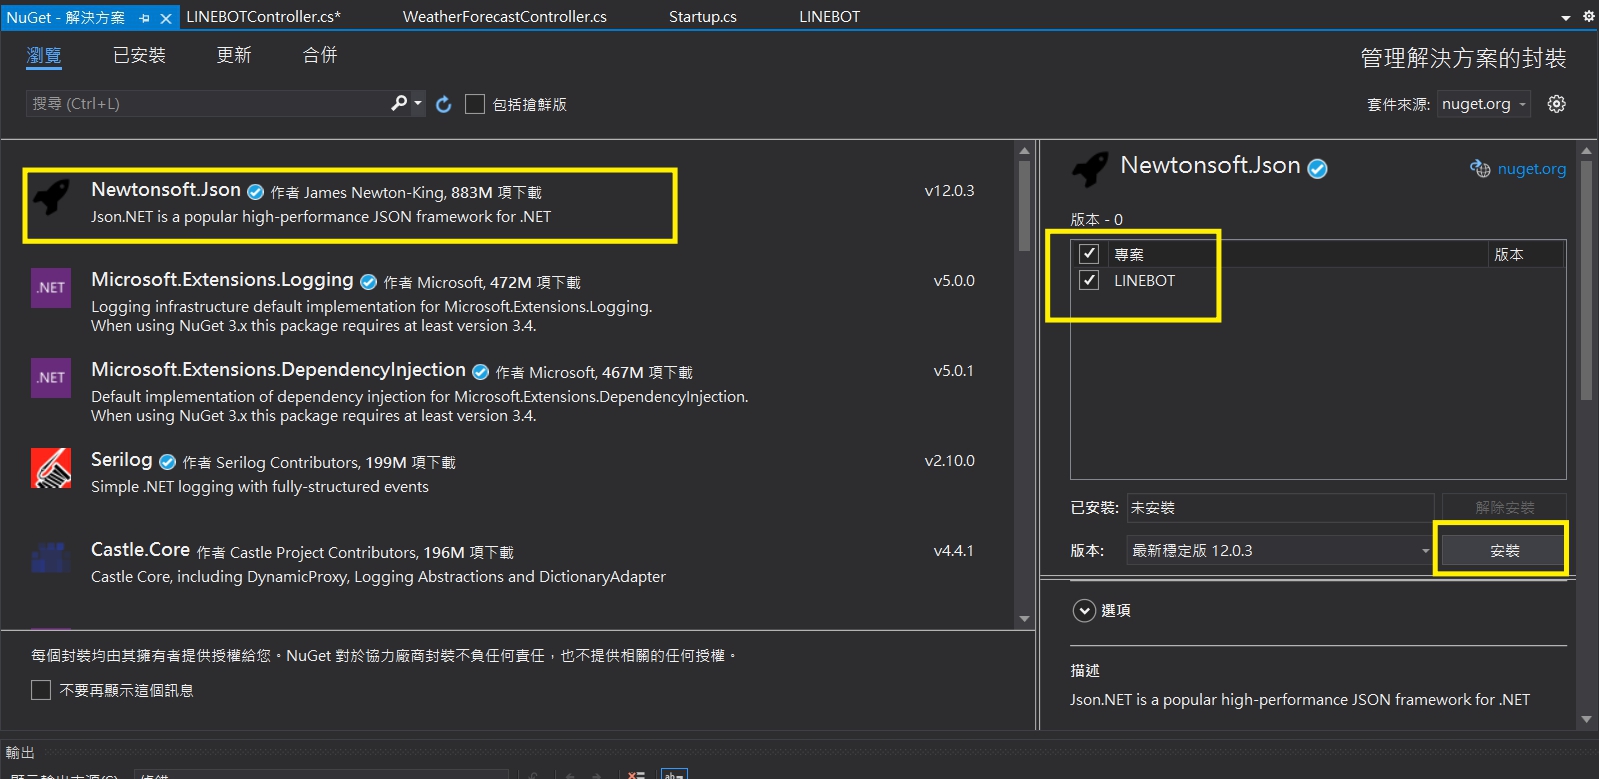
– 到LINE DEVELOPER中取得TOKEN複製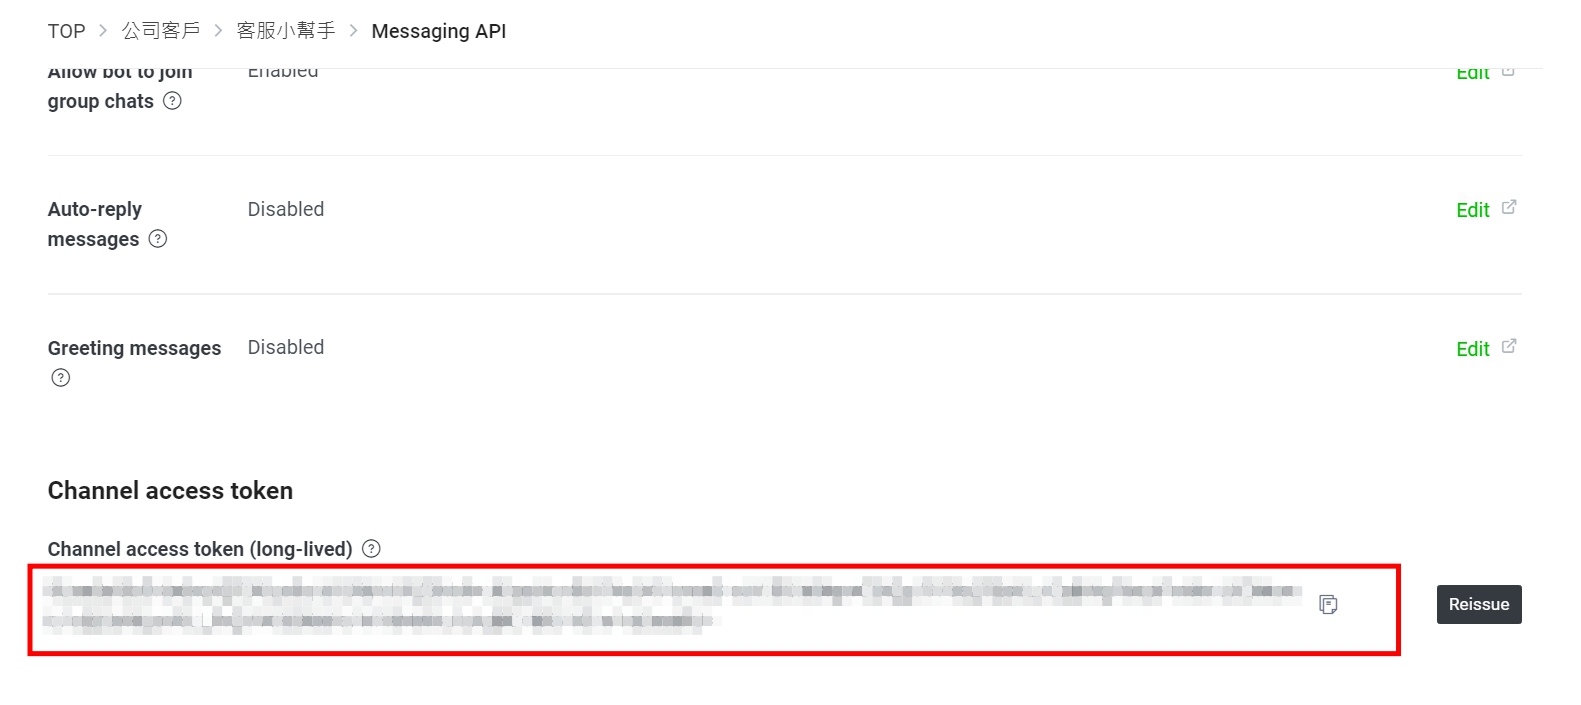
– 加上程式如下
–
public class LineReceivedMessage
{
public List<Event> events;
public LineReceivedMessage()
{
events = new List<Event>();
}
}
public class Event
{
public string type { get; set; }
public Source source { get; set; }
public EventMessage message { get; set; }
public string replyToken { get; set; }
public Event()
{
source = new Source();
message = new EventMessage();
}
}
public class Source
{
public string userId { get; set; }
}
public class EventMessage
{
public string id { get; set; }
public string type { get; set; }
public string text { get; set; }
}
– 修改POST函數如下
public async Task<IActionResult> Post(dynamic request)
{
string x = Convert.ToString(request);
_log.LogInformation(x);
var channelAccessToken = “你的TOKEN”;
var receivedMessage = JsonConvert.DeserializeObject<LineReceivedMessage>(x); // 收到訊息解成物件
string userid = receivedMessage.events[0].source.userId; // 取得使用者ID
string message = receivedMessage.events[0].message.text; // 取得文字訊息
var replyToken = receivedMessage.events[0].replyToken; // 取得回應TOKEN
var replyMessage = new
{
replyToken = replyToken,
messages = new object[] { new {
type = “text”,
text = message
}
}
};
string s = JsonConvert.SerializeObject(replyMessage); // 轉為JSON字串
byte[] bytes = Encoding.UTF8.GetBytes(s);
WebClient webClient = new WebClient();
webClient.Headers.Clear();
webClient.Headers.Add(“Content-Type”, “application/json”);
webClient.Headers.Add(“Authorization”, “Bearer ” + channelAccessToken);
webClient.UploadData(“https://api.line.me/v2/bot/message/reply”, bytes);
return Ok(request);
}
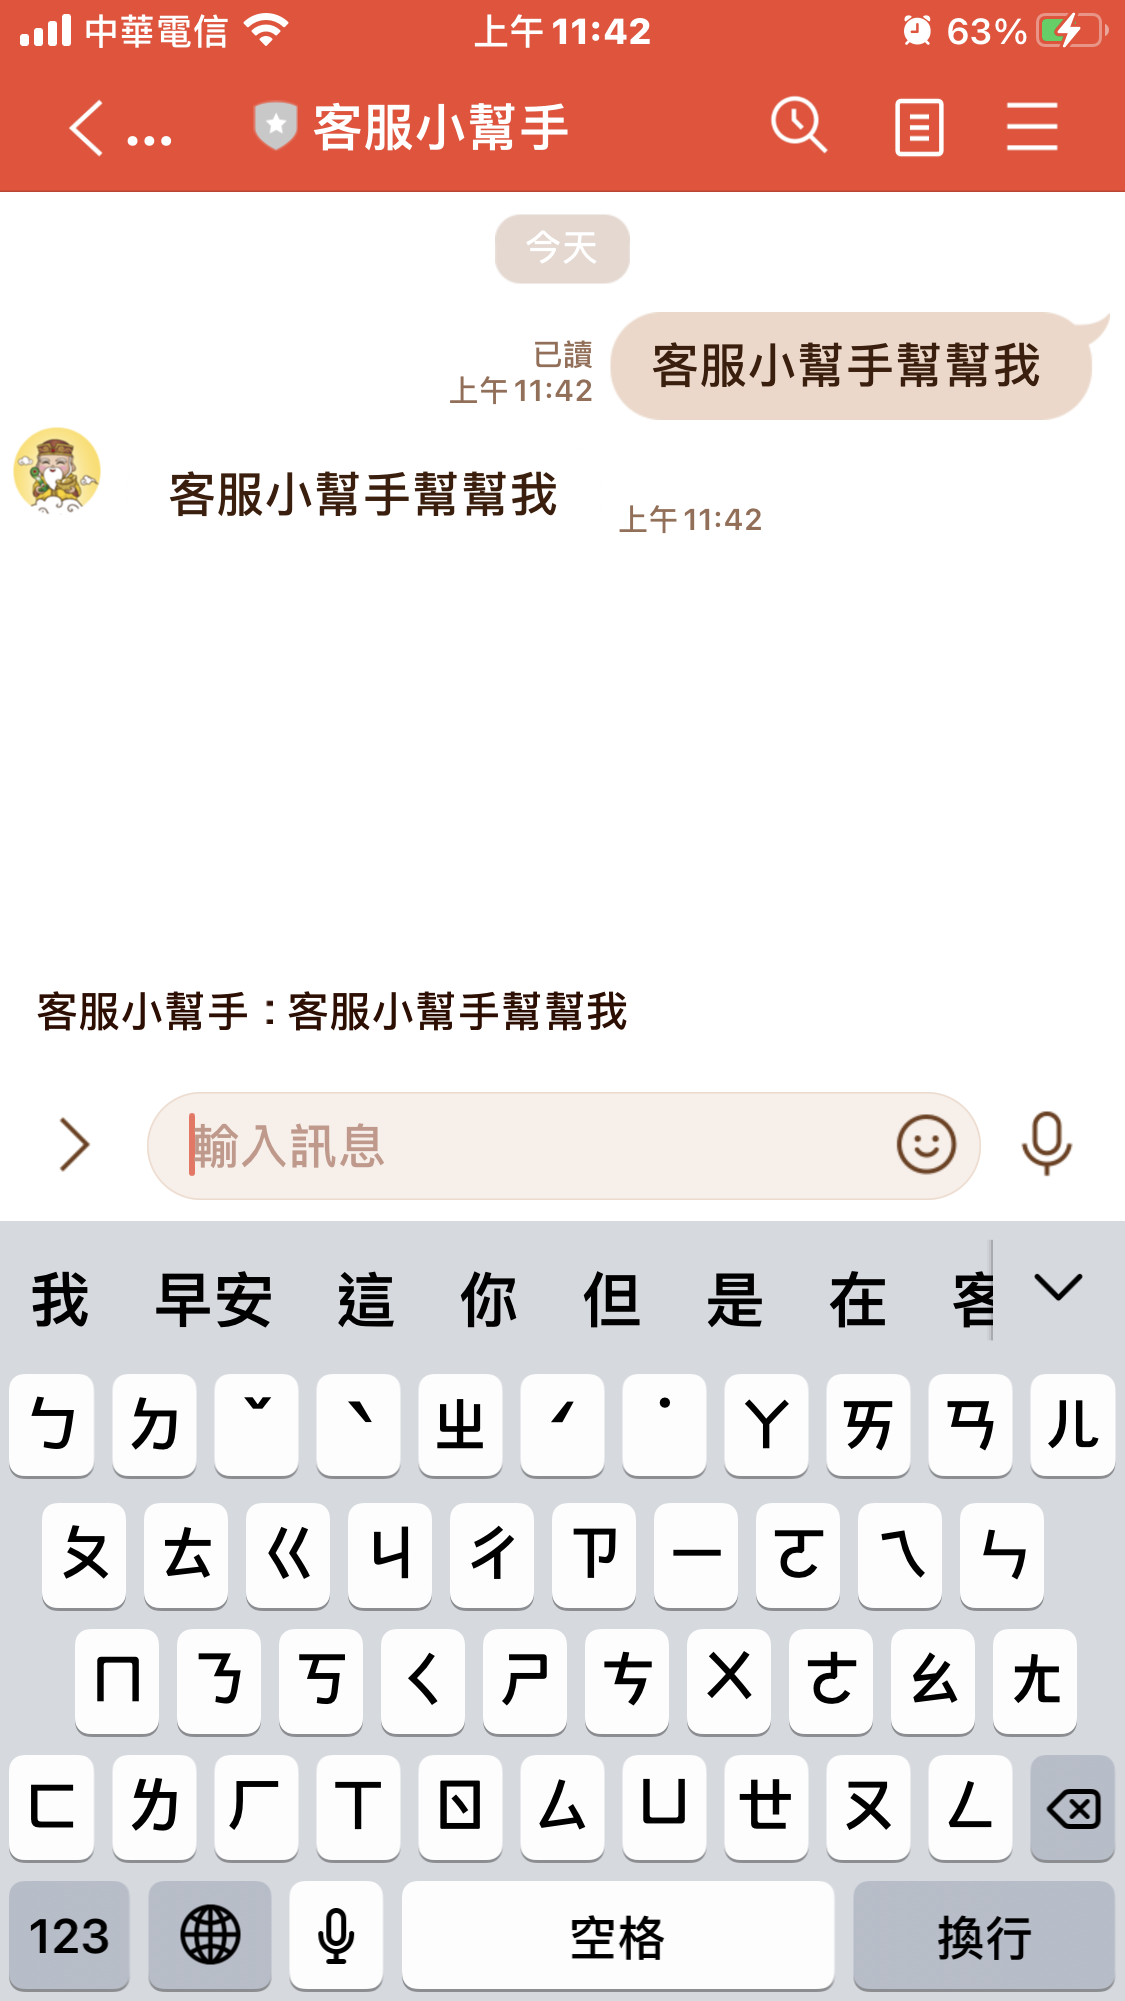
– 結果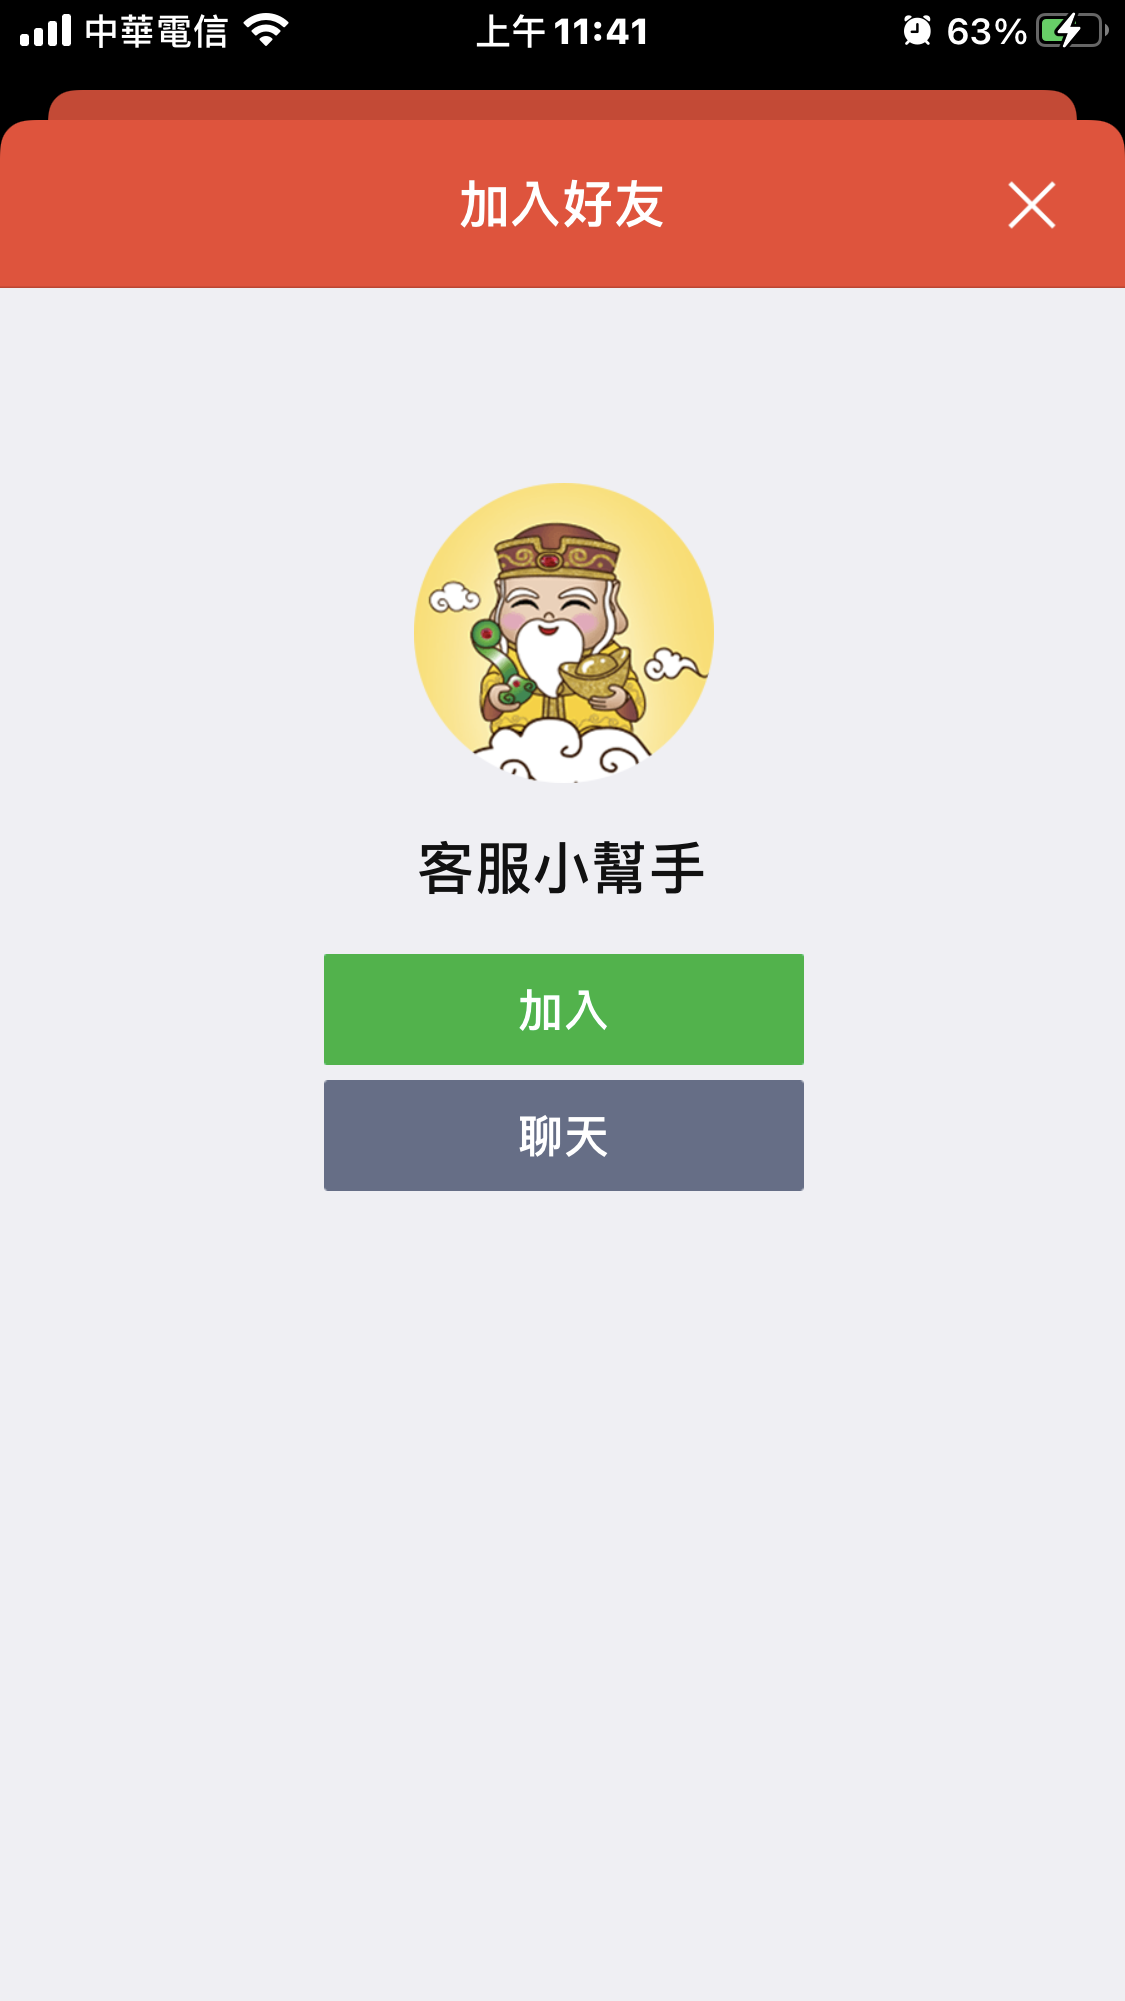
##參考資料:
LINE DEVELOPER API文件
[https://developers.line.biz/zh-hant/docs/messaging-api/](https://developers.line.biz/zh-hant/docs/messaging-api/ “https://developers.line.biz/zh-hant/docs/messaging-api/”)
使用asp.net core 開發LINE BOT時,使用ngrok做本機的服務器時,驗證Webhook出現錯誤。ngrok出現 307 Temporary Redirect的錯誤!
解決方式:
Starup.cs中有一句app.UseHttpsRedirection(); 前面加上 // 註解掉就可以了
參考:
ngrok http [port] -host-header="localhost:[port]"SSL Server Authentication 事件中
Accept := True;
System.Timer 宣告後,如果要處理Form上的元件
會出現需要invoke才能設定的問題。原因是因為UI執行緒與timer不同
網路上一堆解法,結果最單純的是System.Forms.Timer 宣告
timer與UI thread相同了
2020/9/30在embarcadero youtube頻道中發佈了一則Python4Delphi
Python4Delphi 主要作用可以透過Delphi運用 Python的library有:
