Oracle開發團隊釋出新的ODP.NET 支援Oracle Database 11g Release 2 (11.2.0.4) 以上的版本,包括免費的21c xe、21c ee跟 Autonomous DB.
ODP.NET Core for .NET 6 以及 ODP.NET EF Core for EF Core 6 都免費透過 NugetNU取得。
來源
Announcing Oracle Support for .NET 6 and Entity Framework Core 6
大型網站架構..net 架構師.rabbitMQ.redis.行動開發.APP開發教學.PHP Laravel開發..net core C# 開發.架構師之路.Delphi開發.資料庫程式.進銷存.餐飲POS系統
Oracle開發團隊釋出新的ODP.NET 支援Oracle Database 11g Release 2 (11.2.0.4) 以上的版本,包括免費的21c xe、21c ee跟 Autonomous DB.
ODP.NET Core for .NET 6 以及 ODP.NET EF Core for EF Core 6 都免費透過 NugetNU取得。
來源
Announcing Oracle Support for .NET 6 and Entity Framework Core 6

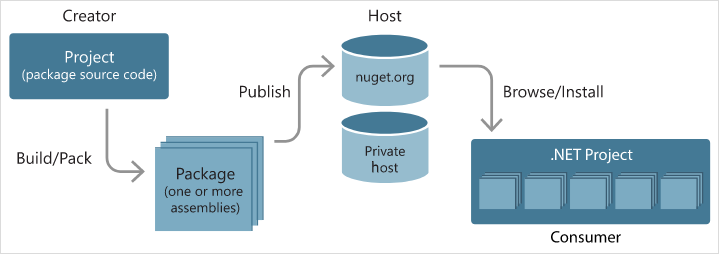
Nuget(https://www.nuget.org/)是微軟Open出來的一個套件管理機制,NuGet 套件就是副檔名為 .nupkg 的單一 ZIP 檔案,內含已編譯程式碼 (DLL)、其他與該程式碼相關的檔案,以及包含套件版本號碼這類資訊的描述性資訊清單。
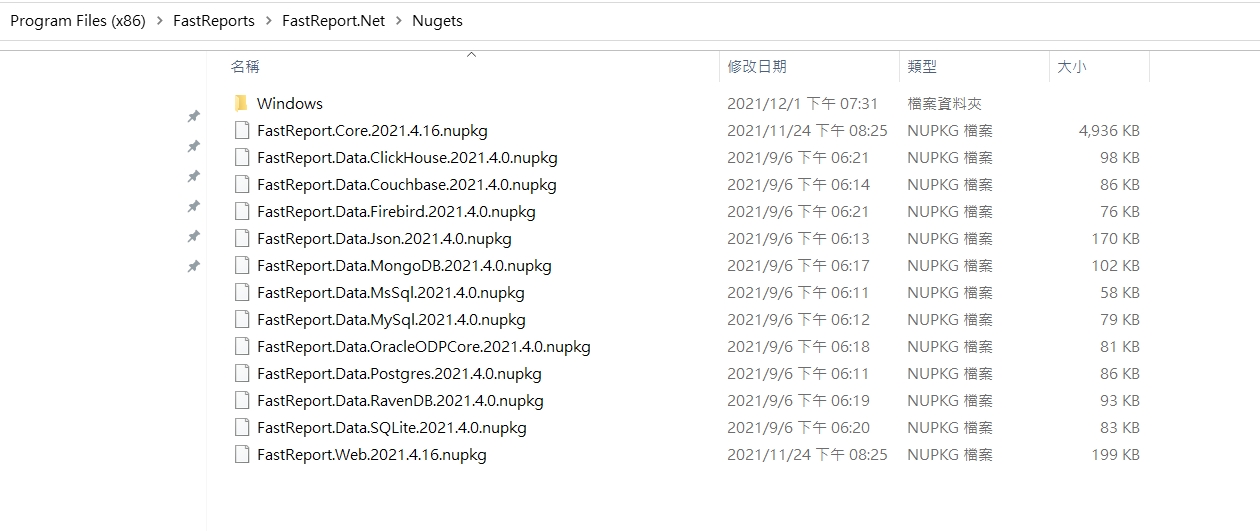
安裝FastReport完成後在資料夾看到有一個Nugets的資料夾
工具→Nuget套件管理員→套件管理員設定
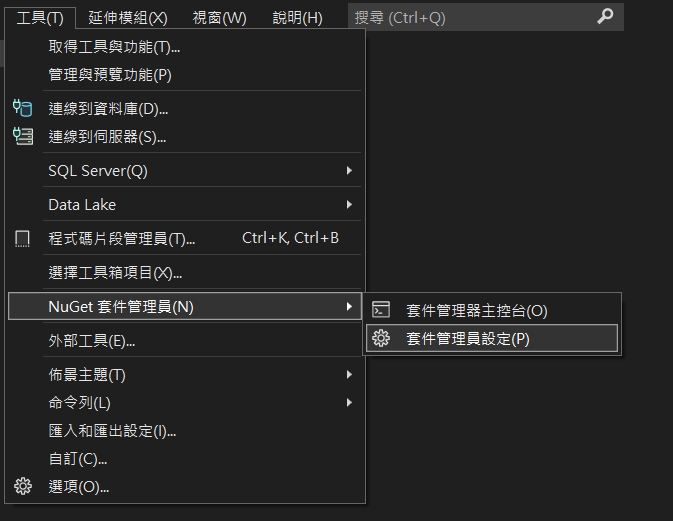
套件來源新增一個Name: FastReport 位置指向剛才的資料夾
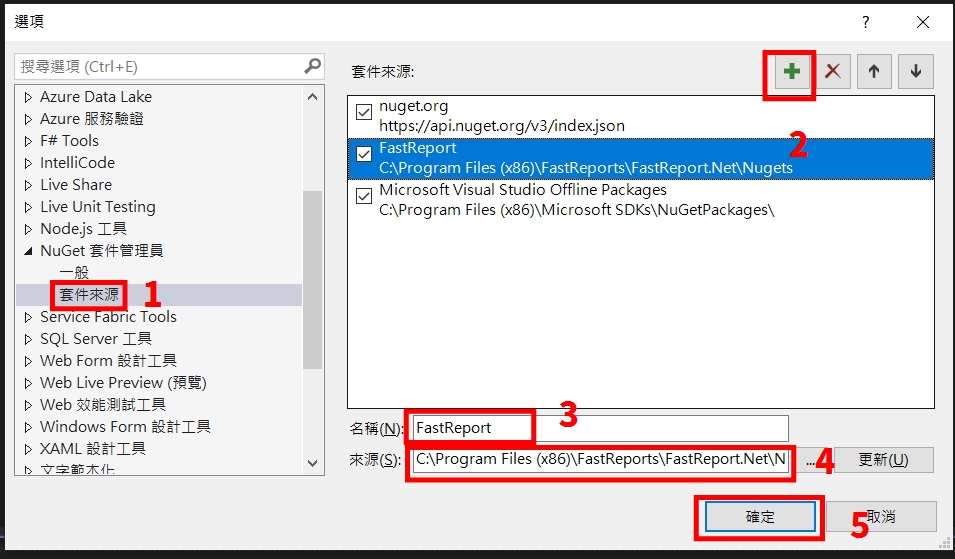
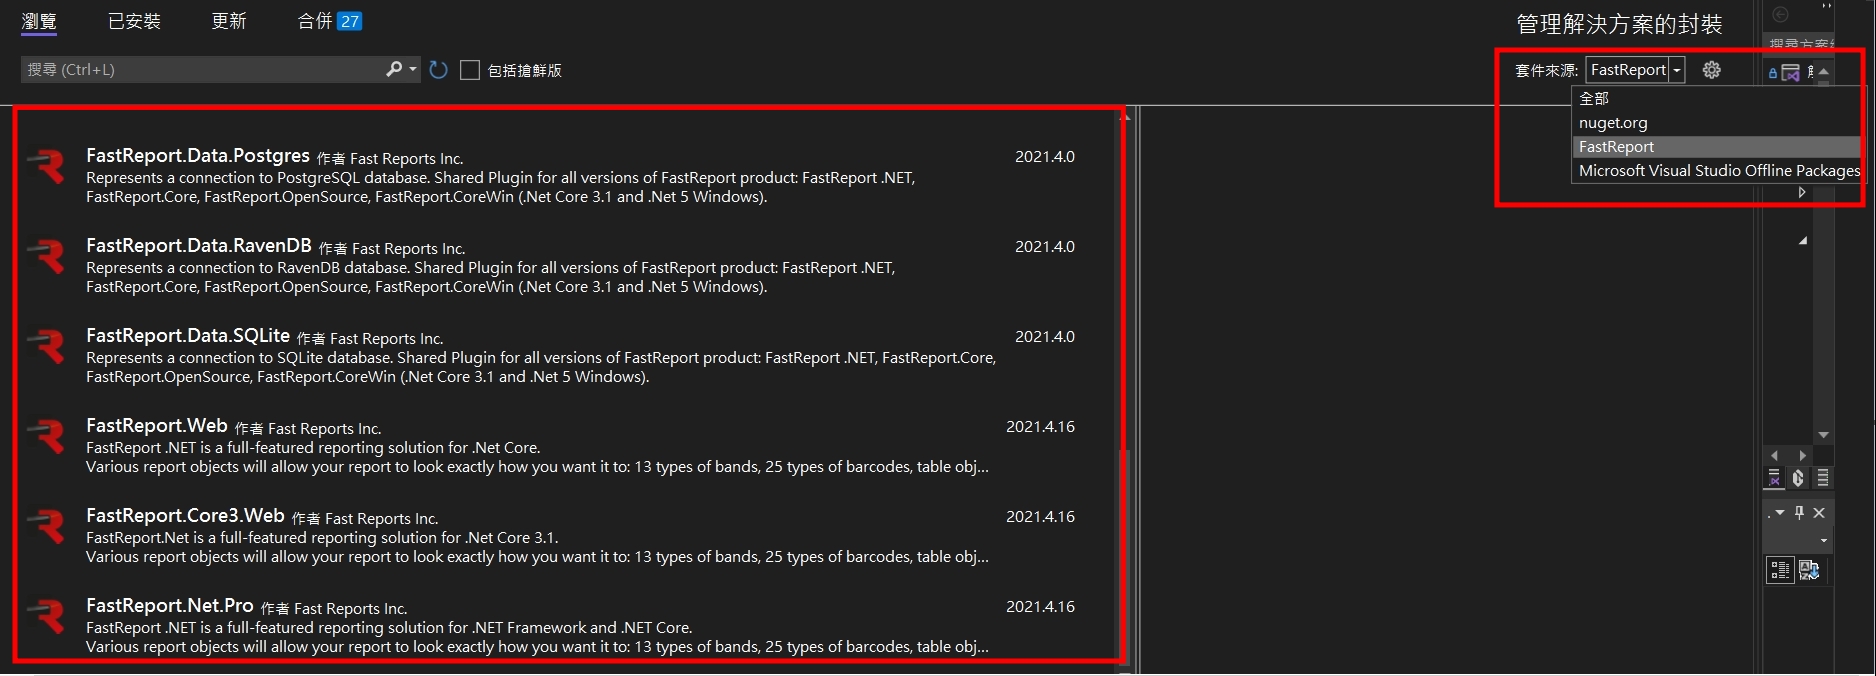
下拉套件來源,選擇剛才新增的FastReport,就可以選到我們購買的元件了
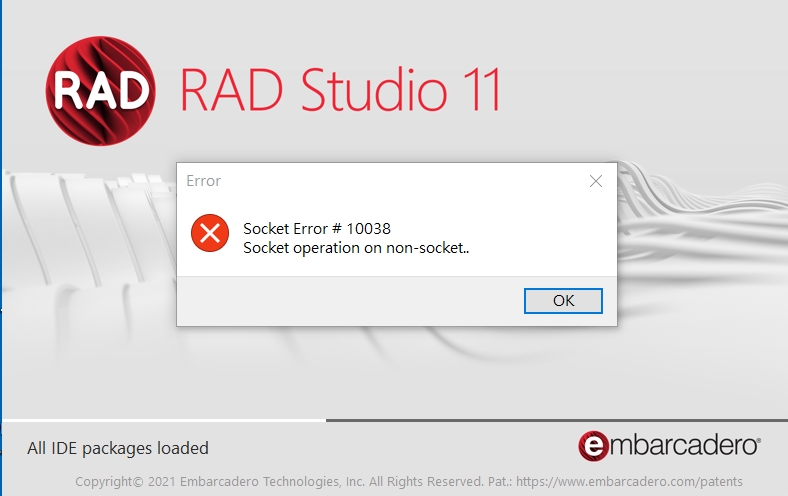
最近安裝完Delphi 11後,一開啟IDE就跳出一個 Socket Error #10038. Socket operation on non-socket的錯誤,接著就無法開啟IDE惹。
感謝捷康的eddie幫忙,處理掉問題,處理的方式是到 regedit 登錄檔編輯器中。依序進入 HKEY_CURRENT_USER \ SOFTWARE \ Embarcadero \ BDS \ 22.0 \ Known IDE Packages ,然後在列表裡找到一個 $ (BDS) \ Bin \ LivePreview280.bpl 接著點二下進入編輯,在名字前面加上二個底線”__” 變成 “__Embarcadero FireUI Live Preview Package”就可以了!終於可以順利操作Delphi 11了 🙂
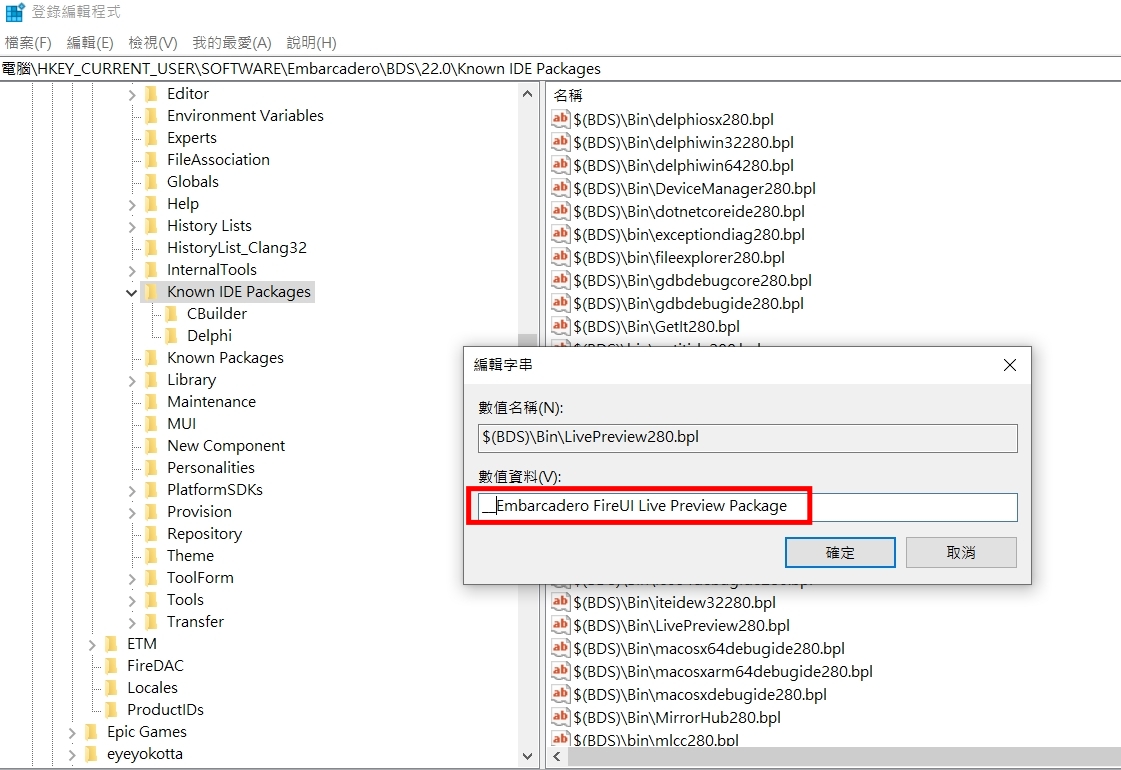
相關連結:
Delphi 10.4.1 Socket Error on IDE Start
https://en.delphipraxis.net/topic/4535-delphi-1041-socket-error-on-ide-start/
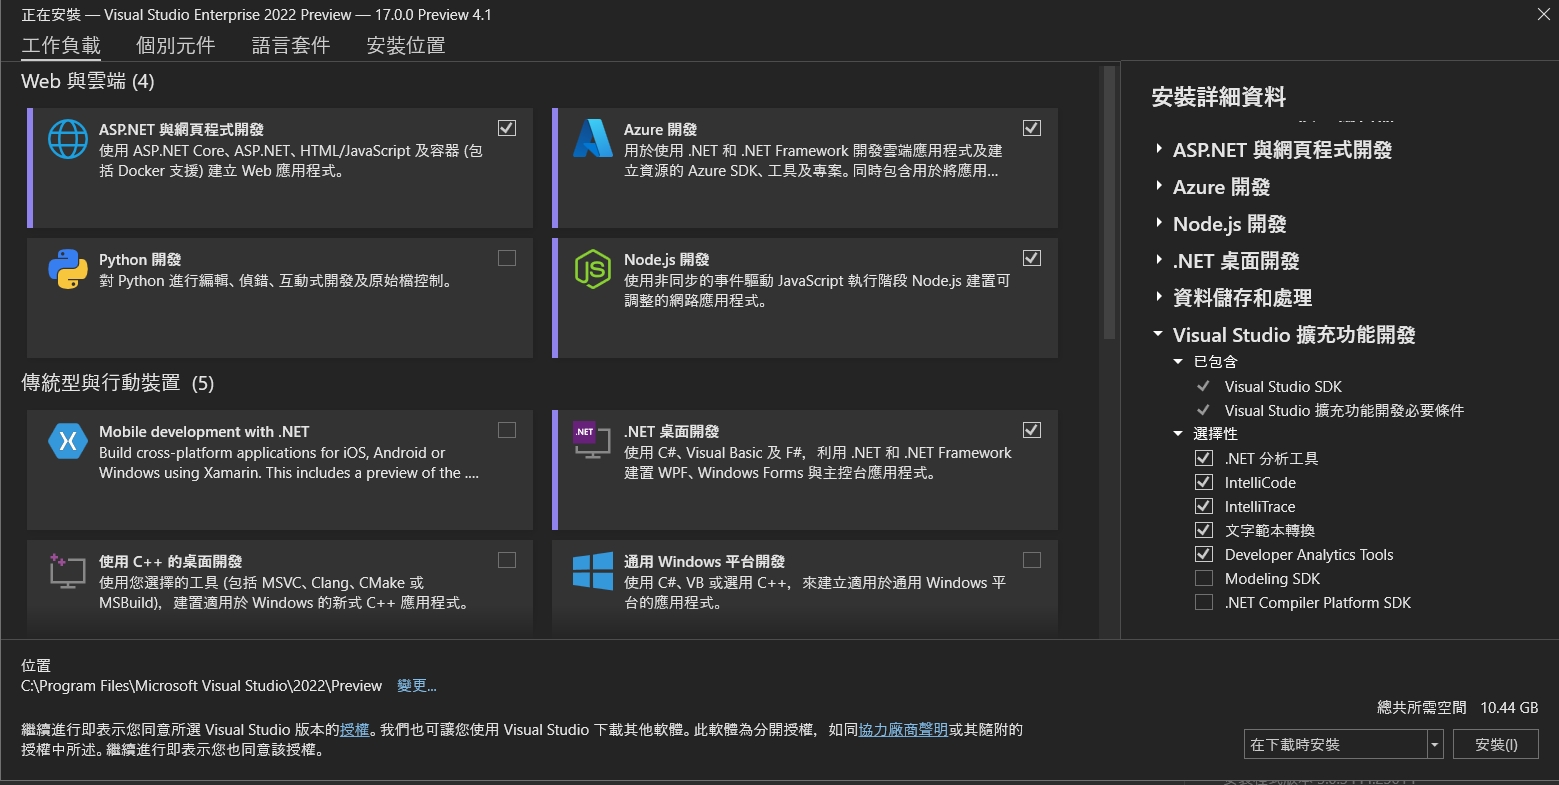
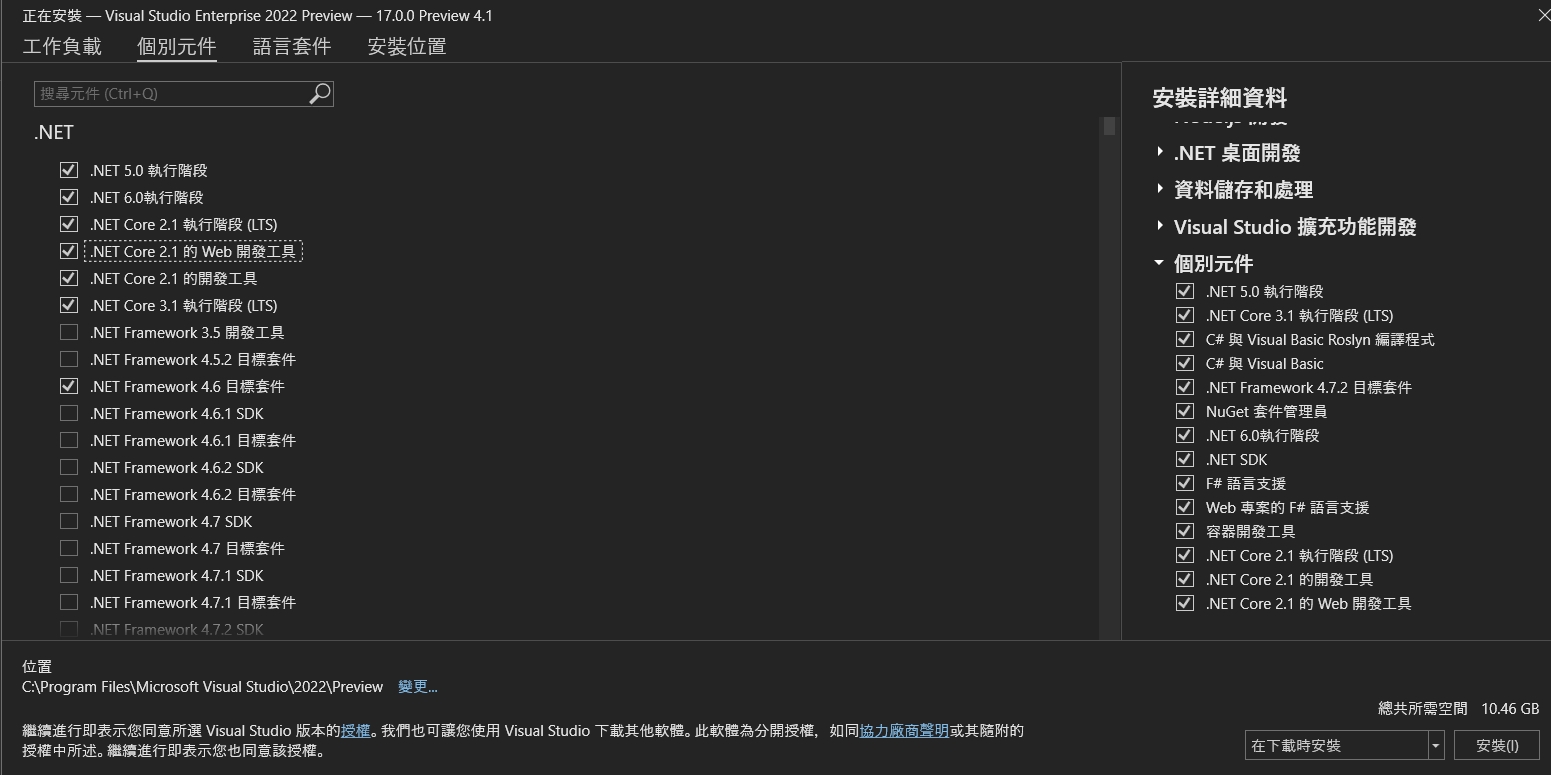
因為Visual Studio2022 預覽版本是跟著.net 6綁一起,於是下載預覽版試用。

下載後開啟在標題列可以看到是 Visual Studio Enterprise 2002 Preview ,版本號是17.0.0 Preview 4.1。在第一個分頁工作負載中,依照自己開發需求去勾選你要開發的項目以及平台有那些,這邊我勾的是ASP.NET/Azure/Node.js/.net desktop/database等等。
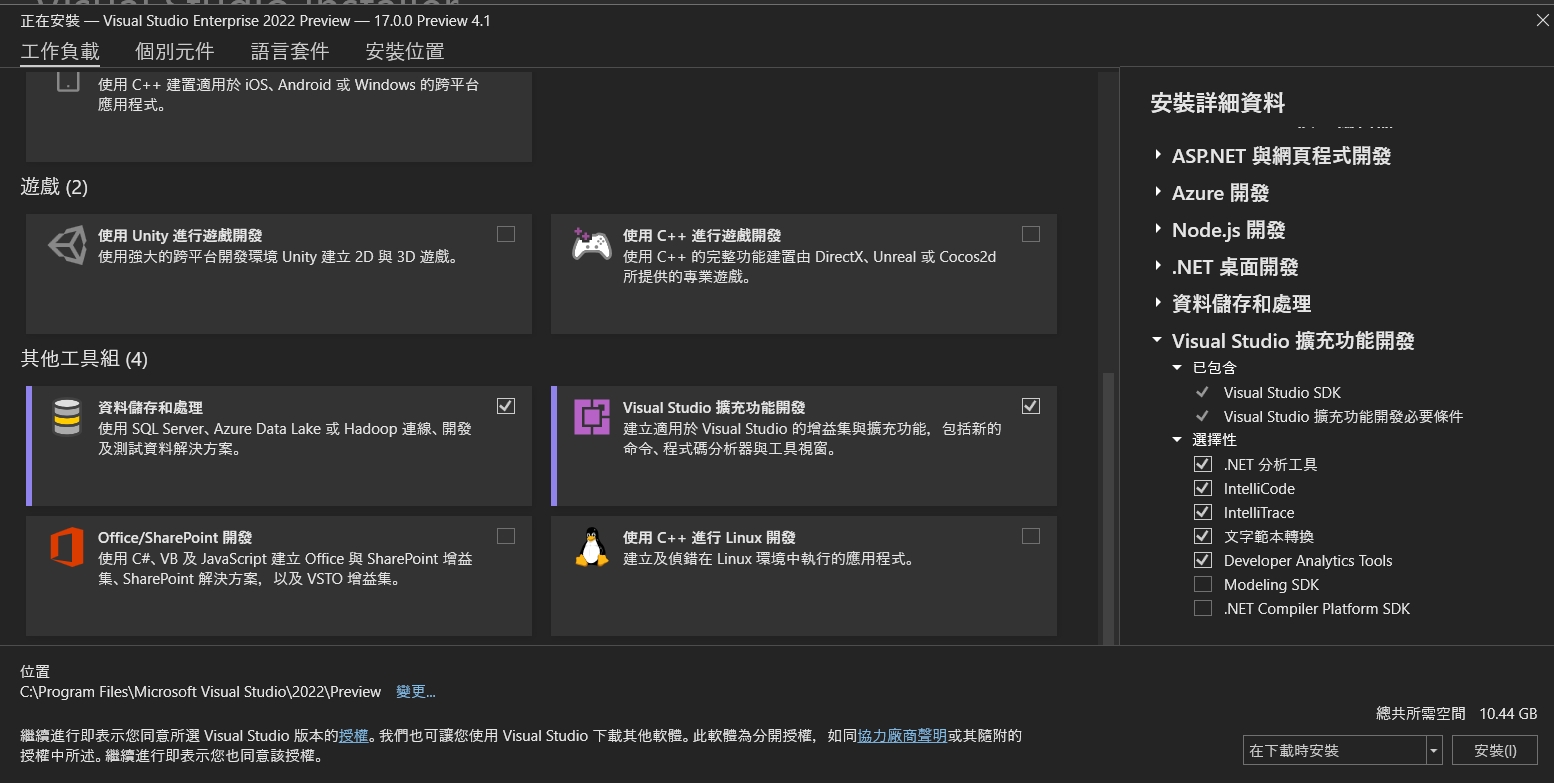
第二個頁籤個別元件的話,在.net的部份預設是勾選.net 6,如果你的舊專案有舊的版本要維護,記得要把相對應的套件勾選起來
接著在程式碼工具中,可以勾選像Code Map/程式碼複製品Code Clone跟類別設計工具Class Design。
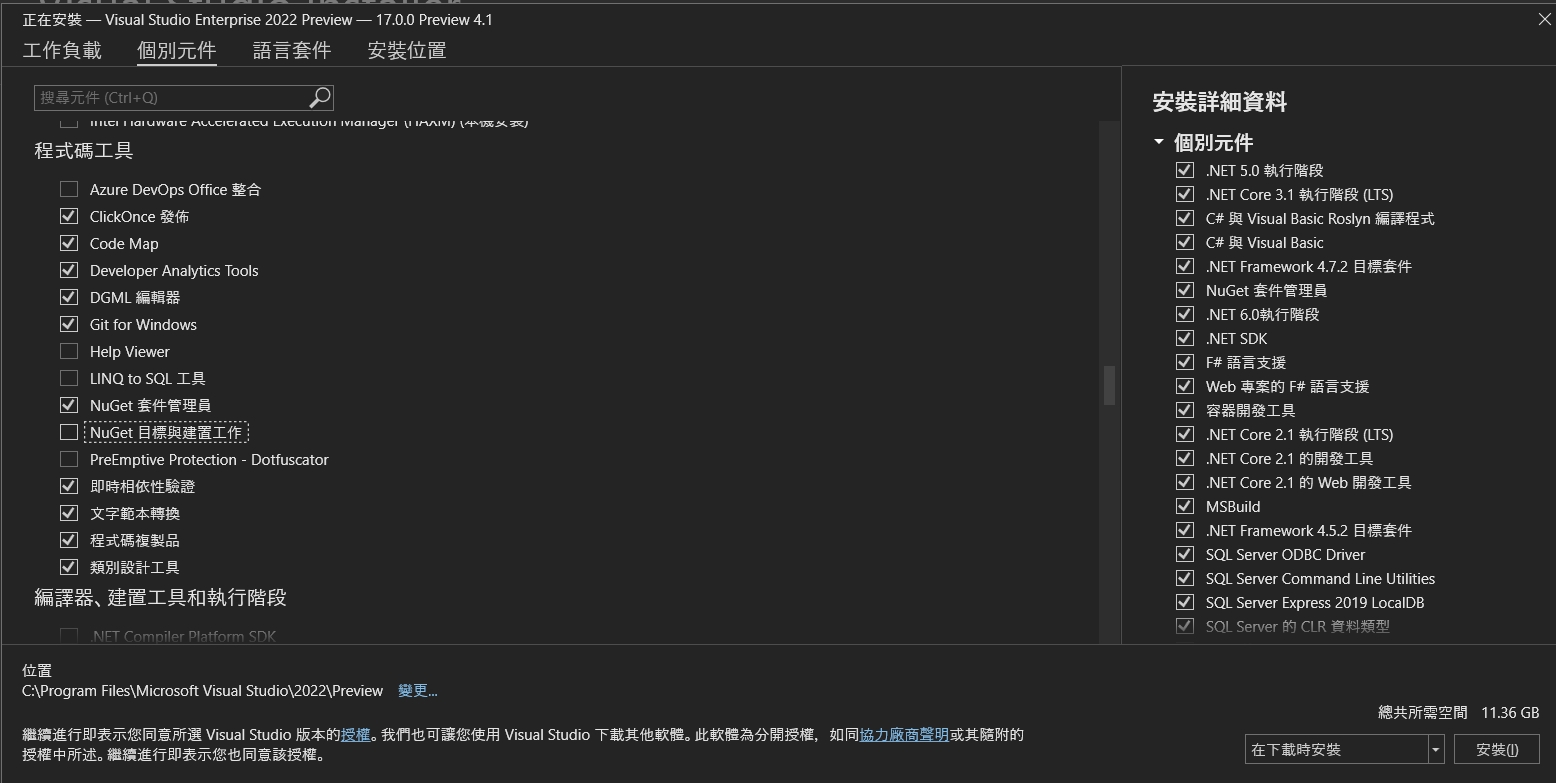
語言套件就不說了XDD 可以增加英文語系讓自己看起來厲害點(誤
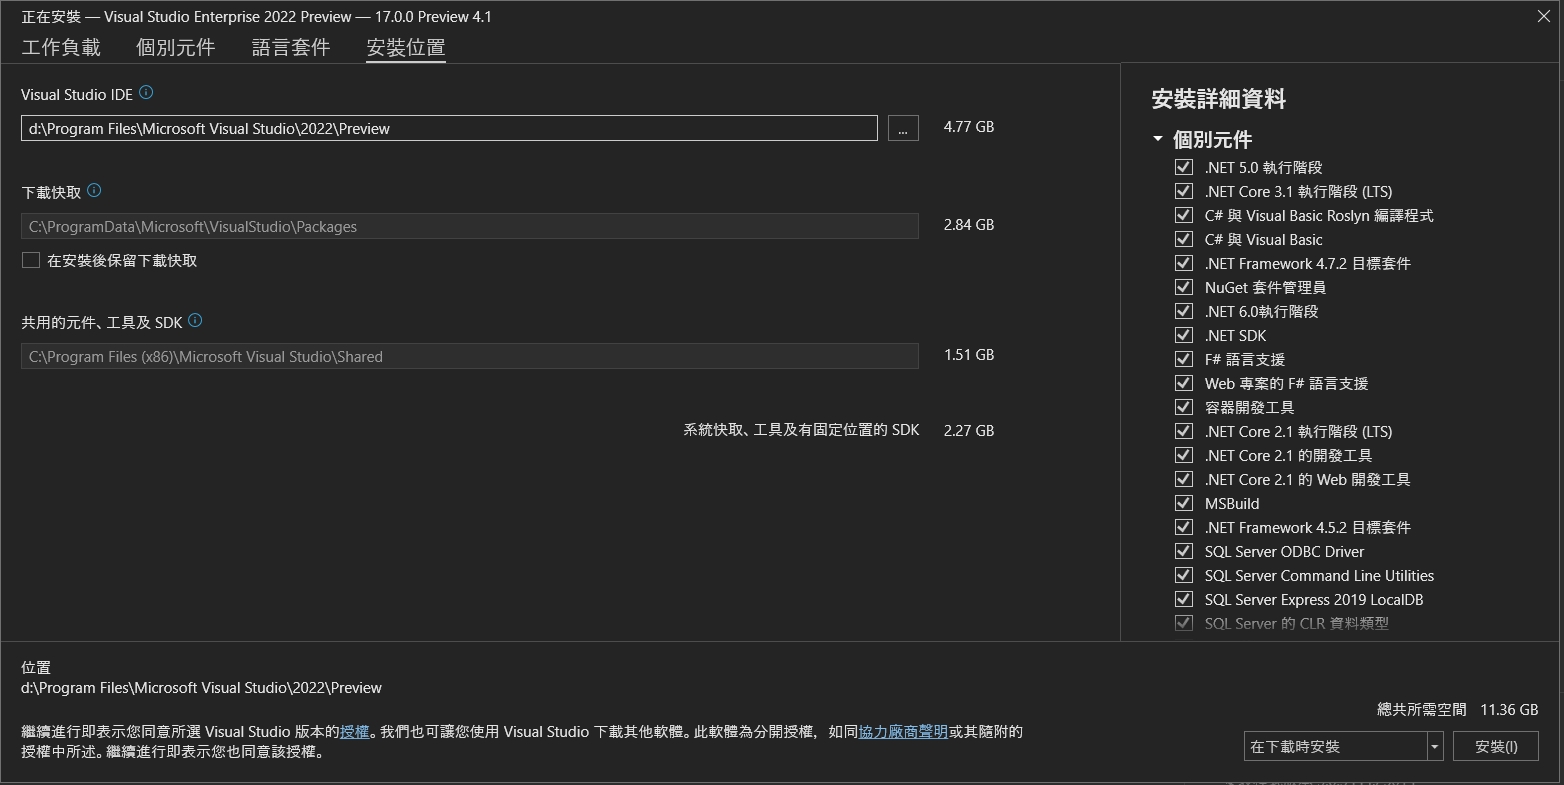
安裝位置的話,預設是C槽,如果要安裝到別的地方的話就可以調整下。右下角顯示大小是11.36G,沒問題就按下安裝去泡杯咖啡吧(喂!要上班呀
我就看著它裝B XDDD
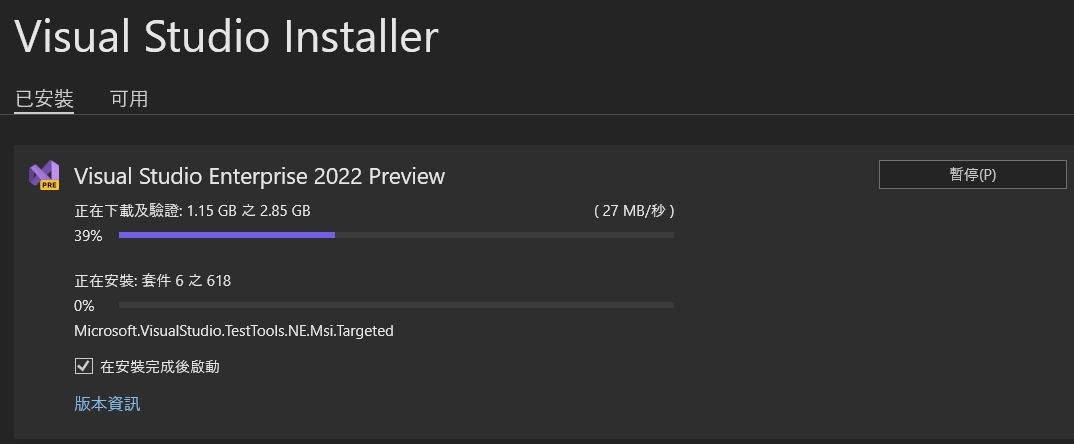
經過了77四十九天後,安裝完畢了
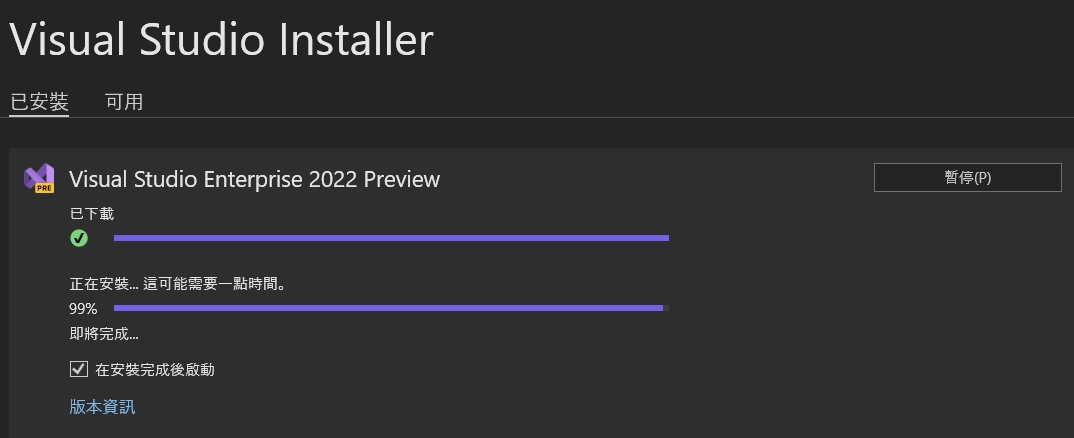
安裝完成後可以看到自動開啟Visual Studio 2022,它還自動帶回我Visual Studio 2019的一些設定(馬賽克)
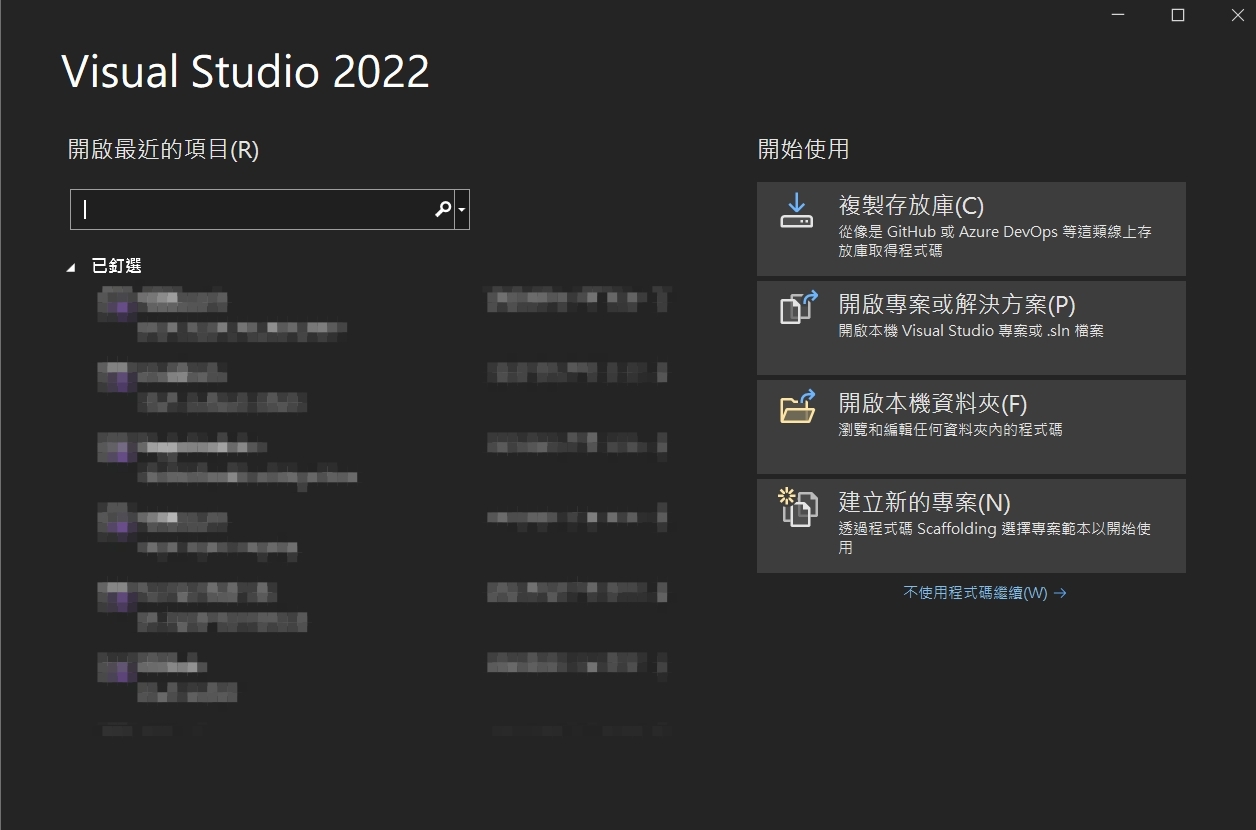
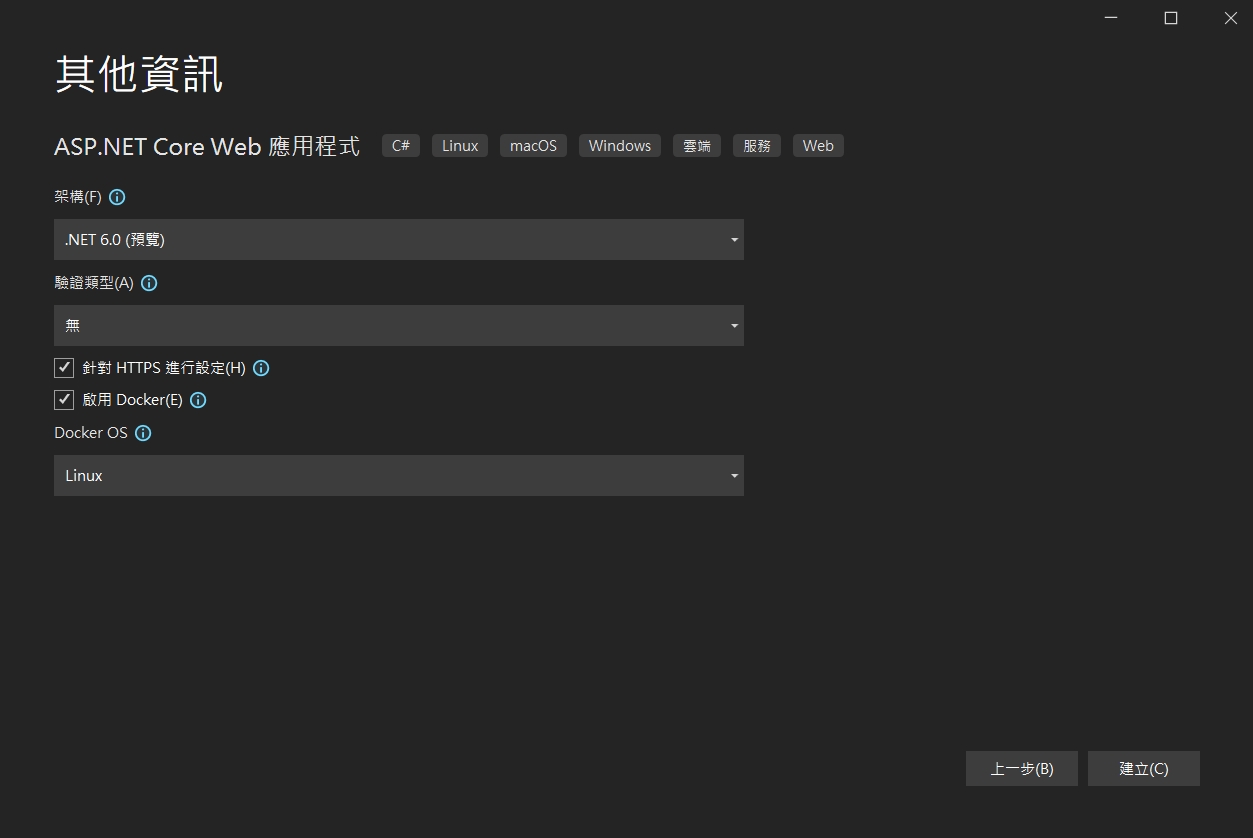
在架構的下拉可以看到.net 6.0的預覽版本可以玩囉!
http3協定是架構在以往被認為最不穩定的UDP基礎上,而為了消除UDP的不確定性,加上了QUIC協定。
透過QUIC來替代TCP對於可靠以及流量的控制,使得http3可以有效可靠的進行傳輸。
在.net 6的preview版本中,微軟也加上了對http/3的支援,也許它會是http協定的一估新的未來
進到網站 https://notify-bot.line.me/zh_TW/ ,右上角有一個登入,登入後選個人頁面
往下拉可以看到一個發行存取權杖(TOKEN),按發行權杖功能。按照步驟就可以取得權杖
複製權杖下來備用。
接下來在安裝ipwork的Delphi上,加入ipwhhtp的元件後,呼叫LINE NOTIFY的程式如下:
2021.06.12 更新 Delphi 版本 ipwork試用連結(官網)
https://www.nsoftware.com/download/download.aspx?sku=IPDF-A&type=demo
七行程式就可以了!
ipwhttp1.Config(‘CodePage=65001’);
ipwhttp1.Timeout := 10;
ipwhttp1.ResetHeaders;
ipwhttp1.OtherHeaders := ‘Authorization: Bearer +’這裡改成剛才的權杖';
ipwhttp1.ContentType := ‘application/x-www-form-urlencoded;’;
ipwhttp1.PostData:= ‘message=’+’這裡改成你要通知的內容';
ipwhttp1.Post(‘https://notify-api.line.me/api/notify’);
最近在測試,如果透過web申請帳號後,可不可以直接在DNS上一增子網域以及在IIS上增加站台的方式,直接申請後就有站台,在Windows 的網站主機上,似乎要透過appcmd與dnscmd達到。後來弄出了一個可以執行的方式,主要重點在於要有較高權限的帳密透過process執行cmd模式再去下指令。分享一下
/// <summary>
/// 新增IIS站台
/// </summary>
/// <param name=”subdomain”>網站名稱</param>
/// <param name=”domain”>網域</param>
/// <param name=”webpath”>網頁位置</param>
/// <returns></returns>
public bool AddSite(string subdomain, string domain, string webpath)
{
using (Process p = new Process())
{
p.StartInfo.FileName = @”cmd.exe”;
p.StartInfo.UseShellExecute = false;
p.StartInfo.CreateNoWindow = true;
p.StartInfo.RedirectStandardError = true;
p.StartInfo.RedirectStandardInput = true;
p.StartInfo.RedirectStandardOutput = true;
p.StartInfo.WindowStyle = ProcessWindowStyle.Hidden;
p.StartInfo.UserName = “高權限帳號”;
string pw = “高權限密碼”;
SecureString ss = new SecureString();
foreach (char c in pw)
{
ss.AppendChar(c);
}
p.StartInfo.Password = ss;
//
p.StartInfo.Arguments = “/c appcmd add site /name:”+subdomain+” /bindings:\”http/*:80:”+subdomain+”.”+domain+”,https/*:443:”+subdomain+”.”+domain+”\” /physicalPath:\””+webpath+”\””;
p.Start();
p.WaitForExit();
StreamReader sr = p.StandardOutput;
p.Close();
string message = sr.ReadToEnd().Replace(“\n”, “<br />”);
if (message.Contains(“ERROR”))
{
return false;
}
else
{
return true;
}
}
}
/// <summary>
/// 透過指令新增子網域(如: levin.ksi.com.tw)
/// </summary>
/// <param name=”subdomain”>子網域名稱</param>
/// <param name=”domain”>主網域</param>
/// <param name=”ip”>主機IP</param>
/// <returns></returns>
public bool AddDNS(string subdomain,string domain,string ip)
{
using (Process p = new Process())
{
p.StartInfo.FileName = @”cmd.exe”;
p.StartInfo.UseShellExecute = false;
p.StartInfo.CreateNoWindow = true;
p.StartInfo.RedirectStandardError = true;
p.StartInfo.RedirectStandardInput = true;
p.StartInfo.RedirectStandardOutput = true;
p.StartInfo.WindowStyle = ProcessWindowStyle.Hidden;
p.StartInfo.UserName = “高權限帳號”;
string pw = “高權限密碼”;
SecureString ss = new SecureString();
foreach (char c in pw)
{
ss.AppendChar(c);
}
p.StartInfo.Password = ss;
p.StartInfo.Arguments = @”/c dnscmd /recordadd ” + domain + ” ” + subdomain + ” A ” + ip;
p.Start();
p.WaitForExit();
StreamReader sr = p.StandardOutput;
p.Close();
string message = sr.ReadToEnd().Replace(“\n”, “<br />”);
if (message.Contains(“成功”)){
return true;
}
else
{
return false;
}
}
}
使用asp.net core 開發LINE BOT時,使用ngrok做本機的服務器時,驗證Webhook出現錯誤。ngrok出現 307 Temporary Redirect的錯誤!
解決方式:
Starup.cs中有一句app.UseHttpsRedirection(); 前面加上 // 註解掉就可以了
參考:
ngrok http [port] -host-header="localhost:[port]"2018年12月6日,微軟宣布Microsoft Edge未來將基於Chromium開發後,微軟在新的作業系統中已逐步移除存在已久的IE瀏覽器,取而代之預設為Edge瀏覽器。
10.4也新增了以Edge瀏覽器為主的webbrowser元件來處理,並取代了早先的TWebBrowser。不過,TWebBrowser仍然保留在VCL元件中,但新增了SelectedEngine可以選取Edge的WebView2瀏覽器。
而新增的Edge使用方式也與先前相同
EdgeBrowser1.Navigate('http://superlevin.ifengyuan.tw/');